Wednesday, May 22, 2019

Sentry box


I picked this up from the Charlie FoxTrot stand at Cold Wars.  I had just bought the Tidewater Mansion and asked if he had one of the Sentry boxes with him.  After rummaging about he asked if I could come back later since he could not find it.  I did, and he gave it to me for free!  Outstanding!


Not sure how authentic a sentry box would be for Rev War period.  But it looks neat and I think it would go nicely with a camp scene or in front of a headquarters buildings.  The kit was super easy to put together.  I painted it gray as I picture it with the Crown Forces in mind and Royal Artillery equipment was painted gray. Pure guess work on my part with no documentation.

Friday, May 17, 2019

Georgian House


    My final building from the bundle is the two story Georgian house.  This was the building which drew me into looking at the site.  It is perfect  for North America and my Rev War/War of 1812 games.  Another  great looking building.  I plan on ordering a couple more of these.

Cutting out window shutters and frames.

  There are a number of small details which need to be glued in place before assembling the house.  The shutters and window sills need to be cut from cardboard and glued in place.  This gives a very good look to The house. The door and door frame I would glue after the walls are assembled.


  Here is the house after construction but before painting.  Note the field stone foundation around house.  It is a beautiful model and looks like many of the homes that were along the Concord, Lincoln and Lexington Battle Road on April 19, 1775.  I plan on buying a few more of these.

Door and field stone foundation added.

The cardboard extras add to the appearance of the building.

  On the Fife and Drum Miniature forum John Carroll (Winston Smith/John The OFM from the Miniatures Pages) has suggested buying the roof shingles from "Things in the Basement" store (www.thingsfromthebasement.com/store/c21/Accessories.html) . Jim Dunkan has suggested the rules from " Warbases "(warbases.co.uk/product-category/from-scratch/tiling-sheets/).  Both have said they look far better  and improve the visual appeal of the building.  I will have to look into these!

  As for painting the house, I am up in the air.  The roof and field stone foundation will get a cost of black  then  set brush grey and brown.  Since I like the color of the stain of the MDF I might leave it as is.  But I am open for suggestions.

Monday, May 13, 2019

The battle of St. David July 1814: part 2


New York Militia Dragoons.


    Preparing for the American army, the British /Canadian players set up a defense in depth.  The 1st and 2nd brigades were pushed forward to defend the fence line as close to St.David as they could.  The 2nd Brigade (1st Militia bde, Incorporated Militia battalion of Upper Canada and Glengarry light infantry ) held the right flank.  The 1st Brigade (1st Regiment of Foot, 8th Regiment of Foot and flank companies) held the left flank.  In the center blocking the road were a Royal Artillery battery and the Royal Marine artillery Rocket detachment.  Towards the rear, by the next fence line were the 3rd Brigade (41st Regiment of Foot, 49th Regiment of Foot).  A group of Native Americans under Norton watched curiously from a stand of tree behind the 2nd Brigade.

View of British/Canadian defense in depth.

49th & 41st Regiments.

Flank Companies, 8th & 1st Regiments.

19th Light Dragoons.

  The Americans marched through and around the village.  Ripley's and Scott's brigades were deployed on the right, while Porter's volunteers and the cavalry held the left.  The battle plan was for the massed regulars to punch through the right while the volunteers protected their left.  The artillery were to neutralize the enemy artillery.


  While the British/Canadian line waited patiently behind the fence line the American advance became unglued.  Bothered by the fields to his front the regulars advanced in a scattered fashion. Finding he could not deploy all his regulars the right flank commander formed two lines of three battalions each.   On the left, with more open ground to his front the commander of the volunteers moved forward in a more solid front maintaining formation. Just out of range of the muskets he  changed formation from column into line and waited for the regulars before opening his attack.

American militia General.

   During this time both sides artillery blasted away at each other.  Although some casualties were caused no batteries were silenced.  The Rocket battery fires away but appeared incapable of hiring anything.


Geese cheer on the American Artillery.

The rockets go up, but where they come down, that's not my department says Wernher von Braun.

Finally, with his forces in proper formation the American commander ordered a advance against the enemy fence line. No fancy echelon attacked.  Everyone march straight forward.


  On the American left(British/Canadian right). Both sides realized it was volunteers against volunteers.  More importantly the  Glengarry Light Infantry saw marching  towards them the arch traitor Canadian Volunteers.  This unit was formed of Canadians fighting for the American side.  They had earned a reputation for misdeeds and had in fact burned a number of villages near here over the winter.  So both sides were curious how these two regiments would act.

Canadian Volunteers.  The flag is a New York militia flag for the period but I thought it went with this regiment rather well.


It's those guys!


All along the front as the Americans charged the British/Canadian line tested morale and held.  They fired at the attackers causing a number of casualties but the attackers still marched on.  In  the fight  that followed  the defenders held and the attackers were all pushed back.  But while the American regulars were still in good shape, and had reinforcements the American left had collapsed.

Add Pennsylvania Volunteers move to the attack.  


Hoping to punch through the Canadian militia the Pennsylvania Volunteers were surprised to find them holding their line and the attackers retired disordered.  To their right the Incorporated Militia routed the New York militia.  But on the far right, the Glengarry Light Infantry decimated the Canadian Volunteers with small arms fire (causing nearly 50% casulties). And the volunteers routed back to the cheers of the Canadians.


 Glengarry Light Infantry route the Canadian Volunteers.

  At this point the crest fallen American commander called the game and decided to retire back towards Fort Erie.

   The game was fun, and moved  quickly.  By the second turn all players had grasped the rules and were playing the game and not the rules.  While they enjoyed the game the American players suggested next time I try to have more American Regiments to give them a better advantage.  I would also suggest that the Americans  wasted their advantage in artillery by concentrating on counter battery fire and trying to knock out the Royal Artillery.  For the Americans this tactic was a mistake. If they had concentrated their fire on a couple infantry battalions they might have caused more damage and helped with the attack.   I will also turn the table about and rather then play up the table length play across the table.  This would give each side note room to maneuver and no anchor a flank on the table edge.

Sunday, May 12, 2019

Battle of St. David July 1814: part 1


   The battle of St. David is a fictional encounter in the Niagara during the War of 1812 . It is the summer of 1814 and the American General Brown is marching his army towards Queenstown to rendezvous with the American fleet.  Their goal is to sail to Kingston, join the American division under General Izard there and capture the enemy naval yard and destroy all ships there.  This blow may cripple the British Navy in the great lakes. British General Drummond, determined to stop him moves his army into a position by the village of St. David.  Here he will attempt to stop the American advance.

  The armies for this battle will be based on those who fought at Lundy's Lane.  Being the largest battle fought during this campaign it provides a wide variety of regiments and three good sized  historical commands per side.  As with many things in the miniature war game world I have substituted some regiments who were in the area for those who were there.  This is because I have a number of favorite regiments who I wish to see on the table.  In addition I have increased the size of some regiments to provide a better table top game.

View of the Battlefield from the British/Canadian position.


View of the Battlefield from the American position.

   The battle ground will be based on the typical countryside of the Niagara.  Farmers fields,  woods, a small stream on part of the village.  There is a slight ridge on the edge of the table the Americans must capture to continue their advance.  Numerous fences should provide the British/Canadian forces good defensive positions to try and hold the Americans.

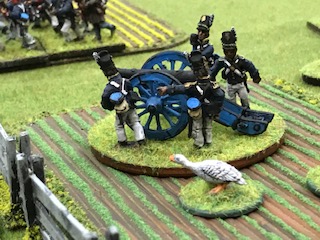
The village of St. David.

   Victory conditions are the American army must capture the ridge so they can exit off the table towards Queenstown.  They have untill the end of game night (7:00 to 11:00 pm).  The  British/Canadian army will try to prevent this.  If either side is reduced to less then 60% of strength they will withdraw off the table towards their base.

  Order of Battle

American Army
General Brown Commanding

Unattached:
US Artillery battery
New York Militia Dragoons (6)

1st Brigade: General Scott
9th US Infantry regiment (24)
11th US Infantry regiment  (24)
22nd US Infantry regiment  (24)
25th US Infantry regiment  (24)
 Towsend's battery  US Artillery

2nd Brigade:  General Ripley
1st US Infantry regiment  (24)
21st US Infantry regiment  (24)
23rd US Infantry regiment (24)
Ritchie's battery US Artillery  (24)

3rd Brigade: General Porter
Pennsylvania Volunteers  (24)
New York Volunteers (24)
Canadian Volunteers  (24)

British/Canadian Army
General Drummond commanding

1st Brigade: Lt.Col. Scott
1st Regiment of Foot  (24)
8th Regiment of Foot (24)
Flank Companies  (12)
Royal Artillery

2nd (Light) Brigade: Lt.Cil. Pearson
 Glengary light Infantry (GLI) (24)
Incorporated Militia Upper Canada (IMUC) (24)
1st Militia Brigade (24)
Norton's Indian detachment (6)
Royal Artillery

3rd Brigade:  Lt.Col. Morrison
41st Regiment of Foot (24)
49th Regiment of Foot (24)
Flank Companies (12)

Unattached:
19th Light Dragoons  (6)
Royal Marine Rocket battery


Grist Mill


  The Grist Mill is a beautiful building which will liven up any table top.  It reminds me of the one at Old Sturbridge Village which I have visited many times.  It could also make a interesting objective in a game as a source of supplies to help a army, or to prevent another side from using it.

 It is also the most difficult building I have yet put together from Impudent Mortal.  This has to do with the wheel first, and the various doors, door says and window sills.  Lots of small parts which could get lost or forgotten about.   But it is worth it for the finished Grist Mill is beautiful.


My suggestion is to study the instructions and pictures of the finished mill first. Lay out all the pieces and arrange them by instruction page.   This will assist you in figuring out where things go and if you are missing  anything.  Then carefully put the pieces together without glue to see how they fit.  Only then start to glue them.


  In the end the Grist Mill is a lot of work, but it provides a wonderful centrepiece to your table top and a unusual item not often seen.  Highly recommended as Hal would say!


Saturday, May 11, 2019

Cabin with front porch


Now that I am getting the hang of this I tried a slightly more complicated kit.  I would recommend reading the instructions and just placing the pieces together before gluing.  Good thing I did this first!  Saved myself a lot of aggravation.  But what I got from it is a very nice addition to my growing list of houses for the table top.  Next I plan on tackling one of the bigger buildings.  The Grist Mill!


Wednesday, May 8, 2019

Stone house


  Another kit from Impudent Mortals.  As it looked simple I put this together next.  It was pretty simple.  Especially with the free instructions provided at the site.  Again, a cost of paint brings the house to life.


Monday, May 6, 2019

Covered Bridge


To learn about how to put these MDF kits together I started with the covered bridge.  I am not so sure how authentic it is for the time period I game in.   But it looks nice and reminds me of the one at Old Sturbridge Village here in Massachusetts.  Since they do a large Rev War weekend each year I could do a table top battle of the mock tactical they put on!


Instructions for the kit are available through Impudent Mortal site as a free down load.  It was very helpful.  The owner of the site who I bought these from at Cold Wars warned me about using a super glue since you cannot correct errors you make.  I used Annie's tacky glue from Michael's which worked excellent.  A sharpe hobby knife is recommended in case you need to trim parts.


The bridge went together in minutes! Very easy.  Next I sprayed it black and painted it with craft paints.  I have to say that painting it really improves the kit and brings it to life.


 Done, and a fine looking addition to my table top it us!  More to follow. BTW, river is from Battlefield Terrain Concepts.