Showing posts with label Terrain. Show all posts

Wednesday, October 5, 2022

Earth Works or Defensive Position


  A terrain piece I picked up long ago at the Cold Wars  convention.  Not sure who made it, its been that long ago!  But its made of  resin and plenty solid.  Time to get it ready for the table.

   Very nice detailing on the gun platforms and wood supporting the walls and the gabbions.  These required just a simple painting brown then lots of dry brushing. For the piled up earth in front I just covered it in the flicking to match my table cloth.  Couple hours work and a nice terrain piece for the table.

Friday, February 4, 2022

Things From The Basement Buildings


   After completing the Hartwell Tavern buildings, I took a moment to look over my collection of buildings for the Wargames table.  I do have a lot of the ones from  "Things From The Basement."  These are correct for North America 16th century to very early 19th century.  In other words from King Philips War (1675) through the American Revolution (1775) to the War of 1812.  I then took a few moments to set up and admire them.


Tuesday, February 1, 2022

Building The Hartwell Tavern Part 3: Painting the Buildings


  Now that the buildings are done its time to paint the kit.  The restored tavern is a dark brown in color.  It is not painted but stained.  Some of the trim over the doors and the caulking around the glass is white.  There is a field stone foundation which is gray in color.  


  For the main brown color I stained the building.  This has worked very well for me in the past.  I use Arax Earth shade From Citadel Paint for this.  If I want a dark shade I brush it on right out of the bottle.  For a lighter shade I dilute it with water.  For the tavern I used it right out if the bottle and brushed it on, two coats.  I then slightly sanded parts to give it a worn look.  But very lightly and sparingly.

  Next was the roof which I painted gray to represent the slate shingles.  I think  next time  I will invest in the pre made shingles sold by "TFTB" which are reasonable priced.  the chimneys were painted A dark red brown then dry brushed light red.


To paint the trim and field stones I tackled it each building at a time.  Time consuming but the end result is worth it.


You don't like my sign?
Then get off my lawn you darn kids!

  The final piece is the tavern sign.  On the downloaded instructions there is a Xerox of the original sign which you can cut out and paste on.  I decided to try and paint the sign myself.  How well it turned you you can be the judge. Personally I will not give up my day job.  And the noble looking horse looks more like a big dog.  So perhaps use the xerox instead!


  When done you have a beautiful model if the Hartwell Tavern as it looks today.  This is a very big model and scale wise will take up a lot of your table space.  Possibly better for a one on one skirmish game.  Also remember that only the tavern was in existence in 1775.  So you can put just the main building on the table.  The additions could be set up as a separate building. So you two buildings for the price of one!


Personally I am most pleased with this.  As I mentioned I spent a lot of time here during my time at Minute Man National Historical Park.  Its a excellent model and it was great fun building and painting it.  Come April when I traditionally do a few posts about April 19, 1775 I plan on using this as a back drop for a few stories.

Saturday, January 29, 2022

The Hartwell Tavern Part 2: Gambrelle 1783 and kitchen 1830 additions


  After construction of the Tavern I set it aside to start the two additions.  The gambrelle addition was added in 1783 to give addition living space for the family.  A new kitchen area was added in the  1830's.   Because both of these additions are part of the restored building many visitors get the wrong impression thus was how the tavern looked on April 19, 1775.  Things From The Basement makes all three sections which you can buy together or separately.  Together these are a very large building for the Wargames table!  But, the economical player can set them up separately to have two or three buildings on the table.  


  In putting this kit together I would once again suggest you fit the parts before gluing. Follow the instructions and you should gave no problem.


  Starting the gambrell section I put together the interior sections of the chimney and stairs.  I added the previously constructed windows and doors.  Once done I carefully added the walls.

  Next was the second floor.  Again fit the chimney together carefully before gluing.  once done it fits snuggly on top if the main floor.  If you use these buildings for skirmish games this is a nice touch as you can remove roofs and floors to battle through the house.


  On the side of the addition is a ground level hatch for a root cellar.  This goes together easily.


The frame for the roof is rather tricky.  I fit it together first, then glued it and then added extra glue along the edges for strength.  Because of the unusual shape there is a lot more careful fitting and gently pushing into place.  Once done fit it into place.  Done!


Moving onto the kitchen wing.   Finish the smaller windows and the details on the doors.  Fit them in to the walls.  Next glue the walls and the support together.  


The roof is very simple and goes together easily.  Again it sits right in top.  You have to decide if you want to permanently attach the roof or let it lift off to put troops inside the house.


So here we are, both additions done.  Now onto painting the structures and sign post.


Wednesday, January 26, 2022

Building the Hartwell Tavern Part 1 The 1775 Structure


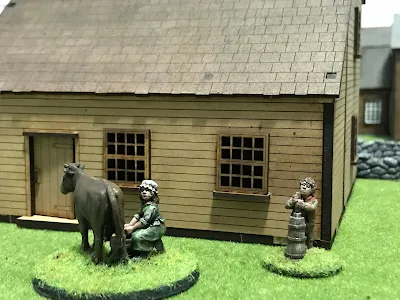
  "Things From The Basement" latest historical building kit is of the Hartwell Tavern.  The tavern is located in Minute Man National Historical Park in Lincoln Massachusetts. 


  The tavern is a typical late 17th early 18th century Salt box style  New England house.  Built along the Bay road that connected Boston to Concord and other towns to its west the building saw heavy traffic (for the time) passing by .  Being a typical "thrifty" Yankee Ephraim Hartwell converted the front rooms of his hone into a tavern.  Drivers brining cattle to market to Boston could stop, feed themselves and their cows before the final push to Boston.  On April 19, 1775 Colonel Smith's British troops marched passed it in the morning and heavy fighting took place around it later that afternoon.  It continued to be a private home up until the 1960's when it was bought by the National Park Service.


 The tavern was restored in the early 1980's to its appearance during the 18th century.  Two additions had been added to the house in the 1780's and 1790's and are included if you want to add them and make it like it looks today.  It was in one of these wings that I had my office during the summer months.   It was around the tavern that many of the parks costumed interpretation programs were staged.  


  First off the kit is very big and I recommend laying out all parts to familiarize yourself before starting.  Also download the instructions from "TFTB" website.  Make sure you have a clean workspace and some good glue.  I use a superglue and also a white glue.   Once done with that you are off and running!


First off are the buildings windows.  And there are lots of them.  Take your time lay our the pieces and put them together. Make sure they fit together nicely, otherwise they will not fit into the openings for then in the building.


Next you start on the main floor if the tavern itself.   The stair case is a bit finicky so fit it together before you use glue. The tavern was built around the big central fireplace.  Again take your time and cut the pieces together.


In the background my famous coffee mug.

Once done you can glue the walls of the tavern together. I first use a little superglue to hold it together. Then I add white gorilla glue along the edges for strength. This is also when you add the doors.  These are tricky and a set of twisers helps. There is a molding around the door that goes on last

The upper floor is mainly the chimney.  Again take your time fitting the pieces together first.  Add the stair case railing and you are all set.


Next the roof.  Carefully fit the rafters together.  I add some gorilla glue afterwards for added strength.  Then fit the roof to the rafters.  This will take a while to fit together.  Take your time.

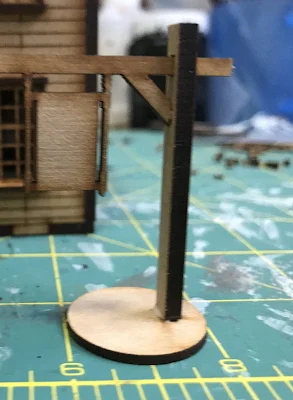
While waiting for the glue to dry I put together the tavern sign.  This adds a nice touch to the set up!  The actual tavern sign is still in existence.  "TFTB" has a Xerox if the sign you can print, cut out and paste on.  Or you can paint it yourself.


Almost done!  Place the second floor and roof together and admire your house!


Next time in part 2 I put together the additions.  Then stain the structures just like the restored structures.