Sunday, February 2, 2020

British Grenadier caps 1775 to 1783


Original Cap in Smithsonian museum.

 How can you be a American Rev War gamers and not have Grenadiers?  We all have them in our collections.  And a more noble sight on the table top there never was.  And while we all know Grenadiers were picked soldiers there may be something we do not really know much about.  That is their famous bearskin caps.  So here is a little bit of history about those caps.

  In the Royal Clothing Warrant of 1768 (which governed the uniforms worn during the Rev War period) the Grenadier caps are described:

  "The caps of the grenadiers to be of black bear-skin. On the front, the King's crest, of silver plated metal, on a black ground, with the motto, "Nec aspera terrent." A grenade on the back part, with the number of the regiment,on it. The royal regiments, and the six old corps, are to have the crest and grenade, and also the other particulars as hereafter specified. The badge of the royal regiments is to be white, and set on near the top of the back part of the cap. The height of the cap (without the bear-skin, which reaches beyond the top) to be twelve inches. "

 Once the new Royal Warrant was adopted regiments went about wearing out their old uniforms before obtain the new uniform.  The old Grenadier cap was a cloth mitre.  Some regiments continued to wear these untill worn out;  other regiments covered their cloth caps in bear skin to get a start on the new fashion.  The series of drawings of the 25th Regiment on Minorca island show the mixture of old and new uniforms.


  By 1775 the new bear skin covered Grenadier caps were standard equipment and the old make due items long gone.  There is a watercolor of a Fusilier of the 23rd Royal Welch Fusiliers on guard duty wearing his Fusilier cap in Boston done in 1775.


 The new Grenadier cap was light weight and folded flat.  It was constructed around a tin front plate which gave the cap it's outline and shape.  The bear skin was sewed around it.  Here are pictures of a original cap's various pieces to show how it was put together. Note the bear skin sewed in shape, the tin plate it is attached to and front plate to cover it.  There is a linen cap inside the cap and decorative cords outside.  The only part missing is the red wool covering the back.


   For daily wear Grenadiers would wear a cocked hat, sometimes with a white feather.  The Grenadier cap was worn for guard duty, parades and also into battle.  At the Battle of Brandywine the commander of the 2nd Grenadier battalion Colonel Meadows is reported to  address his soldiers by saying, "Grenadiers, put on your caps (bearskins); for fighting and drinking I'll match you against the world!"

British Marine Cap.  Photo from the British Marine reenactment group at
 https://britishmarines.blogspot.com/2013/06/1775-british-marine-grenadier-cap.html
   In the Royal Marine museum in Great Britan there is a original Marine Grenadier cap plate.  Slightly different from the 1768 plate it suggests there may have been more originality then once thought.

For more detailed information on the cap and it's construction I highly recommend the following article:

Military Collector and Historian
Vol. 46, No. 3 -- Fall 1994
The Grenadier's Bearskin Cap, 1768-1802: A Method of Construction,
by Linnea M. Bass and William W. Burke

Friday, January 31, 2020

Impudent Mortal and Things From The Basement houses


There are a lot of MDF type buildings in the market for table top wargamers.  These provide a nice looking and easy to build structure for your games.  But outside of pictures on a website how do they stack up?  Years ago many gamers worried over the size of a figure.  Would this new miniature fit with others in my collection?  The same could be said for terrain  and especially buildings.  So here is my attempt to give you a clue to how things look together.  It is a small sampling with just two comoanies:  Things From the Basement and Impudent Mortals.


  Here are some of my Fife and Drum miniatures Grenadiers and Light Infantry by a very nice colonial home by Impudent Mortal.  Funny sounding name but great buildings. These houses are of a "heroic" size , so may be slightly larger then other structures in your collections.  But they are outstanding.

 Unfortunately, visiting their website I found out the owner has passed away and the business is temporarily closed.  I am most sorry for his family at this time. 


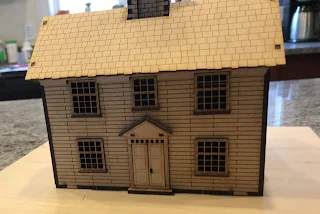
  Here is the Captain William Smith House from Things From the Basement.  It is a great house and I am looking forward to more in the future. It is a little smaller then the other building as you can see. 

   What you do on your table is up to you. You look things over and pick what works or looks best to you.    I like both very much. Like in real life no two buildings are exactly the same.  In my neighborhood the same model homes are slightly different in size due to the builder wanting to save money!  My personal opinion? I will field them in the same table.  Possibly Not next to each other but I will use them together in the same village. 


Wednesday, January 29, 2020

Captain William Smith House (part 2)


  Now that I had assembled the house, how to paint it?  Most New England structures in the 18th century were stained a dark color to preserve the wood.  The bright colors may show up in trim.  The present colors of the Smith House are based on period records.  I intended to follow these and paint it a dark color but with red trim around the Windows and doors and white trim by the roof.


  After searching through my paints for just the right shade of brown, I remember a suggestion from John the OFM from The Miniatures pages.  Stain them.  Brilliant! I thought.  So I got out my citadel Agrax Earthshade and did the front, sides and back.  I think it looked very nice and to me looked like the actual stain on the house today.


  The roof was a light gray.  I highlighted it with white and added a few grey blue shingles for contrast.

  The red trim, doors and windows were done with craft paint.  They were a bit tricky and I taped around the edges as my hand is not as steady as it once was.  The foundation was rocks which I painted medium gray.  I added a little brown to the white trim so as not to be too bright.  Lastly the chimney was dry brushed red.


  All in all this was a fun kit to make and paint.  It makes a very nice structure for your table at a very reasonable price.  it is mostly easy to put together if you fit the parts together before gluing.  You could also change the paint job to get a different house out of it.  Lastly, for me it was a most happy walk down memory lane.  I sincerely hope this is the first of more historical houses  "Things From The Basement " make.


  Ranger Mark says go out and buy yourself one. Or buy two!   Highly recommended!


Monday, January 27, 2020

Captain William Smith house (part 1)


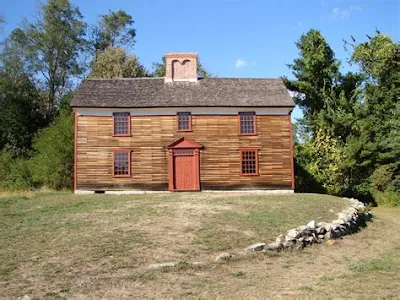
  Back in the late 1980's I transferred back to Minute Man National Historical Park.  I had been a district supervisor in Boston NHP's Charlestown district but wanted to get out of the city.  One of my first projects at MMNHP was the newly restored  Captain William Smith House.  The building had just finished being restored to its mid eighteenth century appearance and I was to set up weekend  interpretive programs around the house and property.  Over the next nearly twenty years I spent a lot of hours at the Smith House.  So when I saw that "Things From the Basement " has done a model of the house I had to buy one.

Open package and examine the pieces

 Starting construction, I open the bag it came in and looked over the various pieces.  I also called up the assembly instructions for the house which can be found in the "Things In the Basement" website.  These are easy to follow and very crisp pictures of the kit. 


 As an example of the great detailing here are the front Windows.  It is a little extra work putting them together but well worth the effort visually.  In addition note the detail of the siding on the house. Very nice!


  There is quite a bit of details inside the house.  things like stairs and diirs.  While great for skirmish type games I intend to glue down the roof of the house and will not be placing figures inside the house.

House frame put together.

  The roof and especially the chimney are very finicky.  Take your time fitting them together before you glue them.  This took some doing, hence no construction pictures of this phase. 


  The roof, when done fits nicely over the house frame.  You can glue it on to the frame, or leave loose if you are playing skirmish type games where you need to place figures indirectly building.


  And there you have it. I put together the house in a couple hours after work.  I will let it dry then touch up with glue the stress points for added strength. 

  Next:  painting the house And the finished model in part 2.

Tuesday, January 21, 2020

2nd Light Infantry battalion


  For most of General Sir William Howe's campaigns the Grenadier and Light Infantry battalions were his one two punch. These battalions were formed by taking Seattle light infantry and Grenadier companies from their parent regiments and forming them into combined battalions.  They were usually his spear head for most attacks in most battles.

  The Light Infantry companies were the new boys in the British establishment.  During the Seven Years War (French and Indian war in North America) it became the custom to form skirmish companies or light infantry companies in each regiment.  This became official in 1770.  These companies were often distinguished by their dress (black or tan belting, caps, red waistcoat and short regimental coat). Because of poor discipline and training William Howe was ordered to set up a training camp for light infantry in 1774.  The results were Howe's Light Infantry discipline and a standard trading requim for the Light Infantry.  Howe used this to train his entire army in 1776 while in Halifax prior to the invasion of New York.


  During this time the Light Infantry adopted the uniform they would wear during the Rev War.  Black belting and equipment, a short sleeved waistcoat and gaitered trousers or overalls.  As the entire army was going with a slouch hat so too did the Light infantry.  The Light Infantry were formed into three battalions starts start of the 1776 campaign.  After the invasion of Rhode Island the third battalion was broken up and combined into the remain two battalions.


  The second Light Infantry battalion was made up by the following companies: 40th (buff), 43rd (white), 44th (yellow), 45th (green), 49th (green), 52nd (buff), 55th (green), 63rd (green) and 64th (black).  For gaming purposes I use 30 figures per battalion with six figures per base.  So I organized them by facing color with one stand buff, two stands green, one of yellow and one of black.  It would have worked out better with six stands but we cannot have everything.

Once in the table I have a very nice command of two Light Infatry battalions to fight alongside their "big brothers" in the Grenadier battalions .


   Figures are from Fife and Drum miniatures and represents the British Light Infantry campaign uniform for 1776-77.  Slouched hats, short jackets and overalls, and black equipment.  Uniform is based on both orderly books and the famous DelDe Garta paintings of the fighting at the Chew House at Germantown in October 1777.  These are really beautiful figures and a joy to paint.  Jim is one of the very few manufacturers who do this uniform and it is a credit to him to provide them to us Rev War buffs.  Great fugures!