Sunday, May 31, 2020

A small pond


  Now that we all have extra time little projects that got put aside or forgotten are getting done.  I picked up this pond at Cold Wars a while ago. I think it is from a  Flames of War terrain pack but the individual selling it did not know (or care to tell me).  Painted and static grass around the edges to pretty it up.  A nice little piece to add to my box of terrain and make my table top look better.


Tuesday, May 26, 2020

Old School Hill Project: part 1


   I have always liked the old school style hills.  The flat top, wedding cake style of hills. Perhaps I have read and looked through my copy of Charles Grant's "The War Game" too much. Perhaps they remind me of the maps on the old Avalon Hill games or topo maps. They are not what is standard on most game tables today.  But then I have never been part of the "in" crowd.  My tabletop style is more of a retro Old School.  I want simple and functional rather then decorative.

  For too long I have wrestled with what type of hill I wanted on my table. What I was looking for was a old school style hill, but with more flexibility.  I have limited space so I cannot have too many hills.  I also wanted long ridges;  perhaps a entire table edges worth.  Or a corner of a table. And large hills, not the tiny things that pass for them. And finally the look had to be something out of the book "The War Game."

   I recently found an interesting suggestion on a blog called Matakishi's Tea House.  The author made a modular series of hills that could be fitted together to create long or short ridges and more.  He used cork panels to make these.  Search as I did I could not find that material.  What I did find at Home Depot were 24" x 24" pink insulation boards about an inch thick.  Here was something I could work with!  I bought six boards and set off to create my module hills.


   First I needed a base for a long ridge or hill.  I took three boards and cut them in half.  I used two of the 12" x 2 4" boards to make end caps ( the ends of the ridge).  With the other four boards I could make one ridge or hill that was 48" long by 2 4" wide.  Or break them into hills 12" x 2 4" .  Or any combination.  The key here is flexibility.

I cut two boards in half.  These will be the basic hills.


I cut two extra boards to make the end caps.

Here are the end caps. I made a set for both the two boards and single boards.

  I used another board to make smaller versions of the same.  I cut the board into three sections;  one was 12" wide and two were 6" wide.  Again this gave me a lot of flexibility.  The remaining board was used for making end caps and a special corner piece.  What was important was keeping a straight edge for each piece.  This way they could lineup well.


Here are the smaller hills on top of the larger hill.  A nice two story hill.

By separating the two sides I can create more variations. Here are two sides of the hill creating a valley between them.

A corner piece.

Add a base for the big hill to a corner piece and I can create a L shaped ridge.


  In a little over an hour and a half I had the basic pieces cut out.

Next up painting and flocking the boards in part 2.

Thursday, May 21, 2020

The Boston Massacre: A Family History by Serena Zabin


The Boston Massacre is familiar to most of us.  Our views of it are filtered, known  through Paul Revere's engraving. That is how most of us still picture it.  A snowy night, blood thirsty soldiers slaughtering innocent civilians.  Or we know it from John Adams' defense of the soldiers.  But there is another side of the story one not know to most people.  That he Massacre arose from conflicts that were as personal as they were political. People on both sides knew and lived side by side.  
  
Professor Serena Zabin draws on original sources to follow British troops as they are sent from Ireland to Halifax and then to Boston in 1768.  She reveals a forgotten world.  That many regimental wives and children accompanied these armies. We see these families competing with Bostonians for living space and for work.  Conflicts came not only from enforcement of Colonial policy and laws but over living space and work.  Soldiers competed for low paying work.  They also shared experience, such as baptisms and births and deaths.  There were romantic attachments and not so romantic experiences.  Sickness such as small pox did not take sides but we're a equal opportunity employer.  When soldiers fired on citizens in the street, it was a final straw in a much longer simmering confrontation.  In many ways it was surprising it had not happened before.

Highly recommended not just for the new information and take on a old topic,  but because it is a very good read.


Monday, May 18, 2020

Glover's Brigade 1776


Here is the new and improved Brigade commanded by General Glover in 1776.  
Inspired by the parade of figures on the blog "Bydand" I thought I would also have a parade for this brigade.  Possibly later I will have to bring out the entire army  But we will see!


3rd Continental Regiment.  Brown coats faced blue with a number of bounty coats mixed in.  


13th Continental Regiment.  Brown coats faced straw.  The regimental color is based on a description of the actual color.  Figures from Brigade Games.


14th Continental Regiment. The figures for the 14th Continental are from Eureka miniatures.  A very nice mix of uniforms and naval type clothing.  It captured the look of this famous regiment.


26th Continental Regiment.  Brown coats faced straw with light blue waistcoat.  Figures by Brigade Games.


Saturday, May 16, 2020

26th Continental Regiment 1776


One of my favorite regiments from the  Rev War.  The regiments history is intertwined with that of  its commander, Colonel Laomi Baldwin.  He was one of those New England  men from who did an amazing variety of things in his lifetime; and did them all well.


The 26th Continental Regiment started as Colonel Gerrish's Massachusetts regiment in 1775 during the siege of Boston.  Following Gerrish's dismissal from the army on August 19 Baldwin was promoted to Colonel commanding the regiment.


 Following the disbanding of the 1775 army, Baldwin was appointed Colonel of the new 26th Continental Regiment in January 1776.  The regiment joined  Washington's army around New York city in April 1775.  They saw fighting at Throgs Neck and Pell's Point New York.  After retreating across the Jerseys they fought at the victory at Trenton before their enlistment expired.  In 1777 they were consolidated with the 21st Continental Regiment to form the new 9th Massachusetts regiment.


The 26th was unusual in having a Grenadier company.  They wore a Seven Years War style cap but with GW instead of GR.  A copy of the cap is in the Smithsonian museum.  I hope to add Grenadier figures to the regiment in the future.

This is my second edition of this regiment.  The first was using RSM LTD. Miniatures.  These are from Brigade Games.  Why the change?  First these new figures are more correct for the  1776 period.  Why?  They are a mixture of The 1775 Bounty coats (Massachusetts gave to soldiers enlisting), Regimental coats (just being issued but in small numbers in 1776) and civilian clothing.  This creates just the right impression I was looking for  originally.  The old 26th will be repainted to continue its service.  

  Regimental uniform was a London brown coat with buff or yellow facings.   In addition there are some interpretation with a light blue waistcoat or vest.  In painting my figures I went with a dark brown coat and buff facings and linings.  My waistcoat blue is darker then most pictures I have seen but it looks very nice against the brown so I kept it.

The regimental colors are from The Flag Dude and follow the suggestion of General Charles Lee that each regiment have a Grand Union flag and a regimental color in the regiments facing color with a patriotic motto.


Thursday, May 14, 2020

13th Continental Regiment 1776


Please note this is my second edition of this regiment.  The first was using RSM LTD. Miniatures.  These are from Brigade Games.  Why the change?  First these new figures are more correct for the  1776 period.  Why?  They are a mixture of The 1775 Bounty coats (Massachusetts gave to soldiers enlisting), Regimental coats (just being issued but in small numbers in 1776) and civilian clothing.  This creates just the right impression I was looking for  in the original.  The old 13th will be repainted to continue its service.  


The 13th Continental Regiment ( Read's Regiment) was raised April 23, 1775, as a Massachusetts militia regiment at Cambridge, Massachusetts, under Joseph Read. The regiment would join the Continental Army in June 1775. The regiment saw action during the Siege of Boston, the New York Campaign and the Battle of Trenton. As part of General Glover's brigade it fought  the rear guard action at Pell's Point in October 18, 1776.  The regiment was disbanded on January 1, 1777, at Morristown, New Jersey.


Little is known of the uniform warn by this Regiment in 1776.  One report suggests brown coats.  The regimental flag was yellow or straw colored  so I went with that as the facing color.   


  Now, as to the regimental colors.  General Charles Lee's  advice for how colors should be for 1776 regiments suggested a regimental color in the facing color of the regiment paired with a Grand Union flag.   So I will follow Washington's suggestion.  The flag is by The Flag Dude and a very nice copy of the original flag it is. The 13th was I usual in that the actual regimental color is documented.

Wednesday, May 13, 2020

3rd Continental Regiment 1776


Please note this is my second edition of this regiment.  The first was using RSM LTD. Miniatures.  These are from Brigade Games.  Why the change?  First these new figures are more correct for the  1776 period.  Why?  They are a mixture of The 1775 Bounty coats (Massachusetts gave to soldiers enlisting), Regimental coats (being issued but in small numbers in 1776) and civilian clothing.  This creates just The right impression I was looking for  originally.  The old 3rd will repainted to continue its service.  


The 3rd Continental Regiment was raised  in January 1776 by consolidating Colonel Learned's, Danielson's and Wood's  1775 regiments .  It was enlisted until January 1777 and  served during the seige of Boston and later in the campaigns around New York city.  It was Commanded by Colonel Ebenezer Learned until his retirement in May 1776 due to illness.  Learned later returned to military service and commanded a brigade during the Saratoga campaign.


During the siege of Boston Colonel Learned and the 3rd Continental regiment manned the important Dorchester heights position which forced the British evacuation of Boston.  When the Americans marched into Boston the 3rd led the march into the city and was assigned the duty of removing obstacles like abatis and caltrops.  Afterwards they marched south to New York city.  Although they did not participate in the fight on Long Island they did see service later in the campaign.  They were assigned to the Brigade commanded by General John Glover with the 13th, 14th and 26th Continental regiments.  At Kip's Bay September 5 they formed the defensive line at Kingsbridge  that Washington's forces retreated past.  At Pell's Point  on October 14 they fought a delaying action against advancing British light forces.  Remnants of the Regiment fought at Trenton before being disbanded with the expiration of enlistments.  Many of the men later enlisted into the 4th Massachusetts regiment of 1777.


  Little is known of the uniform of the 3rd Continental Regiment.  One return I found suggested drab color coats.  These could be a shade of brown or undyed wool.  Massachusetts had large supplies of brown wool on hand.  These included captured and re dyed British coats.  Usually coats were supplied with a facing color and waistcoat or vest to  match.  There were a variety of wool for facing colors avalible.  Since none are listed for the 3rd I have assigned them blue as there were supplies of this material avalible.


Tuesday, May 12, 2020

Test game of "Whites Of Their Eyes"


The best way to learn a set of rules is to play those rules.  So my son Nathaniel agreed to try a game.  We set up a small scenario and started playing.  The table was 6' x 5' with a cross road in the center.  The two houses blocked fire but you could not put troops inside them.  


The order of battle for both side were:
American Order of Battle:
General John Glover
3rd  Continental Regiment (30 figures)
13th Continental Regiment (30 figures)
26th Continental Regiment (30 figures)
Militia battalion (30 figures)
Rifle battalion (12 figures)
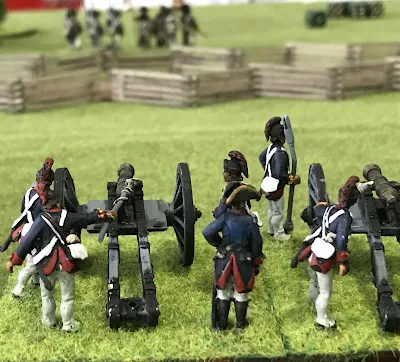
Hamilton's Artillery battery (2 x 6pdrs)
3rd Continental Light Dragoons (6 figures)

British Order of Battle:
General Lord Rawdon
23rd Regiment (30 figures)
33rd Regiment (30 figures)
49th Regiment (30 figures)
Legion Light Infantry
17th Light Dragoons
Royal Artillery (2 x 6pdrs)


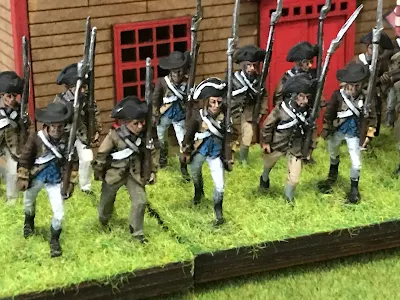
The British set up in the center and marched forward.  The 23rd, Royal Artillery and 49th with the 33rd in reserve.  The Lights and cavalry advanced up the right side of the table  to try and turn the American flank.

The Americans sent the 3rd Continental and Rifles down their right flank to out flank the British.  The Artillery took position in a hill by the British right flank opposed the lights and cavalry. In the center the 13th, 26th and militia hoped to hold on while the rest of the army enveloped the British .

We rolled to see who moved first and Nathan won.  Turn sequence is  check morale, move, fire and after fire movement for first player then second player .  Nathan moved his artillery into two great positions.  One on top of a hill and the other looking down the road.  Both have great views of the British and clear fields of fire.   At this point In the game we both made a error.  Artillery can move and fire in a turn.  Light guns can move 6" or move and fire 3" and can fire out to 36" .  Heavy guns move 3" or 1" and fire and range out to 4 8"  .  Unfortunately we decided they were heavy guns but moved them as Light guns and fired as heavy.  Part way through the game we discovered this.  Artillery was very devastating, possibly because of this.  We will do better next time.

The battle started with American artillery targeting the British lights at close range.  When you fire artillery  you first roll to see if you hit the target.  Roll one dice and point out where you are aiming.  Close range is either a misfire if you roll a one otherwise hit.  You then place a block 4" x 2" centered on where you hit and you roll for the figures within it up to six figures.    Each figure hit gets a saving roll.  Regular infantry save on a 5 or 6 but at close range you lose one pip so save on a 6 only.  Poor rolling saw the light take four hits and then failed the morale check .  


The British guns stayed together and concentrated their fire on the 26th Continental.  We found it important at medium or long range to aim at a point where is you hit it causes the most damage as the  aiming roll could send the shot slightly the right or left of aiming point.  This possibly missing the target or only hitting a small amount of figures.


After a couple turns most  regiments got within small arms range.  The American rifles had superior range but we're slower to reload so fired every other turn.  Light troops could also split move (move - fire - move) but Nathan did not try that.  by this time my Lights had routed off the board due to casualties from artillery fire.  To fire small arms you count up the figures,  check the range and in the small arms chart see how many possible hits.  The target gets to roll a saving roll for each possible hit.  Note that if you are behind cover (walls etc) you add one to the saving roll.  So if you save on a 5 or 6 if under cover you save on a 4, 5, or 6.  Regiments can move and fire.  

In the center the two British line regiments and two guns decimated the 26th Continental which routed.  The American guns continued to cause long range hits in the British 49th regiment.

The American cavalry moved around the British flank and charged the British cavalry.  In a melee both sides throw a dice, add or subtract modifiers and multiple by number of figures.  High side wins.  Loser take a 20% casualties and retired.  Winer take a 10% casualties from front rank.  The Americans easily drove off the British dragoons and then turned against the British center.  


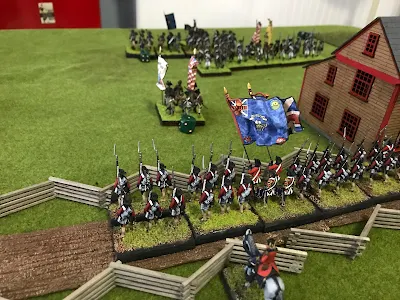
By this time the British were in trouble.  Their lights and cavalry were gone.  American cavalry were moving against their right.  On the left the American 3rd Continental and Rifles were turning that flank. The 49th were taking heavy casualties due to Artillery fire.  But marching steadily onward the British 23rd and artillery took on the 26th (which had rallied and returned) and broke them.  They then routed the Militia battalion. Soon only the 13th Continental stood in their way.  The 49th and 33rd turned to protect their left flank.  In the small arms exchange the 49th was down to less then 50% and failed their morale check.  As they retreated the 33rd charged the 3rd in a attempt to turn the battle.  But it was not to be.  They rolled very poorly ( a 1) and the Americans rolled  very well (6) so they lost lost the melee.  Athough the British 23rd were advancing victorious the rest of their forces were in retreat.  With over 50% losses the game was called and declared a American victory. Well done Nathaniel!


It was a fun game and were learned a lot. For next time I think a cheat sheet for both players will be very useful.   We will be trying another game soon.