Tuesday, August 25, 2020

An insignificant skirmish 1854


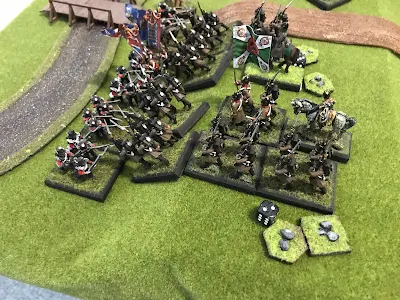
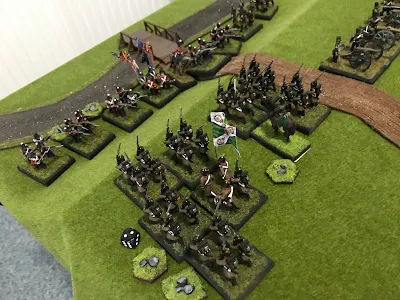
Following on heals of the Russian victory in the Bulgnack River I thought to fight out another battle in the Crimean.  This time I would have my French have a go against the Russian masses.  The scenario would be a French brigade in a delaying action against a Russian Brigade.  The French were outnumbered and had to hold the position as long as possible to delay the Russians.  


The French were deployed with the 3rd Zouave regiment, 6th line  and a battery would hold a stone wall to delay the Russians.  When forced back they would join the 50th line on a small ridge for a final stand.  The 1st Chasseurs d'Afrique held the left flank. Please note each French regiment was of Two battalions each.


The Russians would attack in the same manner as the last game.  After all it worked so well!  The 32nd Kazan Jaeger Regiment on the right and 31st Ouglitch Jaeger Regiment on the left each of four battalions and with a attached battery would sweep forward and drive all before them.  The Cavalry would sweep the right flank clear and outrank the French position.


The Russians swept forward and spent command points to double their moves.  (Note first move was entering table then second move was moving forward).  This brought them up the French line but it allowed the French to get an volley into them.  (If you spend a command point the other side gets to fire at you). With their first  move the French not only fired but fired a second time spending their command points.  They not only out a number of hits on the advancing columns but silenced the Russian batteries which had unlimber within range of the Zouave's rifles muskets! 


The Russian cavalry doubled their move to close with he enemy cavalry.  The Chasseurs counter charged and in the melee defeated the Russians and drive them back into the second Russian cavalry regiment! Into the mass of confusion charged the aggressive french!


By this time the the Russian columns had crossed the stone walls.  Although I should have withdraw I decided to fight it.  The French gave a volley before it was a clash of bayonets.  In the center two Russian battalions defeated one of the Zouaves battalions.  Climbing over the wall it was the high point of the Russian advance.  To either side of them the remaining French held strong and drive off the attackers.  To add insult the two French reserve battalions were now advancing to plug the gap in the center.

In the flank the French cavalry charged into the disordered mass that has once been two cavalry regiments and chased them off the table.


At this point the Russian commander called it and ended the game.  

What was different this time?  First off I remembered to have both sides use their command points!  The extra rolls from the French out brought morale markets in the Russian columns to hurt them in close combat.  In addition the extra range off the rifled muskets took out the Russian batteries before they could inflict damage.  


A good fun game on a rainy afternoon.  


Too much spam!


Is it a by product of this covid 19 thing?  My blog is being swamped with spam messages.  Most are stupid, some are embarrassing.  Because of this I have had to add a comment waiting period to get rid of these pesky intrusions.  So, if I am late responding to a comment please excuse me.

now back to our regular scheduled programing.

Sunday, August 23, 2020

Action on the Bulganak River, 19 September 1854


Following their landed at Kalamita Bay on 18 September 1854, the Allied Army started south towards the port of Sebastapol.   During the March the armies became strung out over a great distance and the British and French forces had become separated.  Being outnumbered significantly by the Russian cavalry it proved very difficult for British patrols to locate the Russian forces, and so the Allies moved blindly forward.    The main Russian field army was positioned on the high ground overlooking the River Alma. The Russians had deployed a detachment forward of the main position under the command of General Kiriakoff, consisting of numerous cavalry and Cossacks regiments, two Infantry regiments (eight battalions) and artillery.

On the afternoon of 19 September the allied army reached a small river, the Bulganak, beyond which was a ridge that blocked the view to the south. On the summit of the ridge sat a group of Cossacks. At this point the British army was stretched out over several miles.  The British sent the Light Cavalry Brigade with a Horse Artillery battery to scout  the ridge.  

The battlefield before them consisted of a shallow river and ridge line beyond it.  From that ridge   the ground dropped away to a valley, beyond which was a second ridge. The British cavalry commande could see Russian Cossacks on the ridge but nothing beyond it.  He sent back for reinforcements and moved the cavalry forward to investigate.  He knew the British Light Division was near by for support.


At this is the point the historical narrative ends and our table top battle begins . 


The British Light Cavalry Brigade and Royal Horse Artillery advance into the valley.  Confronted by Russian cavalry they move forward to engage the enemy and give time for the Light Division to arrive.  


The Russian cavalry spend extra command points to move to contact (each unit has command points to do extra things.  Once spent they are gone.  Better units have more pounts, poorer units less).  In the ensuing melee the British cavalry is sent running from the field!  The Royal Horse Artillery keeps the Cossacks at bay and soon the 1st Brigade of the Light Division has arrived.  They take position on the Heights.  During this time the Russian commander has advanced his infantry across the valley determined to push the British off the field.


Deployed along the ridge line the British await the Russian assault.  The 1st Brigade of the Light Division firm line with artillery support.  The 2nd brigade  is just crossing the stream.  Lord Lucan arrives to try and rally the cavalry after Cardigan's folly.  


Meanwhile the Russian cavalry fall back behind the infantry and artillery numbers up to move forward to get into better range. Both regiments advance steadily maintain spacing.  The masses infantry makes a noble sight.   At this point aged veterans from the peninsula campaigns must be feeling deja vu which is not helped by Lord Raglan mumbling about the French coming in in the old way.


On the Russian left flank four battalion converge on the British.  The 7th Royal Fusiliers and Royal Artillery opened a devastating fire which killed one of the battalion commanders.  But not enough to stop the masses columns who closed and drove the Fusilier back.  In the center the Royal Welch Fusiliers held firm and stoped the columns while the 88th delivered a heavy fire that also stoped the attack on that flank.  Raglan moved the 19th Regiment to protect the British right flank.  The brigade and Division commanders rushed to rally the Fusilier regiment and organized a counter attack.


The British 88th drive back the two battalions in front of them but things were coming unglued. 


 The Russians continued their relentless advance.  They Drive back both the 19th and 7th Fusilier as well as over running the guns.  In addition the Russian cavalry double times it's movement to get into the fight on the left flank.  


The British flank uncovered, Russians mounted a counter attack also by the line and almost no reinforcements available the British commander orders a withdrawal.  The masses of Russian columns were too much for the British this time.  


Conclusion: This was a most enjoyable scenario that in have wanted to fight out for a while.  And I will return to it again.  I think the key to the Russian victory was aggressive use of their artillery (which is very good) and paying extra command points to move extra.  This gave them less time under fire and closing to close contact quicker. Due to the small size of the table and the large number of regiments I did not enforce the six inches between Russian columns rule.  


 I should have had the British use their command points to fire extra times.  The key for the British is to get a number of morale  markets onto the Russian columns to reduce their effectiveness. Remember that for each market you subtract 1 from every due roll.   But it was great fun getting these rules and figures out again.  I think another battle or two in the next month would be grand.  Perhaps the attack of the British 1st and Light Division at the Alma.  Or the French attack on the Russian position at the Akma.  We shall see.


One other thing I learned from this game was my table space here at home is too small.  I have two folding tables which create a six foot by five foot table.  I think this works for small games (see Hobkirk Hill) but not for this number of regiments.  I felt the board was too crowded.  Let's see what a second table can do!   


Friday, August 21, 2020

Another Second Rhode Island Flag?


The following engraving and information is from Edwin M. Stone's book "Our French Allies" published in 1884.

 "The standard that belonged to the Regiment of Colonel Israel Angell, before the consolidation, bears a legend as appears on the accompanying engraving."

The author Stone writes of this flag as if it is still in existence in 1884 when he wrote his book. I am not sure if this could be the regimental colors, or one of the grand division type colors.  Either case it is most interesting.


Wednesday, August 19, 2020

What were the Gostelowe flags ?

Among the papers in the National Archives in Washington D.C. is a report entitled, "A Return of ye New Standards & Division Colours for ye Army of ye United States of America In Possession of Major Jonathan Gostelowe, Comy. Mily. Stores. "  This return was part of a series done in July and August 1778.  The report describes in great detail a series of 13 new Standards and Division Colours to be issued to regiments of the Continental Army.  They describe the colors and devices on the flags and how many division colors and their colors.  Because of this they are a valuable resource for anyone studying regimental colors of the Continental Army.  It is not known which regiments were issued these flags although some writers have expressed suggestions.  

Here is a illustration of each of the thirteen Standards as well as the information provided about them in the actual "return.". Please note that all color illustrations of these flags are from Richardson's "Standards and Colors of the American Revolution."  I hope this may provide the American Revolution gamer with more information to add historically correct and colorful flags for their table top regiments.  There is actually a lot of flags out there other then the same old same old.


Standard #1. Headman Color.

Number of the Standard: 1st

Their Colours:  Green

No. of the Division Colours:  2

Their Colours: Blue and Yellow

The Device of the Standards: A pillow on the top of which is the cap of liberty supported by thirteen hands.

No. Of the Standards:  1st

Their Motto:  This We Will Defend.


Standard #2. United Defense.

Number of the Standard:  22nd

Their Colours:  Red

No. Of the Division Colours:  2

Their Colours: Green and Yellow

The Device of the Standards:  An arm in armour with a drawn sword in its hand and thirteen drawn swords linked together.

No. Of the Standards:  2

Their Motto:  We are Always Ready.


Standard #3. Harmonious Union.

Number of the Standard:  3rd

Their Colours:  Red

No. Of the Division Colours:  2

Their Colours:  Blue and Yellow

The Device of the Standards:  A golden harp

No. Of the Standards:  3rd

Their Motto: Majora. Minoribus. Consanant.


Standard #4. America Triumphant.

Number of the Standard:  4th

Their Colours:  yellow

No. Of the Division Colours:  2

Their Colours:  Blue and red

The Device of the Standards:  Britannia setting on an old stump weeping.  A tree behind her withered, her spear broken, an olive branch lying at her feet, an Indian on the opposite side with his now strung holding an arrow in his hand, by his side a dog (an emblem of fidelity).  Under his feet a shield, behind him a palm tree in full bloom, before the unduan, the sun rising upon the new empire, between the two is game flying towards the Indian holding the cap of liberty and proclaiming: be liberty thine.

No. Of the Standards:  4th. 

Their Motto:  Behold the Rising Empire


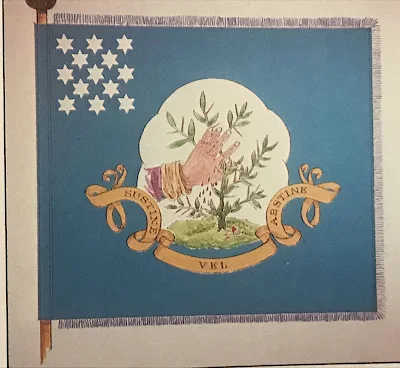
Standard #5. Sustain or Abstain.

Number of the Standard: 5th. 

Their Colours:  Blue

No. Of the Division Colours:  2

Their Colours:  Yellow and Green

The Device of the Standards:  A Thorn Bush and Hand

No. Of the Standards:  5th

Their Motto:  Sustine. Vel. Abstine


Standard #6. Death or Honor.

Number of the Standard: 6th

Their Colours: Yellow

No. Of the Division Colours:  2

Their Colours: Red and Blue

The Device of the Standards:  The Boar and Spear

No. Of the Standards: 6th

Their Motto:  Aut.  Mors.  Aut.  Vita Decora.


Standard #7. Perseverance.

Number of the Standard:  7th

Their Colours:  yellow

No. of the Division Colours:  2

Their Colours:  Blue and Red

The Device of the Standards:  The Beaver and Tree

No. Of the Standards:  7th

Their Motto:  Perseverance


Standard #8. Fight Back.

Number of the Standard:  8th

Their Colours:  Red

No. Of the Division Colours:  2

Their Colours:  Blue and Red

The Device of the Standards:  The Eagle & Craine.

No. Of the Standards:  8th

Their Motto:  Exitus on dubio est.


Standard #9.  Honorable Remembrance.

Number of the Standard: 9th

Their Colours:  Blue

No. Of the Division Colours:  2

Their Colours:  Red and Yellow

The Device of the Standards:  A Laurel Wreath in a Pedestal.

No. Of the Standards:  9th. 

Their Motto:  Si.  Recte. Facies.


Standard #10. Armed Resistance.

Number of the Standard: 10th

Their Colours: Yellow

No. Of the Division Colours: 2

Their Colours:  Blue and Red

The Device of the Standards:  An Arm in Armour With a Sword In Its Hand.

No. Of the Standards: NB.

Their Motto: The Union Agreeable to The Resolve of Congress.  Thirteen Stars is Printed on each Standard.


Standard #11.  American Defense.

Number of the Standard:  11th  

Their Colours:  Blue

No. Of the Division Colours:  2

Blue:  Red and Green

The Device of the Standards:  An Indian Representing America, Laying his Hand on the Cap of Liberty, Placed on a Pedestal, With his Now Strung, and his Dog by his Side.

No. Of the Standards:  11th

Their Motto:  This Is Mine & I'll Defend It.


Standard #12.  Resurgent.

Number of the Standard:    Blank. 

Their Colours:  Blank

No. Of the Division Colours: Blank

The Device of the Standards:  The Plant Acanthus Sprouting  Out On All Sides under a Weight.

No. Of the Standards:  12th

Their Motto:  Depressa. Resurget.


Standard #13.  United We Stand.

Number of the Standard: Blank

Their Colours: Blank

No. Of the Division Colours: Blank

The Device of the Standards: Thirteen Darts

No. Of the Standards: Blank  

Their Motto: Blank


There is a question were any of these Standard and Colours ever issued.  There is no definitive documentation either way.  But there is possibly other hints of confirmation.  Thomas Hughs of the British 53rd Regiment of Foot while a prisoner in Lancaster Pennsylvania made this observation.  "Jan: 19 (1780) A Regiment of 400 men with 6 pieces of brass cannon marched in a great parade into town - The cannon are some of those taken from Burgoyne.  The troops were well clothed and are part of the southern reinforcement.  They  have three Standards, one in the center of the Regiment, and one in the middle of each wing.  The colours were blue, red and white, with the 13 stripes in the corner of each. "  The captured Waxhaw colours are also very similar to the Standard and Colours #7.  The exception is one of the Grand Divison colours which is yellow and not red.  But with that exception very similar.  So it is possible that colours of these patterns were issued and carried in the field.  The description by Thomas Hughes also  Suggests that these were carried by battalions in the approved manner.  And this makes a interesting possibly way to organize and display your late war Continental regiments and Colours.


So, it is possible that these Standard and Colours were issued and used in the field late war by Continental line regiments.  For the American Rev War  gamers these add a very colorful and useful  addition for our American Regiments.  They also offer a alternative to non historical flags on the table top.


Biography:

A Return of Some Continental Army Regimental Colors of 1778"

Holst, Donald W. and Marko Zlatich

MCH, 19 (Winter 1967), pp. 109-115.


Richardson, Edward W.  Standards and Colors of the American Revolution.

Philadelphia, 1982.