Monday, March 11, 2024

A new Project


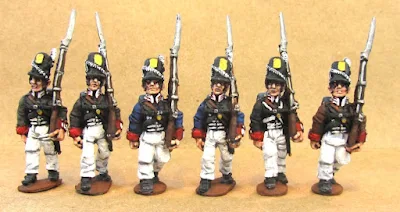
I am adding a few new American Regular regiments to my War of 1812 armies.  I will be using the wonderful Knuckleduster miniatures.  Instead of the usual 1814 uniform I am going with the hybrid 1813 uniform.  Its colorful and different.

  The uniforms of the American Army during the War of 1812 is a very complex subject.   Uniforms changed considerably throughout the war,not once but at least three times.   The uniforms worn early in the war were very different then those worn at the end of the war.  More importantly units didn't always receive new items immediately when they became available. 


  Throughout the 1813 campaign season the American regular infantry wore a hybrid uniform. On paper, the US Army had an entirely new uniform in 1813. This was a plain coatee without the lace adorning earlier versions of the garment, and a ,new leather shako. But as any student of military history can tell you, the dictates from on high do not always translate into changes in the field; at least not right away;  sometimes if ever.  The American army throughout the 1813 campaign season (a third of the war), wore a hybrid of the 1812 and 1814 uniform.


  On paper the United States Army  had an entirely new uniform.  This was to be a plain coatee without the lace the earlier coatee had  plus a new leather shako.

  The leather shako was delivered very quickly to the front lines, and most units had them in hand for the 1813 campaign season.

  The regimental coats were another story. The old laced 1812 coatee continued to be worn by a substantial number of units, and because of shortages of blue dye, it was delivered to units in various shades of grey, "drab", brown, and black. According to Rene Chartrand, the Army specified that, "the mixed color coatees and garments were to be cut as prescribed in the February 1812 regulations, with red collars and cuffs, and white lace binding."

US Regulars in the hybrid 1813 uniform from the Knuckleduster miniatures website.


  The units wearing this old coat/new cap configuration, were as follows (coat color follows listing):

12th US: Drab, red facings

14th: Brown for some, Drab faced with Red for others.

21st: Blue, red facings

16th: Black, red  facings


  Yet another exception to the rule., which the War of 1812 is filled.   The 25th US Infantry had the old felt shako and a blue coat faced with red (and with minimal lace). 


Friday, March 8, 2024

Charge of the Light Brigade Rules


I have been ask a number of times what rules I use for the Crimean War. They are "Charge of the Light Brigade." A home brewed self published rules from the author David Raybin so possibly only a few of you have tried them.   I will state right off I am a big fan of these rules. I like simple rules, but with a twist. I like regiments to look like regiments.  And it is important to me that that a group of colorful miniature soldiers represents such and such a regiment.  I want a game I can play in a evening, gives a period "feel" for the time period played, have fun with and come to a conclusion.  "Charge of the Light Brigade" does all of these. Here is a essay on how they play.


The rules are a simple I Go U Go but with a difference.  Each side rolls for initiative with high side getting first go.  If you won the roll last time you add one to your roll.  Each of your regiments or batteries do one action (move, change formation, fire or remove a morale point).  To move roll two dice (or more depending on formation) and that is how far you can move.   After all your units have moved  you may spend a command point (CP) per unit and that unit may do a second thing.


  Here is something that sets this set of rules aside from all others. The author has taken the simple move/counter move system and twisted it. Every unit has a commander (i.e. Colonel). He has so many command points (CP). More if he and the regiment are good, less if mediocare or poor. Russians often get around 8 (sluggish, dull)  while British line get 12 and elite Guards might get as many of 16.  Better units can do more at critical times. But when your CP are gone they are gone.


OK, now it is your turn, and every unit on your side has done one free action. You may then spend a CP and do something else. Fire, remove a Morale marker or what ever. It gives you a chance to take advantage of something or react to what is happeneing on the table. BUT for every action there is a reaction and the enemy now gets to react against that unit and can either return fire at you or change position/facing.   But only against the enemy that spent that CP.   In a past game a Russian battalion removed a Morale pip by paying a CP. The British reacted by firing at the unit and puting 2 morale pips right on back (darn good shooting with the Guards who rolled four 6's). So you spends your money and takes your chaces.  This portion of the rules is what gets a lot of comments and attention from people who  have played this game for the first time. And rightly so. It is simple, inovative and fun. But I would recommend a GM to run the first few games you try to ensure you all stay on tract and not move ahead.  To track CP I put a sticky note under the command figure stand with the number of that units CP.


  Firing is simple. You throw 1D6 per stand for Infantry and 2D6 per artillery stand. Cross refinance with the firing chart for weapon vs. target and this gives you the chances for a hit. Since there is a possible saving roll you might not lose all those figures hit. Yes, the dreaded saving roll.  But here it takes the place of all those calculations you have to do with other rules.  Watch out for double 6's as they can cause a morale marker to drop onto your unit.  Each infantry stand has four figures. Once all four figures are gone you remove the stand.  Until then the stand fights on.


To me, the neat thing about this system is that you forget about calculation, tables and charts. Hits, saves and morale are all tied into each other. The save chart also brings a little of the old "national modifiers" into the mix. With Russians, who get saved on a 5 or 6 no matter how many stands are left you have to beat each one with a stick until they are all dead. You get that steady, dogged feeling you read about. The British start with a high save chance (they dodge bullets like the bat man said the rules auther) but as they loose stands save chances go way down so they wither away. A little fragile. Poor Johnny Turk never gets a save


Morale is a sneaky system that most folks don't think a lot about until it bites them! You get a morale pip for any number of things (crossing an obstacle, being fired at or having friends route past you). Since you subtract 1 pip from every die roll morale effects everything you do. Move, shot or fight it ties into morale.

In a past game a Russia commander with three morale markers on a regiment found out fast that he could not shoot, or save casualties with that unit. With morale markers, once you get into trouble it comes fast and furious. To me this is a superior system then used in many rules. The unit is effected, and everything it can do is effected.


Close Combats takes a bit getting used to since it is very different from most rules. You do not charge like in other rules. You move within 2' of the enemy. THEN, you would have to pay a Command Point or wait till next turn to close and fight. This gives the defender a chance to do something. Like blast the enemy with a close range volley that causes casualties or mabey a morale marker.  It is actually hard to close into close combat due to small arms fire.  But when you do it can be devastating.


  I really love these rules. The game feels like the Crimean to me based on my reading.  Also for a I Go U Go both sides get to do something so no sitting around. In my games Russians tend to form columns (or at least reinforced lines) and try and close with the British quickly.  (One player has nicked named them "Zulu's in overcoats.") Russian artillery is better then the allies and there is a lot of it.  Russian cavalry is, well, sluggish.  The British tend to want to shoot at things. And shoot a lot. Cavalry is small but very aggressive.  By the way small numbers of cavalry will not damage infantry who can usually shoot them down before they close. Many of my games have seen a single British battalion stopping massed charge like at Balaklva.  The French are interesting as their line have muskets while elite troops like Zouaves have rifles and  more CP.  So each army is very different from the other.  You have to work with what you have and get the best out of them.


Wednesday, March 6, 2024

Attack on an outpost 1854


Quite the Affair old boy!


  The Battle of Kowpenski was a recent table top wargame set in the Crimean war period 1854-55.  It saw a Russian attack on a Allied outpost which guarded the flank of the siege lines around Sebastopol.


Russians enter the table.  It's a very long way to The Allies lines!


Russian advance

   Defending on parallel ridges the battlefield is mostly open rolling terrain with woods protecting both flanks.  The Russian forces (Vladimirski infantry Regiment of 4 battalions, 16th  light artillery battery and the  Kievski and Ingermanlandski Hussar Regiments) enter the table.  The Allies are deployed in three lines.  A skirmish line of 1/1st Zouaves  face the Russians.  Behind them are a battalion of 7th Ligne French line infantry.   In the distance, hidden behind a ridge line are British 7th Royal Fusiliers and 23rd Royal Welch Fusiliers.  The British Heavy cavalry brigades deployed in The woods.    The Russian forces must advance across the field quickly (limited number of moves) and capture the far ridge line while destroying the Allied force.  The Allies must stop the Russians.  Rules used are "Charge of the Light Brigade." All figures are 25mm.


Pesky French


Russians suffer casualties from the Zouaves skirmish fire.

   The game started with the Russian infantry and artillery advancing onto the table.  The cavalry hung back protecting the flanks as British cavalry were rumored to be in the area. The Russians used a command point each per battalion and artillery to try and contact the French, but bad die rolls left them short.  The pesky French pounded them with long range rifle fire while they fell back to join their brother battalion on the ridge.


  Although suffering long range casualties the Russian advance pushed the French back into the first ridge line.  Here their cavalry deployed into double lines to advance and take the French line in a double envelopment.


Heavy Brigade destroyed Russian Cavalry Regiment

  But, out of the wood line where they were hidden came the British Heavy cavalry  brigade which crashed into the Russian cavalry.  Caught in flank the Russian cavalry not only lost the melee and retreated but their commander was killed!  (for every three 6's rolled you check for a leader being wounded or killed).


   The Russians infantry  continued their advance but the right hand battalion formed line facing the British cavalry and their artillery deployed into firing line.  Their work done the French double moved back towards their British allies while the Heavy brigade covered their retreat.


 Having cleared the first ridge, the Russian commander sorted his line out and brought up his battery for the final push. But his left flank cavalry commander, seeing the retreating Zouaves in the open could not contain himself and charged headlong towards them.  This brought him into rifle range of not only the Zouaves, but the British on the hill.  The rifle fire decimated the cavalry, which lost over half its strength and retired.


Russian cavalry charging the French

Taking aim at all those horse!

Both sides reformed in their ridge lines.  Although the Russian commander finally unlimbered his battery he did not have the time to batter the Allies.  He knew could get one or two fires into them before he had to advance.  He managed to remove a stand of the Zouaves with his artillery fire.


Advancing across the open fields, the Russian columns were again brought under heavy rifle fire.  The reformed Russian cavalry advanced to support the infantry.


 But this time the allies had double the battalions they had earlier.  Each battalion picked out a advancing column.  Two of the Russian columns were shot up and had to retire.  At this point the Heavy brigade attacked and drove off the remaining Russian cavalry.


 The French charged off the ridge to attack the Russians while the British advanced against the remaining Russian battalion.


French chasing routing Russian line.


Fusiliers brigade move against a isolated Russian battalion.


At this point, with the Russians in disarray and routing the Allied commanders met to congratulate themselves in the victory.  The Russian commanders met to think up how to write this up as a victory.  Or not get thrown out of upper stories windows in tall buildings.  


   One of the most interesting battles of the Rev War  was Cowpens which the reader may have guessed what was really being played here.   A problem with re fighting any historical battle is you know what happened.  I decided to not tell thus to the players.   So here, the players thought they were fighting the battle of  Little Inkerman  (26 October 1854) but we're really fighting the Cowpens battle.   As a game it worked well and surprisingly mimicked the historical battle very well. 

  This was a small, but enjoyable game. It was great fun to get my Crimean collection out again, and great fun to play "Charge of the Light Brigade" rules again.  Couple things about the period are getting to have British and French fight together on the same side and seeing masses of Russians in overcoats.  The rules are great fun and I enjoy them very much.  They create a fun game that moves fast and mirrors the period very well.  Sadly they are not more widely available.  I will post a rules review of them soon, and anyone who is interested in a set please send me a email and I will attach them.


Saturday, March 2, 2024

McKenzie Heights 1855


 Time to get my Crimean War collection out!  Here is a past game night battle I never recorded.   The battle on McKenzie Heights saw a Russian division of 12 infantry battalions, four batteries and three cavalry regiments defending a cross roads.  Fortifications have been added to add strength.  Meanwhile two British divisions advance to capture the same cross roads.  Rules used were Charge of the Light Brigade, and all figures were 25mm from Wargames Foundry and North Star miniatures.


  The Russian commanders placed all four batteries behind fortifications along the front line.  Four battalions defended the tiwn, and four more battalions were placed on each flank.  Two cavalry regiments guard the Russian right flank while one cavalry regiment guard the left flank.


 The rules are a U-Go-U-Go but with a twist.  Each regiment gets so many command points.  These can be used to do addition actions.  When it is your turn each unit can do one free action (move, fure, change formation, lumber or unlimber).  After The free action they can spend a command point and do a second action.  They can do a third action which cost two command points.  And so on.  But once spent command points are gone.  Better units have more command points, poorer have less.  When you spend a command point The other sides gets to react to it by returning fire.  Intetesting!  You can get morale chips for being under fure, or losing a close combat.  For each moral marker you get you subtract one pip from every die roll.  So this quickly becomes dangerous.


The Game:
  The British placed the 1st Division (Guards and Highlander) on their right with orders to outrank the village.  The Light Division crossed a minor stream to attack the village in front and hold most of the Russia's attention.  The Light Cavalry brigade was held off table.

On the Russian Right Flank:
Supported by a battery two Russian battalions advance against the British line.

   As the British came into the board and crossed the stream, the Russian commander launched an attack.  Two infantry battalions and a Hussar and Cossacks regiment charged the British  line.  During his move the Russian commander spent an extra command point to move his forces more quickly forward. But he was hampered by poor dice rolling (movement is by five roll and he rolled very low).


  The British commander not believing his good luck spent a command point and got his artillery into line and unlimbered, while his infantry fired twice at the Russians causing high casualties.


When the charges went in they were easily defeated and sent routing back with high casualties and multiple morale markers.  The Russian commander then advanced two more infantry battalions, this time in line to exchange fire with the British.  Superior rifles and numbers told and the decimated Russian infantry retired.  The British proceeded to silence the batteries with long range rifle fire.

Russian Left Flank:


  The British 1st Division advanced into range to engage the Russians with rifle fire.  Good die rolling from the Russians saw the British battery silenced very quickly. The Russians used a number of command points to change formation from double line into line to bring more muskets  against the British.  This did not work.


  In a desperate effort to stop the British the Russian commander charged the nearest enemy with his cavalry regiment.  Ironically, that was the 93rd Highlander of the  thin red line fame.   This time history did not repeat itself and the cavalry win the close combat.  The retreating highlander caused disorder as they retired and the Russian cavalry charged into the next unit the 42nd.  This time, supported by the Guards the Russian cavalry broke and retired off the board.  With little opposition in front of them the British continued their advance.


 At this point the game was called.  Both flanks were wide open and two batteries silenced .So the Russians had little chance of stopping the British.

  The game was fast paced and great fun.  All agreed that the rules were easy to understand and provided interesting twists with the command points. one point were All agree on was in future battles more Russian infantry needs to be on the table to counter British superior rifle range.  All are interested in playing again soon.