As I have mentioned earlier I love dioramas and they have instilled in me my love of model soldiers. While the Lexington Green one will always be my sentimental favorite this one of the North Bridge fight is up there with it. Because it was local whenever I was in Concord I would try and stop by to visit it.
.jpg)
This great diorama is at the Concord Museum in Concord Massachusetts. It was commissioned by the historian Allen French and built by Guernsey and Pittman in Cambridge Massachusetts in the 1930's. Allen French provided the historical research for the builders. If you are not familiar with him, his books, "Day of Lexington and Concord" and "General Gage's Informers" are the foundation of any study of the battles. While working at Minute Man National Historical Park I took some time going through the Allen French papers. Included was his correspondence about the diorama and notes to the builders. After all these years I was curious how it held up and what shape it was in. I am very happy to say it still looks great!

Guernsey and Pittman are famous for their quality of dioramas. They had a office in Harvard square In Cambridge Massachusetts. Both men had been professors at Harvard University. I plan on doing a blog posting about the in the future in which I will showcase some of their work. Here is a picture from the Concord Museum of the two men bring the finished diorama into the museum in 1930.

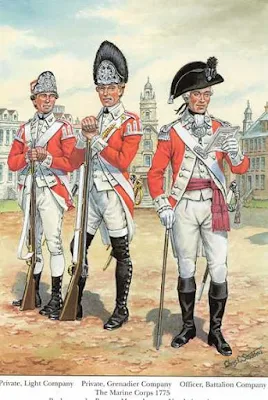
British Light companies in street fighting position.

Nice detail of the fight.

The front rank of British soldiers are retiring to the rear to reload after firing. Note the soldier leaning on his file mate and standing in his tip toes to get a better view!


Although the miniatures are very crude by today's standards they are still works of art. Each figure us individually made.

There are neat little details in the diorama that reward multiple viewings. Note the planks pulled up on the bridge.

Or the man knocking the cap off the head if his file mate.


In the picture here Lt. William Sutherland calls for volunteers to join in him to flank the Americans.
.jpeg)


.jpeg)