Showing posts with label Loose Files and American Scramble. Show all posts

Friday, August 7, 2020

Fighting Hobkirk's Hill


General Greene by the Maryland brigade.

General Nathaniel Greene and the Maryland brigade view the battlefield.

Starting position for the game.  Turn #1

The game starts with the American main line deployed along ridge and skirmishers out front.  Artillery, Militia and Rifles are covered and appear in turn three (the British were historically unaware of their present). Because the Americans were surprised by the British attack they cannot move untill turn three, except for the Light troops who must delay the British advance.  


The light troops or both sides skirmish with the British side getting the worst of it.  Finally, turn three the American Artillery and militia appear.  The Virginia Brigade moves to flank the British advance supported by the militia and rifles.  Colonel William Washington brings his dragoons off the ridge to flank the enemy and the American artillery opens fire.  The light troops of both sides clear off for the line troops to take over.


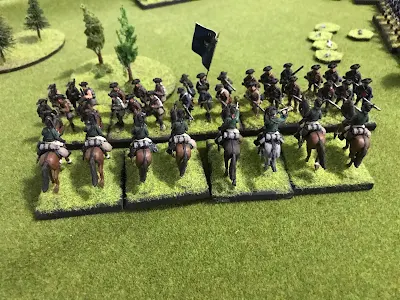
On the American left flank Colonel Washington leads his dragoons in a impetuous charge against the 63rd Regiment of Foot.


The steady infantry hold their ground and the dragoons take casualties....


And go back from the direction they came from!

 The Maryland and Virginia light companies move up in the background to cover the flank if the Maryland Brigade.


On the American right flank the Virginia Brigade moves up to engage the loyalists.  The North Carolina rifles face to get in position to cause some long range damage. (Note: the small markets behind the regiments are disorganization points.  These represent temporary disorganization.  They can be removed by generals or by rallying in place).

 
The South Carolina Royalists move up to support the NYV.

Captain Coffin brings his loyalist dragoons over to add his support.


The Virginia Brigade and Loyalists continue to blaze away at each other.  


Charging home the Loyalist dragoons rout the rifles....

...and send them racing back to safety.


Lord Rawdon advanced the King's American Regiment and the Volunteers of Ireland against the Maryland line.


The 63rd rallied in place assisted by The brigadier.  (Note the D point markets by the regiment.  For each one you subtract a dice for shooting and get  -2 in close combat.  Once you get 5 P points you start to loose stands if figures.  So it is important to taken the time and remove them occasionally).


At this point, in a all or nothing move Greene ordered the Maryland Brigade off the ridge and they charged the surprised enemy.  it was regiment against regiment on the left flank.  But with both sides in good shape it was a stand off with both sides taking a casualty and a D point and locked in battle for another turn.  It looked like both sides were going to grind each other down.


On the other flank it was the same situation except both sides were shooting each other to pieces.


But in the edges of the fighting things were different.  Captain Coffin charged the advancing North Carolina militia.  They got off a ineffective volley before the dragoons crashed into them and sent them routing back.


The 63rd, having rallied now advanced to sweep the Light infantry in front of the off the field.

Add caption


With both his flanks open and the possibility of the enemy rolling up his forces Greene decided discretion the better part of valor and called the game.  He hoped after withdrawal he could met up with Lee's Legion and the various partisan commanders to continue the campaign.  Rawdon at this pointless just pleased he had driven his opponent from the field.  Tomorrow would be another day.

Summary:
I enjoyed this game very much.  I think the loss of the American dragoons so early in the game hurt the American player.  I also enjoyed the rules which I had not played for a long while.  They work very well solo and provide a fast game.  I had forgotten close combat can be a grind fest if neither side goes into them with any advantage.  In addition training grade is very important.  A better regiment will run over lesser quality regiments (see Coffin's dragoons!).  I look forward to playing this again.


Monday, November 18, 2019

Rules I use for Wargaming: The American Revolution


  An older set of rules which were available in the first issue of Wargames Illustrative.  Written by Andy Callan these rules capture the feel and tactics of the war. I was instantly taken with them and have been playing them since they first came out. Not to everyone's taste but a great favorite of mine.  They have brought a lot of fun games and enjoyment to me over the years.

 The Disorganization Points (DP) are a clever way to tract the temporary wavering, disruption and casulties of a regiment.  This can be caused by movement, terrain, small arms, artillery or close combat.  Better trained regiments can dress the line and reform while poorer regiments tend to fall to pieces.   This is done by removing DP's.  A unit stops, does nothing for a turn and can remove a DP based on training and quality.  In addition a mounted officer can assist by helping to remove additional DP's.   Quality in this game is vastly  superior to quantity.

Here is a link to the rules as they first appeared in WI #1
https://www.wfgamers.org.uk/andy-callans-articles/loose-files-and-american-scramble

  A personal observation of mine.   When I have played these rules with players for the first time long time wargamers get confused or bogged down.  The rules are unlike most wargamer rules out there.  But reenactors or individuals who have been in reenactment regiments pick them up just fine.  I find this most curious.  But then I do tend to think of table top miniature  games more as battle reenactments then simulations.

  Here is a quick cheat sheet for playing these rules.  They started as a quick cheat sheet put out by the Corlears Hook Fencibels.  I have made a handful of changes within these.  I have made a couple minor changes to better reflex how I interpret the game. These have been based on reading Matthew Spring's With Zeal And Bayonets.   By the way I play with 25mm figures instead of 15mm but have not changed the measurements.  Please feel free to adapt as you like.  Also, if you currently play these rules I would love to hear from you about how you play them.  Any house rules or such.


Loose Files & American Scramble Quick   Reference Sheet

Order of Play in a Turn (all movement is simultaneous)
1.Compulsory Retreats/Routs following combat in previous turns.
2.Calculate Morale effects provoked by 1 above.
3.Firing (units can fire or move not both)*
4.Allocate Command Points.
5.Move units. Announce attempted advances to contact/charges before moving.
6.Combat.
7.Re-dress ranks (according to training) of units that did not move this turn.
*skirmishers may fire then move

Command Points CP
Move own commander up to 1 die (choice of average or D6) inches = 1CP
Inspire troops in combat (give +1) = 3 CPs *
Rally (remove) one DP = 2 CPs *      * must be in contact with unit

Disorder/demoralization points DP
1st class (elite, veteran) may remove up to 2 DPs per turn if stationary and not in combat
2nd class (line) may remove 1 DP per turn as above
3rd class (green,  partisans) may remove 1 DP per turn if stationary, not in combat/shot at
4th class (militia, Indians) may only remove DPs with aid of an officer
5th class (unmotivated Indians) may only remove DPs with the aid of the Army CO
Casualties
Once a unit has taken the maximum number of DP's (5) each DP after is a casualty.  Remove a stand of infantry  (3 figures), troop cavalry (2 figures) or artillery stand.

Artillery and Small Arms Fire
Artillery Fire range under 10 inches close, 10-30 long (light) 10-36 long (medium)
Roll one D6 for each stand firing modified by below:
+1 heavy gun, target column or limbered artillery, same target/range as last turn
- 1 new target, each DP of firing stand, light gun
- 2 target in fieldwork or stone building or target in skirmish order/unlimbered
Long range inflict 1 DP for 4 or higher.
Short range inflict 1 DP for 2 or 3, 2 DPs for 4 or 5, 1 DP and 1 casualty for 6 or higher.

Infantry fire (Only skirmishing infantry can fire and move in the same turn)
Musket range 8 inches, rifles 10 inches. Roll 1 D6 for each stand firing, minus DPs of firing unit. Halve result shooting at skirmishers/unlimbered artillery, halve if target in fieldwork or building. Round up.
1 DP for each 6 rolled. Skirmishers roll again on 5, with subsequent 4,5,6 = 1 DP.

Movement
Movement is the number of dice score X inches
1st/2nd/3rd class units may move one or two average dice
4th/5th class units may move one average dice or one average plus one D6
Skirmishers may move an extra D6, Cavalry may move one or two extra D6
Formed troops get 1 DP for each 1 or 2 rolled, 1, 2 or 3 in woods.
Hessian infantry (except Jaegers and von Bose regiment in South) move one average die or one average die + 2 inches.
Cavalry who charge must roll at least 3 dice. Can change speed 1 dice up or down per turn.
Moving in woods or uphill -1 inch from each die rolled.
Wheeling, change formation or facing : pivot either right or left stand and line up figures,   1 DP (2 if under fire).
Cross fence/wall,; stop at obstacle, continue nice next turn, 1 DP (2 if under fire).
Retire facing enemy: ½ move get 1 DP if cavalry or under fire.
Heavy artillery takes two moves to limber/unlimited take 1DP
Medium artillery one turn limber/unlimited take 1DP
Light Artillery can do two operations each turn. ( move and unlimber, etc) 1DP

Morale: seeing friends retreat/rout within 6 inches
Troops ignore retreat of lower grade friends but get 1 DP if such rout within 6 inches.
If equal/higher grade friend retreats within 6 inches get 2 DPs.
If equal grade friend routs within 6 inches get 2 DPs and one stand deserts.
If higher grade friend routs within 6 inches get 3 DPs and one stand deserts.


 Combat occurs when a unit closes with enemy.   To close must declare charge to contact before movement otherwise just stop 4 inches from enemy.  Each side throws an average die modified by below:

+3 each training grade better than enemy
      defending fort or stone building
+2 defending fieldwork or wood building
      making bayonet attack*
+1 terrain advantage
      officer spends 3 CPs inspiring troops
- 3 in skirmish order
     attacked in flank/rear
- 2 each DP, each casualty
- 1 outnumbered
- 2 outnumbered 3-2
- 3 outnumbered 2-1
- 5 outnumbered 3-1 or worse   1 cavalry figure = three infantry, one gun = six infantry

Result is difference in scores:
+4 or more: Easy victory get 1 DP. 1st/2nd/3rd class obey orders. 4th/5th class pursue.

+2/3: Successful get 1 DP and (vs. infantry or artillery, not in fort, building or fieldwork) one casualty. Halt one turn.

+1/even/-1: Stand off both sides halt fight continues next turn. Each get 1 DP and (unless infantry facing cavalry or bayonet attack, or in a fort, building or fieldwork) one casualty

-2/-3/-4: Driven back get 2 DPs and one casualty. Retreat one move at maximum speed.

-5/-6/-7/-8: Defeated get 2 DPs and 2 casualties. Retreat at maximum speed behind next line of friendly troops, or next terrain obstacle if no support.

-9 or worse: Routed run away at maximum speed to beyond enemy artillery range or next terrain obstacle, whichever is further. Get 4 DPs and 2 casualties.

* Option only for British to represent aggressive tactics during war.

House rules:
Must move full distance rolled unless point out stopping point (i.e. stop at fence line or top of hill, etc).

Can roll movement for entire brigade if moving together.

Corlears Hook Fencibles House rules: after 2nd stand off in a row both sides retreat 1 average die unless defending an obstacle, fieldwork, building or fort.

Militia units with 50% losses or more flee the field  remove from table. Other units with 75% or more losses flee. No further DP losses by friends who see this