Tuesday, February 23, 2021

New England houses from "Things from the Basement"


   In addition to the Salem Meeting House Things from the Basement has also released two New England style houses.  These can be built as is, or you can add the extension kits to make them into the traditional salt box style homes.  I have chosen to add the extension as I really like that style and worked inside that type of house during my career with the park service.  Both houses are alike so I will just describe building one of them to give you an idea of how they go together.  A second post will go into how to paint these period houses and how I painted them.

  First off I lay out the parts sheet to familiarize myself with them.  After downloading the assembly plans from the site I am ready to start putting these together.  I use superglue to assembly the building.  I then usually add a beading of white glue along the inside edges for added strength.  


  One of the nice details is the windows of these buildings.  There are two parts and you snap out the windows and ledge you want.  I tend to do these all at one, assembly line fashion.  Glue the window to the ledge and then push it through into the opening.  These give a nice effect and each has great details.  


Also note there are two doors for each building.  One fancy, which I will use for the front and the others plain which I will use for the back.  


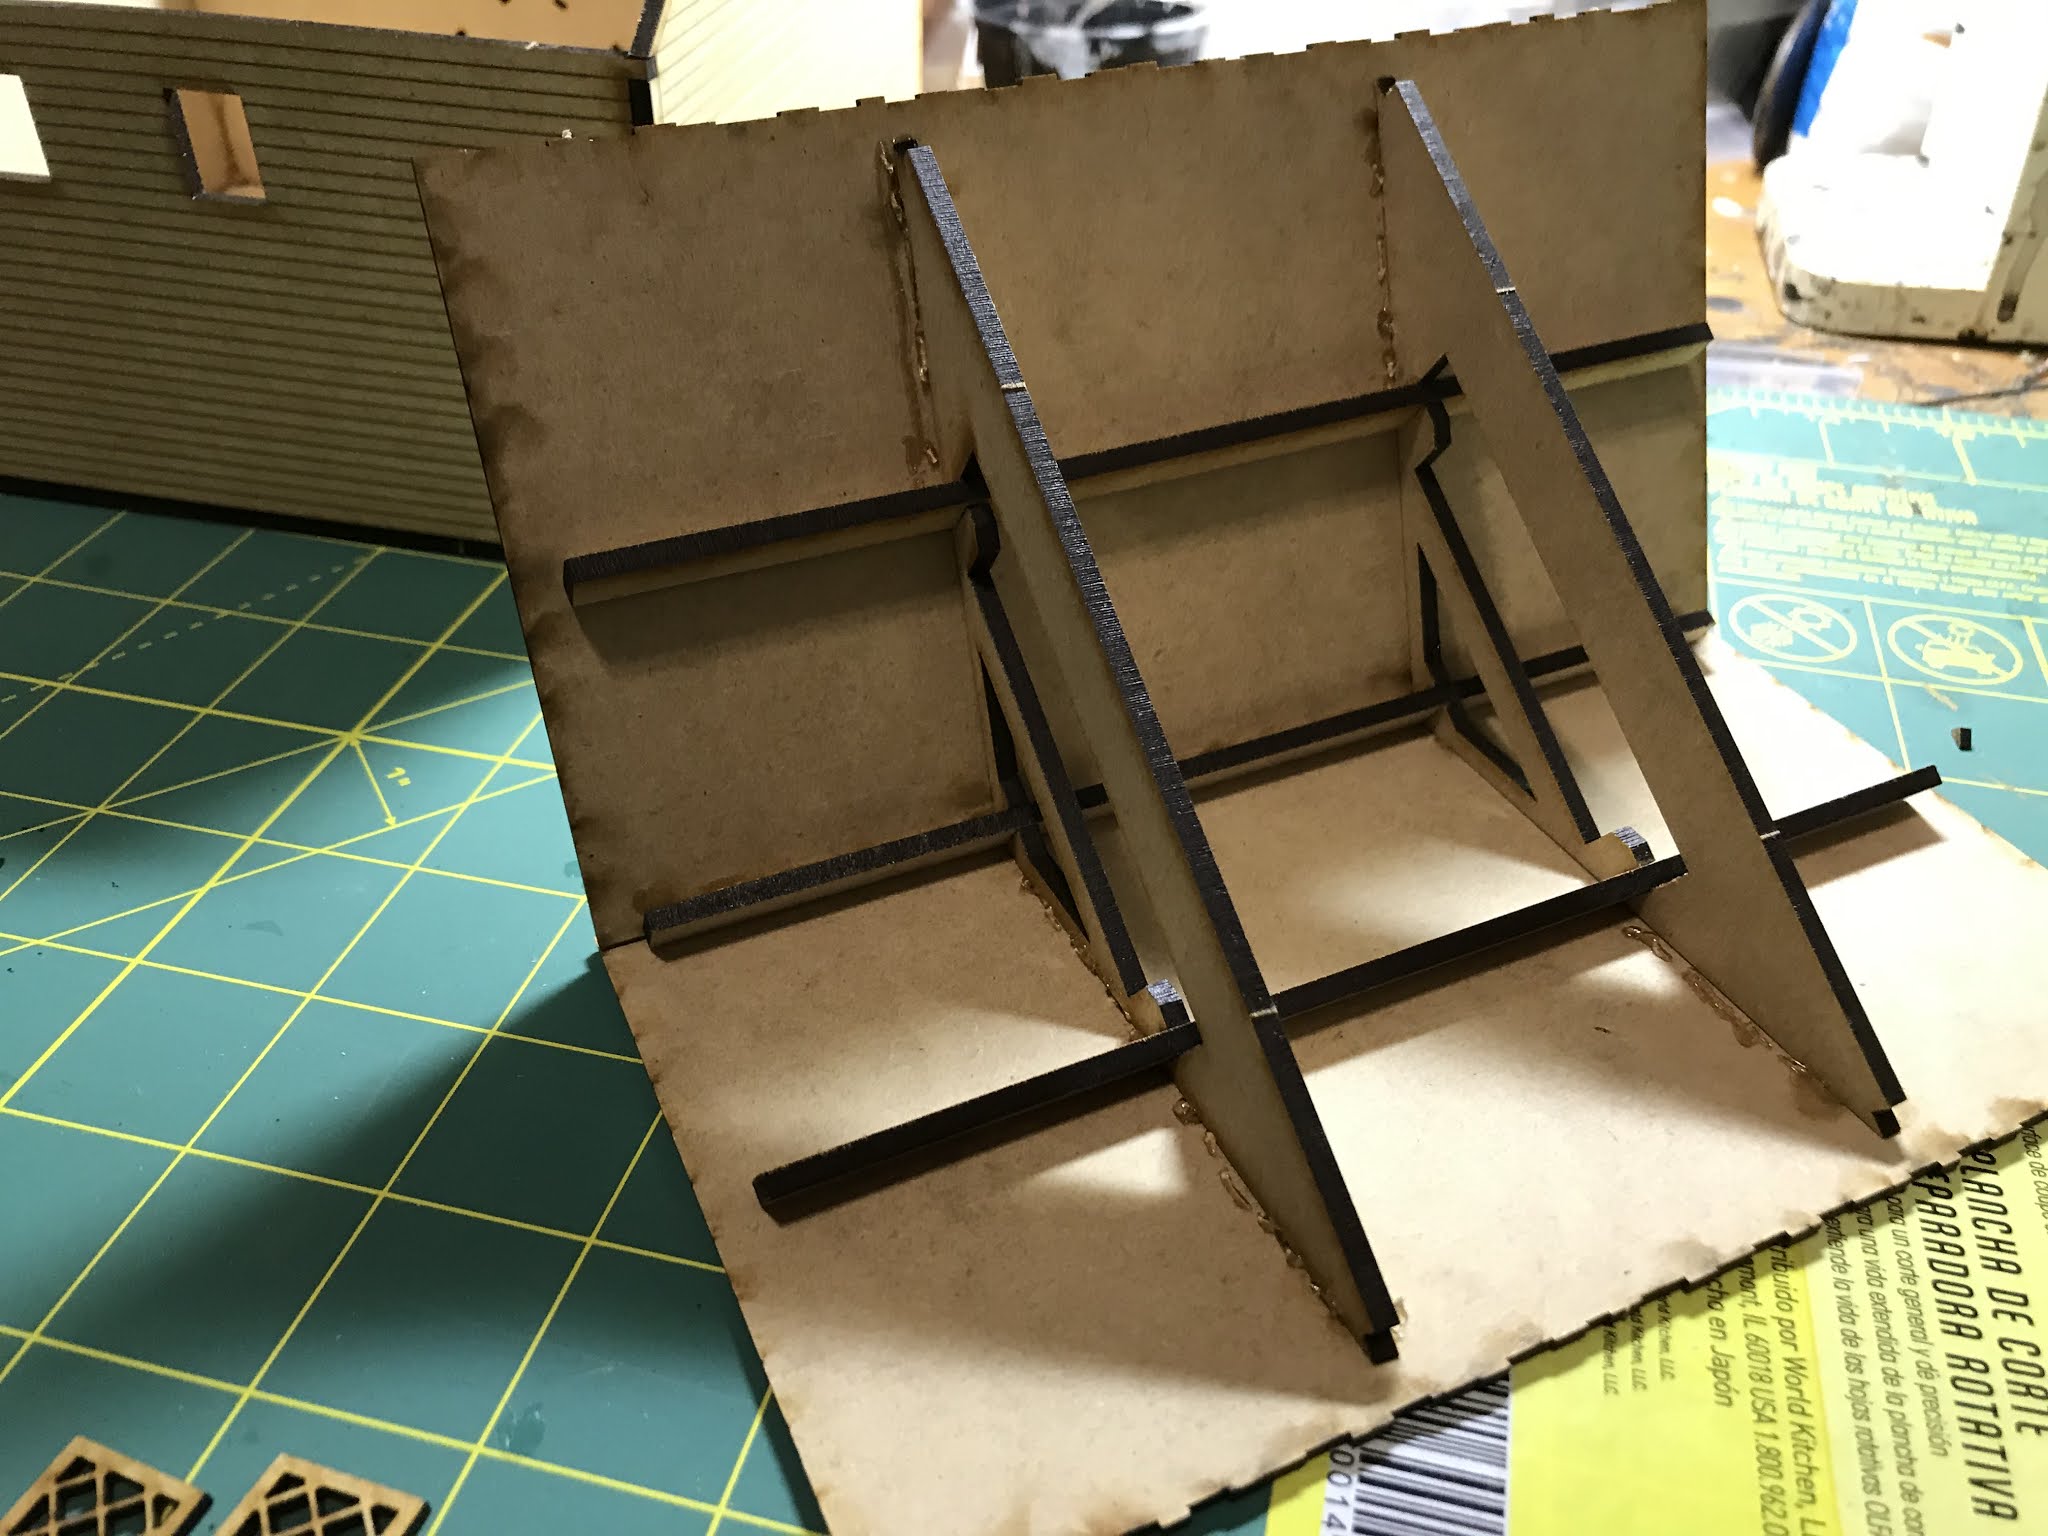
Next step is glue the four walks to the floor.  Again take A moment to fit the pieces together before you glue them.  You may want to secure them with a rubber band as they dry.  There is a second floor to the building which you can just drop in.  This is for skirmish type gaming.  I glue the floor for added strength as I do not bother putting figures into the buildings.  I also glue down the roof but you do not have to.


Lay out the chimney assembly.  I suggest carefully fitting it together before gluing.  Its a little fidgety so take your time.  Same with adjusting the roof around it.  Make sure the glue is dry on the chimney and take your time fitting it together.  When done fit to the house.  You can glue it to the house or not to fit your games.


  Lastly, once together I assembled the extension.  No need to go into the details.  It fits to the main house easily.  once done you have a great little house put together to grace your table top terrain.  Well, actually two houses with this kit!  


Next time I will go into a little about historical home colors in New England in the 17th and 18th century as well as how I have painted these homes.  See you then! 


Hey!  Get your chickens off my lawn!


Update:


The second one house you get in the package us slightly different then the one I built here.  So you get two of the same house types but both are slightly different. More value for the money. Well done!


Saturday, February 20, 2021

Building the Salem Meeting House kit


  Most meeting houses in New England in the 17th and 18th century were plain, box like structures.   They were practical and not for show.  Some, like the one on Lexington Green were almost barn like.  Too many wargame churches look like late 19th century structures and are very wrong for the time period I game.  So I was most excited to get this model for my American Rev War and War of 1812 battles.  Plus I really like the models from "Things from the Basement" and knew this would be a good addition to my collection of buildings. The gentleman who runs Things from the Basement does a outstanding job and make truly outstanding models.  Highly recommend!

  The Salem Meeting House is based on the replica that was built for the movie "Three Sovereigns for Sarah" about the Salem Witch trials.  You can visit it at the Rebecca Nurse house in Danvers Massachusetts.  The site is run by the Danvers Alarm company, a reenactment group portraying a American militia company on April 19, 1775.  They are a excellent group, extremely authentic and very knowledgeable about the period.  They have maintained and managed the Nurse house and its property.  It's worth your time to visit them.

Now,onto the MDF building!


Before starting I lay out all the parts and review the down loadable instructions.  Once familiar with them I start construction.  I use a superglue to put the building together.


I start by putting together the windows and doors.  


Simple but clever.  I think that these add period charm to the building and give it personality.  They go together very easily.


Next, after fitting the walls together to get a good fit I glue them together and put a rubber band around them to hold them tight while the glue dried.  


I finish the entry way and glue the windows and doors into placce.


Next the roof is put together.  The rafters requires careful fitting and patience.  But once dine tit fits very nicely in place.  If you ate going to use it with figures inside in skirmish games do not glue the roof onto the building.


Once put together the meeting house looks great and I am sure will fit on my table rather nicely.  To give a scale of the building I have put a Fife and Drum miniature in front.  Next up I will be painting the building using the actual structure as a guide.

 Most 17th and 18th century buildings in New England were not painted.  Instead they were stained.  Windows and trim may have been painted and they usually show up in period illustrations as a light color.  This is a rule of thumb and of course there are exceptions.  For my buildings I was looking for a stained look much like I did with the William Smith house.  I included the two photos if the actual house at the top of the post to show how the stain looks at different times of the year and in different light.


I started out with the citidal stain.  I put a couple of light stains over the building.  for the roof I mixed in a little black paint to give it a darker shade.  Later I lightly sanded a few spots on the walls to show weathering.   Next I highlighted the roof shingles with a little gray.  I mixed a darker shade to give some contrast to the shingles.  Then the windows and trip also with gray.  Not too much.  


  And there you have it.  A New England type meeting house that goes together nicely, is fun to build and will look great on your table top.  Fir thise of you tgat woykd like more details "Things from the Basement" sells shingles for the roofs that will give great details and improve the model.  They also make furniture to fill your house if so desired.  but for me I am very happy with how the house turned out.  I am sure it will look great on my table.

Highly recommend!


Friday, February 19, 2021

Review of US Soldier vs British Soldier War of 1812


I received the Kindle edition of this Osprey series book.  There is not much out there on the North American War of 1812 in wargame circles. So when something comes out it is met with great rejoicing.  I saw this originally on the Osprey publishing website and pre ordered it right away.  I then spent the morning reading, and rereading it.  As someone who has limited dollars to spend on his hobby I have to say I was most happy with the book and think it well worth adding it to your library.


First off, what the book is not.  It is not a uniform guide.  It is not a history of the war.  There are other better books for those subjects.  Nor is it about the various Militia, Volunteer or Fencibels regiments.   

What it is is a comparison if the United States Regular soldier and his British counterpart.  It details their training, organization and background.  It goes into the drill manuals and how regiments formed up for battle.  There is some information about uniforms but just basics.  And there are three workman like accounts comparing the two armies at three major actions:  Queenstown Heights 1812, Chrysler's Farm 1813 and Chippewa 1814.  


The heart of the book is how the US regular army grew and developed during the war.  At the start the regular army was often the poor step child compared to the state militia.  Officers were often political appointed and ignorant of their duties.  There was no solid non commissioned ranks to train and maintain discipline and to be an example like in the British army.  Drill manuals?  Take your pick! Because there was no standard it was each regiment on its own.  As the war progress the incompetents are weeded out and a solid officer and non commissioned officer corp evolves.  A group of talented and dedicated officers rose to command positions.  The difference between the army at Queenstown and Chippewa was as light is to darkness.  


The book is not biased or one sided.  The British regular was a professional who maintained that reputation throughout the war.  The US regular evolved and developed throughout the war.  So yes, there is much more about him in the text and how this development came about.  Again the book is a comparison of the two regular soldiers from the start of the war to the end.  I think it is important to understand this before you buy the book.    I enjoyed it very much and found lots of good food for thought and lessons for my wargames armies.  


Wednesday, February 10, 2021

Things From the Basement MDF buildings


Captain William Smith House by Things from the Basement.

There are three really nice buildings just released by "Things From the Basement."  These were from a kickstarter program for a King Philip's War card game called "Devil in the Wilderness.". The kickstarter must have been successful since the buildings are now available to the public.  These are perfect for American Rev War and I am sure will see service with my War of 1812.  Please note that all pictures of these buildings are from the website of Things from the Basement.  

Salem meeting House

First off there is a very nice Salem Meeting House.  most models of churches out there are very 19th century.  Thus INE is much better and captures the box like meeting house I was familiar with in New England during  the 17th and 18th century.  An example of this is the Meeting house on Lexington green in the Amos Doolittle engraving of the battle on April 19, 1775.  Thus one would not be out of place in my Lundy's Lane battle either.

Two very nice houses

Side view of houses

Then there are two New England type buildings with extra extensions for the back.  You can building them with the extension so they are traditional salt box type homes or without.  So with very little effort you can get four different looking homes for your table top.  


Extensions to buildings

Extensions added to houses to create salt box 


I have bought the Captain William Smith house and it has graced A number of games here on my blog. They are very easy to build and are very economical.  You can also buy things roof shingles to improve the appearance if you wish.  And much more is out there if you are inclined.


Here is the link to the website for the buildings:

https://www.thingsfromthebasement.com/store/c45/Historic_American_Buildings.html


 I am ordering these houses as a early birthday present for my self so please stay tuned in March for once I have them built.  Thank you Earl for bringing these to my attention!

Sunday, February 7, 2021

"US Soldier vs British Soldier War of 1812"


 I had missed this new book from Osprey in their elite series.   Thank you to the  "Flintlock and Tomahawk" site for bringing this book to my attention.  

"US Soldier vs British Soldier War of 1812" by Greg Adams and illustrated by Johnny Shumate. It's schedule release is 23 Fenbruary 2021 and will be available in both paperback and Kindle editions. From the pre publication post in the Osprey website it looks to be very interesting and well researched. It will feature three battles (Queenston Heights, 13 October 1812; Crysler's Farm 11 November 1813 and Chippewa 5 July 1814) and traces the growth and development of the United States regular army. From the information available I am most excited about it and have pre ordered the Kindle edition. If its as good as I think it will be I will then order the paperback edition too.  So if nothing else Osprey has already made a sale on this book!


(Illustrations here are from the Osprey blog page)

For more information about this publications check out the Osprey Blog with an interview with the author here:


ospreypublishing.com/blog/US_Soldier_vs_British_Soldier


And the Amazon page for the book here:


www.amazon.com/US-Soldier-British-1812-Combat/dp/1472841670/ref=mp_s_a_1_3?dchild=1&keywords=US+Soldier+vs+British+Soldier&qid=1612552344&sr=8-3


Wednesday, February 3, 2021

West Ford village 1814


I enjoyed the American Revolution battle problem so much,  I cleared the table off of troops and brought my War of 1812 collection out.  This should illustrate that the game can be fought out in any horse and musket period battle.  This time the Americans are on the attack and the British/Canadian forces defending.


General Rial needed to hold the enemy for seven turns and withdraw his army to fight another day.   Cautiously, he placed his regular infantry (41st, 49th and 100th Regiments and the Lincoln and York militia) back from the front, his guns forward and the native Indians in the woods opposed to the north ford and bridge.  Once the enemy had started to cross he would move his infantry forward.  Two regiments (100th and 49th) were  to defend the south ford while the militia defended the north ford and bridge.  In reserve he placed a troop of militia cavalry and the 41st Regiment.


General Brown commanded two Infantry Brigades.  Scott's Brigade of the 9th, 11th US 22nd & 25th US Infantry and  Ripley's Brigade of the 1st, 5th, 21st, 23rd US Infantry. The 1st US Rifle Regiment, three batteries of artillery and a troop of the New York State militia Dragoons rounded out his army.  Rather then attempt an out flanking move he determined to bull through across the bridge and both fords.  Scott would take his Brigade and cross at the lower ford while Ripley's brigade crossed at bridge.  The Rifles, with the 5th US would move through the woods and cross at the northern ford.  With overwhelming numbers and better troops (two of Scott's regiments were rated elite)  they would capture the town and drive off the enemy easily.


Turns 1 & 2:

The Americans were surprised to find the woods covering the north ford undefended.  The Rifles quickly moved through the woods to take position at the ford.  More slowly the 5th US infantry with General Ripley followed. (Note: Skirmishes move full movement rate through woods while troops in formation move at half rate and get a DP each turn moving) Brown himself took the 1st US infantry across the bridge and deployed into line.  The 21st US followed but both battalions found themselves under fire from Artillery and Indians to their flank. 


  Scott marched his Brigade forward and got two battalions (22nd and 25th US) across.  But they too quickly came under musket and artillery fire.  Worse, Scott was lightly wounded while steady his troops. (He lost 2 Command points) An unforseen occurrence was the movement of the infantry massed the artillery fire and the American guns stood useless!


Turns 3 & 4:

With part of there infantry across the southern ford and bridge the American commaners quickly tried to dress ranks and remove the DP's which were rapidly growing. (Notes: you can remove a DP by a commander spending Command points and also by halting for a turn)

 The Rifles crossed the and spread out to protect the 5th as they crossed. At this point the British plan came into action.  In the center cannister  and musket fire disordered the 1st US (5 DP's).  Here and at the north ford the militia charged the disordered troops in front.  Although normally the militia would be handily defeated by the regulars he to the DP's the militia defeated both the 1st US infantry and 1st US Rifles.  Routing backwards the regulars disordered the regiments behind them and the front line came to a halt.


The 100rd and 49th charged Scott's regiments which were in terrible shape. (Note:  5DP' s on one regiment and four on the other)  The 25th US was destroyed in the fight with the 100rd and the 49th continued their fight with the 22nd US next turn.  Scott, already wounded took yet another wound and was escorted off the field.  


At this point, with the entire front falling apart Brown ordered his regiments to pull back.  The surprised British and Canadians cheered and fired a salute.  Their victory was totally unexpected.

Conclusion:

I like the changes to the rules.  They clear up (to my mind) the confusion and provide a fast fun game.  One point to remember is once you start to accumulate Disorder points things get out of hand.  One or two are not bad but after three they seriously effect your Regiment.  You subtract one dice per DP when firing and subtract two per each DP in close combat.  After five DP you start removing stands of figures.  This is what happened to the American side.  Their front line regiments could not remove DP's fast enough and the enemy charged into regiments with four or more DP's.  

I think if I fight this again I need to get another table to give myself a bigger battlefield!  Also,  by attempting to out flank the enemy up the road to the south you spread out the defender and make it harder for him to concentrate his forces against you.  Just compare the last game to this one on who had the better plan.