Friday, August 14, 2020

Battle of Blastoffski Bridge 1854


Russian commander massed his infantry and guns together and marched to cross the river South of the bridge and church.  He hoped to use his faster speed (marching in column) to get to the river and cross it and then close with the British infantry.  He unlimber his guns as quickly as he could to get them into play and cause some damage to the enemy infantry.   He sent his cavalry north of the bridge and hoped to cause mischief there.


The British formed line with his infantry and advanced forward in a most stately manner.  His Royal Horse Artillery took the high ground to get into a good firing position while the Light Cavalry Brigade protected their exposed flank.


Once the Russian infantry reached the river they came under fire from the superior range of the British infantry. Casualties were light but both forward battalions suffered a couple morale chips.  (The morale rules are simple but deadly.  For every morale chip you subtract one  each from every dice thrown.  Since dice are used for movement and firing this can have a cumulative effect.) 


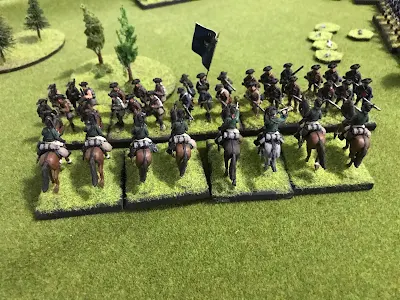
The Russian cavalry quickly crossed the river and charged their enemy.  The Hussars tangled with the Light Brigade (who counter charged) while the Uhlans took on the guns and quickly over ran them!  The Light Brigade routed the Hussars and sent them flying.


Seeing the disaster to his flank the British brigadier turned the 23rd to cover his exposed flank.  He then spent two command points to fire twice at the Russian columns in front of him to cause as much damage as he could. (Each unit has some many command points in the game.  Each turn that unit can spend a CP to do an extra action.  Once you spend a CP it is gone).  


As the Russians closed with the British line they took one more volley before close quarters fighting.  The British easily saw them off due to the morale chips they had acquired.  As they retreated they blocked the guns so the British infantry was given a break.  With a single battalion left the Russian commander turned to his cavalry who were being chased off the field by the Light Brigade.  With no hope of victory he shrugged his shoulders and thought how best to compose his report and try and salvage something from the disaster.


If you liked this action and are curious about the rules used here is a link to my explanation of how the Rules work.  They are a fun set of rules which capture the flavor of the period and provide a fun and fast game.

https://bravefusiliers.blogspot.com/2019/11/rules-i-use-for-wargaming-crimean-war.html


It was great fun to bring out my Crimean Armies.  These are my oldest miniatures and I have a great sentimental attachment to both the armies and the period.  So, I will be planning on a couple more games in the Crimean War period soon.


Thursday, August 13, 2020

Return to the Crimean War


I return to the classic wargamer battle, but this time transport it to the Crimean War 1854.  The two sides are once again  looking to capture a vital bridge.

Rules used were "Charge of the Light Brigade " by David Rayburn.  A very clever set of rules which has always given me a fun enjoyable game.  The miniatures Wargame Foundry 25mm.  Here is a description of the rules and how I play them:
https://bravefusiliers.blogspot.com/2019/11/rules-i-use-for-wargaming-crimean-war.html


The photo above will give a good visual of the battlefield.  The British set up on the (viewers) left and Russians on the right.  The church blocks site only.  You can cross the river along most of its length except one foot in either side of the bridge.  


British Order of Battle:
Light Division: 1st Brigade.
7th Royal Fusiliers
23rd Royal Welch Fusiliers
33rd Regiment of Foot
Light Cavalry Brigade
"C" troop Royal Horse Artillery battery


Russian Order of Battle:
1st Brigade/16th Division
31st Vladimir Musketeer Regiment
(4 battalions)
Heavy artillery Battery
11th Kiev Hussars
Combined Uhlan Regiment


Tuesday, August 11, 2020

"Regimental Standards of William Health's Brigade of Continental Foot, 1776"


  One of the joys of the lifting of restrictions during this time of sickness is the reopening of libraries.  Once again I can pester the inter library loan desk to look up unusual books for me or get me long forgotten articles.  At present I am doing research on regimental colors of the Continental line during the American Revolution.  In a series of postings I will be posting some of my finds here.  I hope this spreading of information will be If service I my fellow Rev War gamers and buffs.


The information is from the Massachusetts Historical Society who have the William Heath papers.  This concerns his brigade in April/May 1776 and provides some interesting information concerning facing colors and standards for the Continental line regiments in his brigade.

 "Two standards for each regiment and four colours to each regiment for the Grand Divisions, the First Standard to be the Union throughout.  The Second to be the colour of the facings of the regiment with the following motto.

  7th Regiment Col. Wm. Prescott, red, white field, black thorn bush, flesh coloured hand extended to pluck it up, motto: "He that touches one shall prick his fingers."

 16th Regiment Col. Paul Dudley Sargent, red, white field.

18th Regiment Col. Edmund Phinney, black (crossed out) buff.

24th Regiment Col. John Greaton, buff, red field, white thorn bush, flesh coloured hand extended to pluck it, motto: the same as the 7th Regiment.

26th Regiment Loami Baldwin Colonel, straw color. "

So, what might this flag have looked like?  I have used this image of one of the Gostelowe flags as an example.  The center device is very similar to that description turn The 7th and 24th Regiments.  This flag, and others from the Gostelowe flag series are available from" League of Augusberg" at a very reasonable price. These are highly useful and very colorful.  I have used a number of them in my 1776 regiments.

https://www.leagueofaugsburg.com/shop/products-subcat-37.html


Bibliography:

Zlatich, Marko. " Regimental Standards of William Heath's Brigade of Continental Foot, 1776"

Military Collector and Historian, 33 (Winter 1981), pp. 174-175.

Also:

Papers of William Heath

Vol. 6 folio 245

Massachusetts Historical Society.

Friday, August 7, 2020

Fighting Hobkirk's Hill


General Greene by the Maryland brigade.

General Nathaniel Greene and the Maryland brigade view the battlefield.

Starting position for the game.  Turn #1

The game starts with the American main line deployed along ridge and skirmishers out front.  Artillery, Militia and Rifles are covered and appear in turn three (the British were historically unaware of their present). Because the Americans were surprised by the British attack they cannot move untill turn three, except for the Light troops who must delay the British advance.  


The light troops or both sides skirmish with the British side getting the worst of it.  Finally, turn three the American Artillery and militia appear.  The Virginia Brigade moves to flank the British advance supported by the militia and rifles.  Colonel William Washington brings his dragoons off the ridge to flank the enemy and the American artillery opens fire.  The light troops of both sides clear off for the line troops to take over.


On the American left flank Colonel Washington leads his dragoons in a impetuous charge against the 63rd Regiment of Foot.


The steady infantry hold their ground and the dragoons take casualties....


And go back from the direction they came from!

 The Maryland and Virginia light companies move up in the background to cover the flank if the Maryland Brigade.


On the American right flank the Virginia Brigade moves up to engage the loyalists.  The North Carolina rifles face to get in position to cause some long range damage. (Note: the small markets behind the regiments are disorganization points.  These represent temporary disorganization.  They can be removed by generals or by rallying in place).

 
The South Carolina Royalists move up to support the NYV.

Captain Coffin brings his loyalist dragoons over to add his support.


The Virginia Brigade and Loyalists continue to blaze away at each other.  


Charging home the Loyalist dragoons rout the rifles....

...and send them racing back to safety.


Lord Rawdon advanced the King's American Regiment and the Volunteers of Ireland against the Maryland line.


The 63rd rallied in place assisted by The brigadier.  (Note the D point markets by the regiment.  For each one you subtract a dice for shooting and get  -2 in close combat.  Once you get 5 P points you start to loose stands if figures.  So it is important to taken the time and remove them occasionally).


At this point, in a all or nothing move Greene ordered the Maryland Brigade off the ridge and they charged the surprised enemy.  it was regiment against regiment on the left flank.  But with both sides in good shape it was a stand off with both sides taking a casualty and a D point and locked in battle for another turn.  It looked like both sides were going to grind each other down.


On the other flank it was the same situation except both sides were shooting each other to pieces.


But in the edges of the fighting things were different.  Captain Coffin charged the advancing North Carolina militia.  They got off a ineffective volley before the dragoons crashed into them and sent them routing back.


The 63rd, having rallied now advanced to sweep the Light infantry in front of the off the field.

Add caption


With both his flanks open and the possibility of the enemy rolling up his forces Greene decided discretion the better part of valor and called the game.  He hoped after withdrawal he could met up with Lee's Legion and the various partisan commanders to continue the campaign.  Rawdon at this pointless just pleased he had driven his opponent from the field.  Tomorrow would be another day.

Summary:
I enjoyed this game very much.  I think the loss of the American dragoons so early in the game hurt the American player.  I also enjoyed the rules which I had not played for a long while.  They work very well solo and provide a fast game.  I had forgotten close combat can be a grind fest if neither side goes into them with any advantage.  In addition training grade is very important.  A better regiment will run over lesser quality regiments (see Coffin's dragoons!).  I look forward to playing this again.


Setting the Stage


The Battle of Hobkirk 's Hill (April 1781) was an unusual afair.  Although outnumbered Lord Rawdon led a scratch force of mostly American Loyalist regiments out of Camden to attack a larger American Army under General Nathaniel Greene.  Although surprised Greene quickly counterattack and almost pulled off a double development.  But as the 1st Maryland fell apart while maneuvering the American army retreated and left the field to Lord Rawdon.  Inspite of this victory Rawdon was forced to evacuate Camden.  Thus Greene continued to lose battles but still fought a successful campaign.

I felt this would be a good battle to fight on the table top.  I already had most of Greene's army. Having always wanted to add a loyalist brigade this was the perfect opportunity.  Numbers were reasonable and each side had a good chance for victory.  In addition both sides had the possibility of reinforcements arriving which could  create a different fight.  I have kept the historical order of battle but have increased the size of each unit while keeping the ratio of forces historical. The Americans still outnumber Rawdon's army.   This is for the appearance of the game.  I dislike tiny regiments on my table top.  


So I am off and running refighting this fascinating battle.  Here are the order of battle for the table top.  For the battlefield I am using the illustration from the interpretive wayside at the battlefield.  It gives a simple look at the ground which translates well to the table.  And there will be specific rules and guidelines for the battle.  Enjoy!


American Order of Battle:
General Nathaniel Greene commanding
Reserve:
Continental Artillery  (2 x 6#'s)
North Carolina Militia battalion (30)
North Carolina Rifle men  (12)
Washington's Dragoons (10)

Main Line:
Maryland Brigade: Col. Otho Williams
1st Maryland. (30)
2nd Maryland. (30)

Virginia Brigade: Col. Isaac Huger
1st Virginia. (30)
2nd Virginia  (30)

Skirmishers Line: Capt. Kirkwood
Delaware Light Infantry company (18)
Maryland & Virginia light infantry companies (18)

Possible Reinforcements:
Americans roll to see if Lee's Legion and Marion's Militia Brigade will join them.


British Order of Battle
Lord Rawdon commanding
Main line: Lt.Col. Campbell
Rifles and volunteer light infantry  (18)
63rd Regiment of Foot (30)
King's American Regiment (30)
New York Volunteers  (30)

Reserve: Major Campbell
Royal Artillery (6#)
Coffin's Dragoons (8)
South Carolina Royalists (30)
Volunteers of Ireland (30)


Possible Reinforcements:
British roll to see if 64th Regiment, Provincial Light Infantry and Royal Artillery join them.


Scenario Rules:
1 -  American set up.  Maryland and Virginia continental line set upon edge of ridge facing British side.  North Carolina militia and rifles and continental artillery set up behind them and are not unmasked untill the third turn.

American skirmishers set up at double musket range in front of American line.  

British enter game at corner of table.  
2 -  Turn 1 only American Skirmish Line may move.  
3 - American Artillery may unmask on turn 3 or later (unless British come within 12" and can see them)
4 - American Main Line Infantry Regiments (Continental infantry and dragoons) can move on turn 3.  5 -  N.C. Militia and Riflemen cannot move until end of turn 3 (hidden).

6 - Roll D6 at start of game for possible reinforcements.  On a 1or 2 reinforcements will arrive.  Roll second time for game turn they will arrive.  Reinforcements always enter table on owning sides base line.

Rules used will be Loose Files and American Scramble.  One house rule I use is one side can fire first but move second while the other moves first but fired second.  In this game Americans always fire first and British move first.  All units cannot move into close range (4" ) unless they declare a charge first.