Monday, May 9, 2022

Wake up! FIghting Stoney Creek


Set up:   The American encampment was behind a long ridge line.   In addition a shallow creek was in front of the ridge. A rail fence was along the ridge that gave cover to troops behind it.   One regiment was placed in front of the ridge as an advanced guard.  Unfortunately they were asleep.  The rest if the American army was asleep in their encampment areas (marked by rough ground) behind the ridge or in the case of the artillery off to the side of their guns.  Woods covered both flanks.  Once alarmed the Americans will roll to wake the regiments and respond to the attack.  There are six American regiments and two guns.

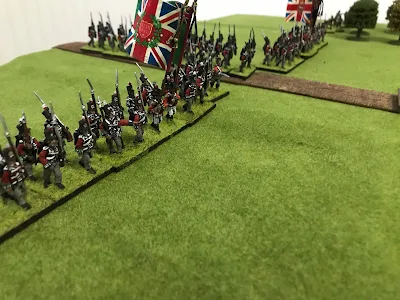
  The attacking British and Natives enter the board and advance towards the American lines.  There are two line regiments, a combined flank battalion and a small warband of native warriors.

Turns 1 & 2:  The Americans roll a "5" so they continue to sleep soundly.  The British advance forward.  On turn 2 they roll a "4" so they continue their rest.


Turns 3 & 4:  the Alarm is sounded!  Americans roll to activate.  Indivual stands more forward towards the danger.  One of the American guns is manned, the other not.  Stands in range fire!  No hits (really poor die rolling here!).  Infantry rolls one dice per stand (or one dice per 2 indians)  with a six a hit.  Artillery roll one dice and half the number rolled rounded down are hits.

The British 8th regiment charges the advanced American Regiment.  The Native warband also attacks.  Since all American stands are not activeated they first test morale with a negative 2 per die roll. The American regiment is soundly defeated and retreats.  (note:  In close combat you roll one dice.  A 1,2 the British withdraw, 5,6 American withdraw otherwise continue.  I then fight another round until one side is beaten).


The combined flank battalion races up the road to engage the American guns.  They take three hits on two stands which withdraw due to poor morale ( if a stand takes a hit through fire it tests morale).


Turns 5 & 6:

More American stands activate and head towards the battle.    They attempt to form a line to drive off the attackers.  There is lots of fire back and firth but very few hits.  (Stands when they are withdrawing check morale.  If they pass they return to the fight.  If not they continue withdrawing but subtract from roll.  This is bad and causes them to rout off board).

Flank battalion captures the two guns!

Turn 7:

The 8th regiment is locked in close combat with an equal number of Americans.  It's a back and forth action with stands withdrawing  and finally the American line breaks. In the center the Flank battalion also drives back the stands in front if it.  

And in the woods the Native warriors chase the enemy from the woods.


Turn 8:   American numbers are starting to tell.  Fresh stands are forming into lines.  The 8th regiment is driven back.  More re American stands move up to engage the 49th and Frank battalion.    At this point the British side decided to start a withdrawal taking the captured cannon with them.  They have blooded the invader and captured their artillery and with few casualties.  The American army has seen the attackers off but now must decide if they should continue the advance through the country.

Conclusion:

I have played this now about four times.  It is always a fast game.  If the Americans can get an early warning it speeds up their activation and gives them more time to bring up stands.  Eventually, as in the historical battle numbers tell and the British withdraw.  But until then its a series of individual actions and you see how much damage they can do. There are a lot of Americans and only half as many British.  But the game dies give a goid feeling for the actual battle and the results are also similar.


   All in all it's a fast fun game and can be changed to almost any time period depending on what figures you have.  Give it a go, you may enjoy it!


Saturday, May 7, 2022

How to fight Stoney Creek: or Thank you Hal and Richard!


  One of the more unusual battles of the North America War of 1812 was Stoney Creek, 6 June 1813. In a daring night attack a British force of about 7-800 men attacked a much larger American forces of 3500.   The fight itself was a confusing affair of not regiments and battle lines  but companies attacking, withdrawing and running away.  Confusion reigned and Captains and NCO's influenced and directed the fight.  But the question I have been asking myself is how to recreate this on the table top?  Clearly the usual set up your miniatures and battle it out will not work.  What I am looking for is less a historical recreation of the battle, but more a fight that gives the feel of it.  I would like confusion and unpredictably.  And, since I am stuck inside to fight it solo.

  I have pondered and thought about it until one day I picked up a old issue of The Midwest Wargamers Association Newsletter or MWAN.  This publication by the great and good Hal Thinglum was a godsend during my early years of wargaming.  It was always chocked full of inspiration and good ideas and what other people were doing.  And in issue #105 was an article, "Going It alone: The Solo Wargamers Corner" by Richard Barbuto.  In it he mapped out how he fought the Battle of San Jacinto in 1835.  Outstanding!  Here was a battle similar to what I was looking for.  Richard lay out his game to include variable times for warning the camp and activating troop.  He also included simple beer and pretzel rules.  What was not to like here.  I was off and running!


  Now this is not a historical recreation.  Its a game to capture the feeling of the battle.  Nor is it a regiment vs regiment battle.  It's companies (stands) vs companies.  Confusion is everywhere.  Some stands fight, some run away.  Armies are mixed up.  The rules used are super simple.  I want a fast and furious game and do not want to bother looking up charts.  Remember what Tuco says in The Good, The Bad and The Ugly, "When you have to shoot, shoot.  Don't talk!"


The set up:

  My game would be played on my 6" x 5". The American encampment would be in the left side and the British would enter on the right side.  Woods covered both flanks and a small creek was in front it the American lines.  The stream was fordable (move up to the stream and stop.  Next move cross and continue on your way)  but a bridge gives quicker access.  Along the American line were a rail fence which.  One American infantry regiment was placed in front of the stream, and Captain Towsend's battery faced the bridge.  The rest of the American forces (5 infantry regiments) were in their tents behind the lines sleeping peacefully.  Troops stayed in their camp until a alarm was sounded to wake them up.  The British forces (2 infantry regiments, A combined flank company battalion and a small group of warriors under John Norton). Entered the table 12" from the American lines.  


Wake Up!  How I play the game:


Turn sequence is

Americans roll for alarm

American stands activated can move or fire

British can roll to charge

British move or fire 


The British enter 12" from the American lines.  The first turn of the game the American roll a d6.  If its a 1 or 2 the sentries spot the British and sound the alarm.  If not, the British continue their advance. The second turn they roll a d6 and a 1, 2 or 3 sounds the alarm.  The third turn the alarm is sounded automatically.

  Once the alarm is sounded each American Regiment  rolls to see how many companies (stands) are activated.  A 1 or 2 is one stand , A 3-6 is two stands.  Once a stand is activated it can move or it can fire.  All unactivated stands remain in the encampment area.  The artillery rolls a d6 and is activated on a 1,2 or 3.  Again, once activated that stand can move or it can fire.  Stands in the encampment area act like sleepy teenagers and do nothing.  If contacted they roll for morale with a -2 per roll for each stand.


 What if the British want to charge and possibly contact some if the sleepy American stands before they are aware?  During the first two moves each stand in a regiment rolls a d6.  On a 1,2 move 6";  on a 3,4 move 7" and on a 5,6 move 8".  You are breaking order but I think this captures the wild charge.


 All stands can either move or fire.  If they contact a enemy stand they are locked into close combat.  To shoot roll d6 and hit on a 6.  Musket range is 12".  A stand can fire as long a it has figures alive.  Once all figures are dead remove the stand.   Stand in close combat roll a d6.  On a 1,2 the British stand withdraws one move.  On a 5,6 the American stand withdraws.  Anything else continue the fight next turn.  If two or more stands attack a single stand the defender withdraws on a 1,2 and anything else continues the fight.


Once a turn a stand that takes a casualty or withdrawals from a fight has to check morale.  In addition any American stand shot at by a native warrior has to check morale.  Each stand on my checks once per turn after the first cause.  To check roll a d6.  Americans on a 1 rout off table, on a 2 withdraw one move and on a 3-6  no effect.  British withdraw on a 1 and no effect otherwise.  Note!  If a stand gets a withdrawal two turns in a roll that stand routs off the board.  Any American stand not activated and still in its encampment area that us contacted by a British stand checks morale with a -2 to the roll.  If it survived it activates.


Next Time playing the game!


Wednesday, May 4, 2022

Painting again


  I have been trying, off and on  to paint.  With very little luck.  My hand eye coordination is off nd and my brush huts my hand more then it does the miniature.  Still, I have carried on and tried a little bit every other day

  Still, at the end of a month's work I have finished painting these French chassaurs for Luazun's Legion.  I still have to do the command figures and a couple more infantry but I am very excited I got these done.    

On to the hussars next?

Monday, May 2, 2022

Testing the Rules


 I set up a small game to test out my rules I posted about.  Two units per side, with Pilgrim units walking into an ambush. I wanted to test out the rules and see how they work.  So the actual set up was less important to me then seeing how the rules worked. I am looking for a simple but fast moving game.   

Wampanoag Indians units:

Chanonchet commands one unit of warriors armed with muskets.  Deployed in fields north of road.

Mudawamp commands one unit of warriors armed with muskets deployed in woods by road.

Settlers units:

Captain Winslow's company is first unit in column of militia and is armed with muskets.

Captain Atwood's company of volunteers are armed with muskets.  They are just crossing bridge when ambush sprung.


  Turn 1:

Indians  roll for 1 operation

Pilgrims roll for 2 operations.  They also rolled high so go first in turn.


  Captain Winslow' company changes firmation and deployed to right and left of road.  They fire at groups opposite of them. (this takes two operations) Chanonchet's warriors take four hits and Chanochet is killed! (group is in massed in open so easy target.  After casualties roll d10 and a 10 equals leader killed)  Mudawump's group in woods take one hit.  Window's command's muskets are now unloaded.  Atwood's company deployed into skirmish line behind ridge to support Winslow.  

  Wampanough's check morale.   Chanochet's warband fails morale and routs.  Philip attempts to rally them.  Mugawump fires at column in road and hits five settlers.  Winslow's command tests morale and routs back.  (To test morale must roll d10 and add subtract modifiers.)

Turn 2.

 Both sides roll a 1 for operations and each has only 1 operation this turn.  The Wampanoag goes first.

 The late Chonchet's warband Rallies from rout, but us still disordered.  Mugawump's warband turn to face enemy to their right.

Atwood's command moves to top of ridge while Winslow's rally in place.


Turn 3

Wampanoag rolls 6 and gets 3 operations each this turn.


Chonchet's warband rallies, and charges Winslow's company on the ridge.  Winslow is unloaded so cannot fire.  Defeated in melees rout back.

Mugawump's warband fires at Atwood's company on the ridge and kills six figures.  Atwood's return fire kills four.  Atwood's company failed their morale test and routs!

Turn 4

Pilgrims race for the bridge.  I could have continued the game and combined the two companies.  But having my gotten a good sense of the rules, I decided to end game.


Conclusion:

Rules did what I wanted them to.  A quick game with a good feeling for period. The rules worked well and play moved along at a quick clip.  I learned not to be in formation  in open when being shot at! I enjoyed them and looking forward to playing soon.  But first, time out for a War of 1812 game up next.


Sunday, May 1, 2022

King Philip's War rules


I have been playing around with the rules I use for my King Philips War games.  I am looking for a simple set of rules which gives a flavor if the period.  Most English settlers were poorly  trained militia.  The better trained Rangers were few and came about late in the war.  I call them volunteers to distinguish from militia.  Indians were not supermen.  If charged they tended to retreat and charged if it was to their advantage.  In addition because they tended to avoid heavy casualties their morale was brittle.  

  I recently found a set of rules by Richard Barbuto on the  The Lone Warrior site which looked good.  After a few modifications on my part I will be giving them a try.

  If interested in them here is a link to the original set called   " From Bunker Hill to New Orleans. "

https://lonewarriorswa.com/complete-rule-sets


 Of course I will be writing up a game using them soon.


Fighting King Philip

Organization:

All units of 8 - 12 figures.  One figure in unit is A leader. All figures are individually mounted.

Each side gets 1 group leader or commander.


Formations:

Line: two ranks base to base.

Column: two figures wide three or more ranks deep. Only first two ranks can fire.

Skirmish Order: single line of figures all touching.

Open Order: single or two ranks.  All figure spaces one figure apart.  All can fire

Mass:  group of figures as wide as deep.  Only two ranks can fire.


Sequence of play:

Turns are UGIO.  Roll dice for which side goes first.

Next roll D6 for each unit for side movin.  This gives # operations for all units that turn.

Indians: 1,2=1 / 3,4=2  /5,6= 3

Militia: 1-3= 1 / 4,5= 2 / 6=3

Volunteers: 1,2=1/ 3-5= 2/ 6=3

Operations:

Move/change formation/change facing

Rally or reform

Load/ Fire


Movement:

Volunteer = 10" column/ 6" line/ 8" open order/ 10" skirmish order

Militia = 10" column/ 6" line/ 8" open order/ 10" skirmish or mass.

Indians= 12" skirmish order/ 10" mass


Terrain:

Roads:  add 50% to move if start on road in column.

Hills: All movement up hill except in skirmish order is halved.

Open Woods: deduct 50% movement unless in skirmish

Thick woods:  deduct 50% all movement.

Spotting in woods:  stationary units spotted at 8"/ moving units or units that fired at 12". Cannot fire at target unless you can see them.


Fire Combat:

All firing is straight ahead. Routed or disordered units cannot fire unless rallied and reformed which takes two operations. 

Target classes:

A: Formed Troops in open

B: Formed in woods/ skirmish in open

C: Formed in Thick woods/skirmish in woods

D: Skirmish in Thick woods/behind fence, breast work, low wall, etc...

E. Garrison house or Fort.


Roll D10 per figure firing.  Match range to target and must roll that number or less to hit.

Firer.     Range.    A.   B.   C.   D.   E.

Militia    8".            5.   4.    3.    2.    1

Volunteer 8".          5.    4.    4.   3.    2

Indian.     8".           5.    4.      3.  2.    1

Bow.          4".          6".    5.     4.    3.  2

 For each hit roll D10.  On a roll of 10 unit leader is killed.  


Charge:

Declare charge.  Must be able to move to within 2" of target.  Charging unit must be in good morale to charge. Note after melee charger is disordered.

Defender may fire if loaded, charged from front and passed morale check.  Attacker checks morale if hit.

If charged home line up figures in formation they were in.  May double up figures.  Never more then 2 vs 1.


Roll D10 per figure fighting.  Add subtract modifiers.  

Modifiers:

Superior Leader with unit   +2

Defending class D.  +2

Defending class E.  +3

Additional figure fighting   +2

Non Indian charging.  +1

Indian in skirmish formation charging  +1

Indian in mass formation charging. +2

Figure disordered  -1

Attacked from rear or side. -2

Note: in 2 vs 1 only one figure fights and gets +2.  Second figure cannot be killed or withdraw but fights second round melee if survived.

Results:

In the case of two figures meleeing with a single figure.  Only one of the two figures rolls and it gets the +2 bonus.  That second figure does not roll, nor can it be killed or forced to withdraw.  It is not a casualty (but would withdraw if the unit lost the morale check described below.)


If a figure’s die roll is twice that of his opponent, then the opponent is killed.

If a figure’s die roll is greater than his opponent’s, but not double, then the opponent withdraws one skirmish move, facing the winner.

If scores are equal, both figures maintain position for the moment.

When all the figures in contact have rolled, count up casualties for both sides (dead and retreats).

The side with the most casualties has lost.

Compare the number of casualties of both sides and apply the morale check results to the losing unit.  e.g. if the winning unit had 3 casualties and the losing unit had 5, the difference is 2.  The losing unit withdraws two skirmish moves (the surviving figures of the unit remain together.)  The unit is disordered but faces its opponent


Morale:

Check morale if takes casualties, charged or charging.

Roll D10 to check must equal if lower to pass.

Volunteers 8

Militia 6

Indians in cover 8

Indians in open 6


Modifiers:

No leader  -1

Each 2 casualties that turn -1

Disordered -1

Less then half strength -1

Charged in flank or rear -2

Indians charged  -2

Higher level leader attached +1

In class D cover +1

In class E cover +2

Indians charging skirmishers. +1

Indians charging flank or rear +2


If fail check;

By 1 or 2:  withdraw # operations that turn by skirmish move rate.  Face enemy.  Disordered.  Takes one operation to reform.

By 3 or 4:  withdraw # operations skirmish move rate.  Back to enemy. Routed.  Takes one operation to rally and one operation to reform.  Two operations total.

By 5 or 6: withdraw # operations at skirmish move rate.  Back to enemy.  Permanent lost one morale level for rest of game.  Routed.  Takes one operation to rally and one operation to reform.  Two operations total.