Wednesday, September 22, 2021

Impudent Mortal Buildings Are Back!


  Back in 2019 I bought my first MDF buildings.  These were from a company with an unusual name called Impudent Mortal.  They were easy to put together and looked very good.  My table terrain instantly looked better.  I bought a set of buildings including a Georgian Manor house, a Grist  Mill and a covered bridge.  I wanted to buy more buildings but sad to say the owner of the company died and the company was closed.  


  Well all that has now changed.  The company is back in business.  There is a Facebook site and a Esty site you can order buildings from.  This is great!

  The buildings are very nice and priced right;  very affordable.  Compared to other MDF buildings these are slightly larger.  What Ed on the Fife and Drum miniature forum calls "heroic scale."  In the picture above the Imputant Mortal building is on the right and a building by Things From the Basement on the left.


If you are interested in ordering any of these buildings their Esty site here:

https://www.etsy.com/shop/ImpudentMortal1


Tuesday, September 14, 2021

Test game The Sword and The Warclub

  To test out the rules I set up a small game that I played out solo.  It was more to familiarize myself with the rules which I have not played in along time. I hope to iron out the kinks before playing with a actual  opponents.  Again, I plan on using the rules pretty much straight out of the box with a few variables I mentioned last post.


 A small company of  colonial militia are tasked with escorting a supply wagon to a garrison house.  The company had ten figures and there is another ten figure company within the house.  They cannot leave the house until they hear gunfire.  The company is marching up the road with five figures in front and five figures behind the wagon.


Set up in the woods to both sides of the woods are three Native Warrior bands of ten figures each.  They will not reveal themselves until the firing phase.


The wagon and its escort move up the road unaware of the danger.  Although there is the spotting rule I have cut back the distance to half. They then roll a D6 and spot the enemy on a 4-5-6.   This is due historically the colonial inability to find a ambush force before it found them!


  The first two cards drawn in the firing phase are red!  musket fire from the woods hit three figures who are wounded.  When a black card is drawn the return fire hits one warrior. I am using the charts from the rules as is.  Egyptian infantry for colonist militia and the Pathan chart for native warriors. I am not worried too much about ranges.  

  Next turn the wagon and its escort race up the road. They use a charge move.  For the game I will take stragglers for a charge move to an object or to simulate a run.  When charging  opponent for close combat I don't worry about it.   The militia from the house move out to support the wagon. The two warrior bands move forward also.

At the start of the firing phase the third warrior band revels itself and its fire kills the leader of the wagon train escort.  But fire from the militia from the house kills or wounds wounds half of the band (good die rolling!)   


 In the moral phase both the wagon train escort and third  warriors band fail their morale. The warriors retreats towards the ridge while the militia abandoned the wagon and race for the house.   Because they failed moral I have them abandon the wagon (which is now immobile)  and flee to the house.  Again, because they failed moral they do not stop to carry the wounded.  Its every man for himself. 

Out numbered the militia from the garrison house fall back behind the stone wall in front of the house.  The other two bands if warriors more closer.  Both groups have a long range shoot out with no casualties but lots of smoke (Note, both groups are under cover).  At this point some of the warriors charge towards the wagon.  The wounded are killed and the wagon is set on fire (roll a D6 with a 5-6 start fire).   Satisfied with the results they leave the field to head home and celebrate their victory.


Conclusion:

The rules came through and delivered a fun game.  It struck the right balance between a skirmish and big battle game which was something I was looking for.  Although the ranges for weapons might appear extreme I think they work within the terrain and size of my table.  Its hard to hit a figure within cover.  A future problem could be with the reduced size units.  A twenty figure unit can take more casualties then a ten figure unit.  But until I build bigger units these work fine.


On game balance I think both sides have their advantages and disadvantages.  Both have similar weapons and similar results for firing.  But the colonists have slightly better moral while the warriors can more quickly through the terrain.  Its harder for the colonists to detect a ambush due to the spotting rules.  With the addition of Christian Indians added to a colonial militia company that will change.  Historically later in the war this is what happened and it was a new ball game.  


I am most happy with the results and plan on using  these rules for further battles. And comments or suggestions are welcome as thus will be a work in progress.


Thursday, September 2, 2021

The Sword and War Club


  In searching for a set of rules to play my King Philips War games with I have decided to try out a old favorite; "The Sword and the Flame."  Although written for 19th Century Colonial battles it has been adapted for many other conflicts throughout the ages.  It is also a fun game to play and a set of rules most people I game with are familiar with.  In the past I have had a number of very fun and most memorable games.  The French intervention into Mexico game where I killed "El Guapo" (and made Larry Brom fall off his chair laughing)  comes to mind. But that is another story for another day as they say.


  I am not planning in doing a lot of  reversions;  more of a "vanilla" version where Colonists use the Egyptian charts and Native Warriors use the Pathan charts.  Due to lack of figures I will be using commands of 10, 12 and 15 figures per unit for infantry.  Mix them up in the same game to add variety.  Each unit gets only one leader. A special or elite unit might get two but that will be unusual.

  The Colonists will use the Egyptian charts.  The Natives use the Pathan chart.  Ranges are as is. Both sides used flint lock muskets.  Match locks went out very very quickly with the colonists and the natives never liked them.  So both sides have the same  "technology. " 

  Formations are loose Skirmishers lines and massed groups.  Colonists were know to occasionally form line for volley ( but not very often) and some occasions  a back to back or circle rather then square.  But those were desperate affairs.  

  I am not worried about using stragglers for charging,  but am using it if using a charge move to get to a location quickly. Not everyone can keep up!   Carrying away the wounded is requiring a lot of thought.  From my reading it might not be required.  There was a lot of " there but for the grace of God goes I" and days later we recovered and buried the bodies.   At the retreat after The Turner's Fall Fight the main body of Colonists knowing left the rear guard, the commander saying each man for himself.  But we will see.

The colonies secret weapon were the Christian or Praying Indians.  They were excellent at scouting and preventing an ambush.  I have not read of any difference in their fighting abilities;  So I am thinking of using  them as scouts.  They will be attached to a command but operate independently and can only be hit with a special card (king, queen joker).   this way they can find and warn about an ambush before it happens.

Another unusual unit will be Colonists cavalry.  They appeared to be mounted Infantry.  So rude to the battlefield and dismount to fight.  But there were a few (very few) mounted cavalry charges.  

That's its for now.  More after a couple play tests.  I will post A solo game soon to show how it plays.

And, as always feedback is appreciated and looked wanted.

Tuesday, August 31, 2021

"Sickle's Salent" part 2


  When we last left off, the Confederate division of the late general Hood had taken the wheat field.  A Brigade had failed to take Little Round Top.  A second division was poised to assault the Third Corps center by the Peach Orchard.


  Confederate General  Rhodes ( taking over for Hood) continued to push into the wheat field.  Brushing aside the brigades to his front he ran into the newly arriving division of General Ayers' division.  Although he hit the lead brigade before it could deploy into line with his Georgians his brigades luck ran out and he was defeated and forced to fall back.  The Texan brigade was caught in a withering fire from four batteries and also retired.  The division commander called for help but there was none to give.


Hood's old division was spent.


In the center Law's division moved forward.  They pushed the Union brigades aside and took the Peach Orchard.  For a while it looked like they would link up with Hood's division.


In the north west corner of the board Wilcox's brigade moved forward.  But they made no progress and the Union line held firm and sent then packing.

On the south east corner of the field the Union reinforced Little Round Too.  With two brigades and two batteries it was a solid position. The Alabama Brigade decided not to try to take it and retired into the woods.


we are feeling very brave today!


In the center Law's division kept moving forward.  But with no support to its right or left flanks it dud not look goid.  Caldwell's union division moved up to hold them while other union forces moved to cut off their retreat.


At thus point, with the Union army looking to overwhelm the southerners we called the game.  It looked at this point to be a decisive Union victory.  They had recovered the positions they had lost earlier and destroyed two Confederates divisions.  It now looked like, with additional reinforcements that they would sweep the field.  Rather then being A disaster, Sickel's Silent proved to be a decisive Union victory.


This was a great game, and played out over two Mondays.  Its nice to be able to leave the table up and continue the game.  Personally I think thus us A hard nut to crack for the South.  The continued reinforced Union line will eventually wear down and defeat the smaller number if southern brigades.  If the Union can hold Little Round Top they also have a good anchor to hold the line.


By the way, wewill be taking next Monday off due to the labor day holiday but he back with a naval game on Monday 13 September.  See you then!


Sunday, August 29, 2021

"Sickle's Salent" part 1


I have not had time to write up the last Monday Morning Gaming groups battle and now we are getting ready to finish the game.  But we left the Rev War and returned to the Civil War with our next Fire and Fury game;  "Sickle's Salent."

On the second day of Gettysburg Sickle took his corps and marched them out of place, across the wheat field  into what he felt was a superior position.  This not only disrupted the Union line but put him in a terrible position via the oncoming Confederate attack.  We take up the fight just as Hood is launching his attack.


Overview of the game table.
Hood's division is at top right of picture.


The game starts with two turns of artillery bombardment.
Hood was killed during the first round!

The Texas and Georgia brigades attacking in the wheat field.


And capture the position.


Longstreet prepared to attack in the center.

Vincent's Brigade dig in on Little Round Top.


They hold the hill against a Brigade assault.

The Confederate brigade regrouped for another try later.


 As it stood at the end of turn 4 the Alabamians were driving off Little round top by Vincents Brigade ( 20th Maine Included).  The wheat field has been attacked and a determined defense is forming. The Peach Orchard is in jeopardy of being over run and Barksdale Mississippians are getting ready to enter the fray. All and all it looks like a great set up for this coming Mondays continuation of the battle on Monday August 28.

Thursday, August 19, 2021

Fighting Benny at The Cowpens


After the Friday night club game John had enjoyed the rules so much he asked if I could put on a American Revolution game for our Monday morning get togethers.  We both thought it would be a nice change from the usual Fire and Fury Civil War games.  So I volunteered to put on The Battle of Cowpens. 

  Cowpens is one of the more interesting actions fought during  the  American Revolution.  General Daniel Morgan with a mismatched command won one of the most decisive battles of the war.  He understood how his opponent Banastre Tarleton fought and designed his battle plan for him.  He understood the various strengths and weakness of each of his troop types (rifles, Continental line regulars and militia) and set them to maximize their strengths and off set their weaknesses.


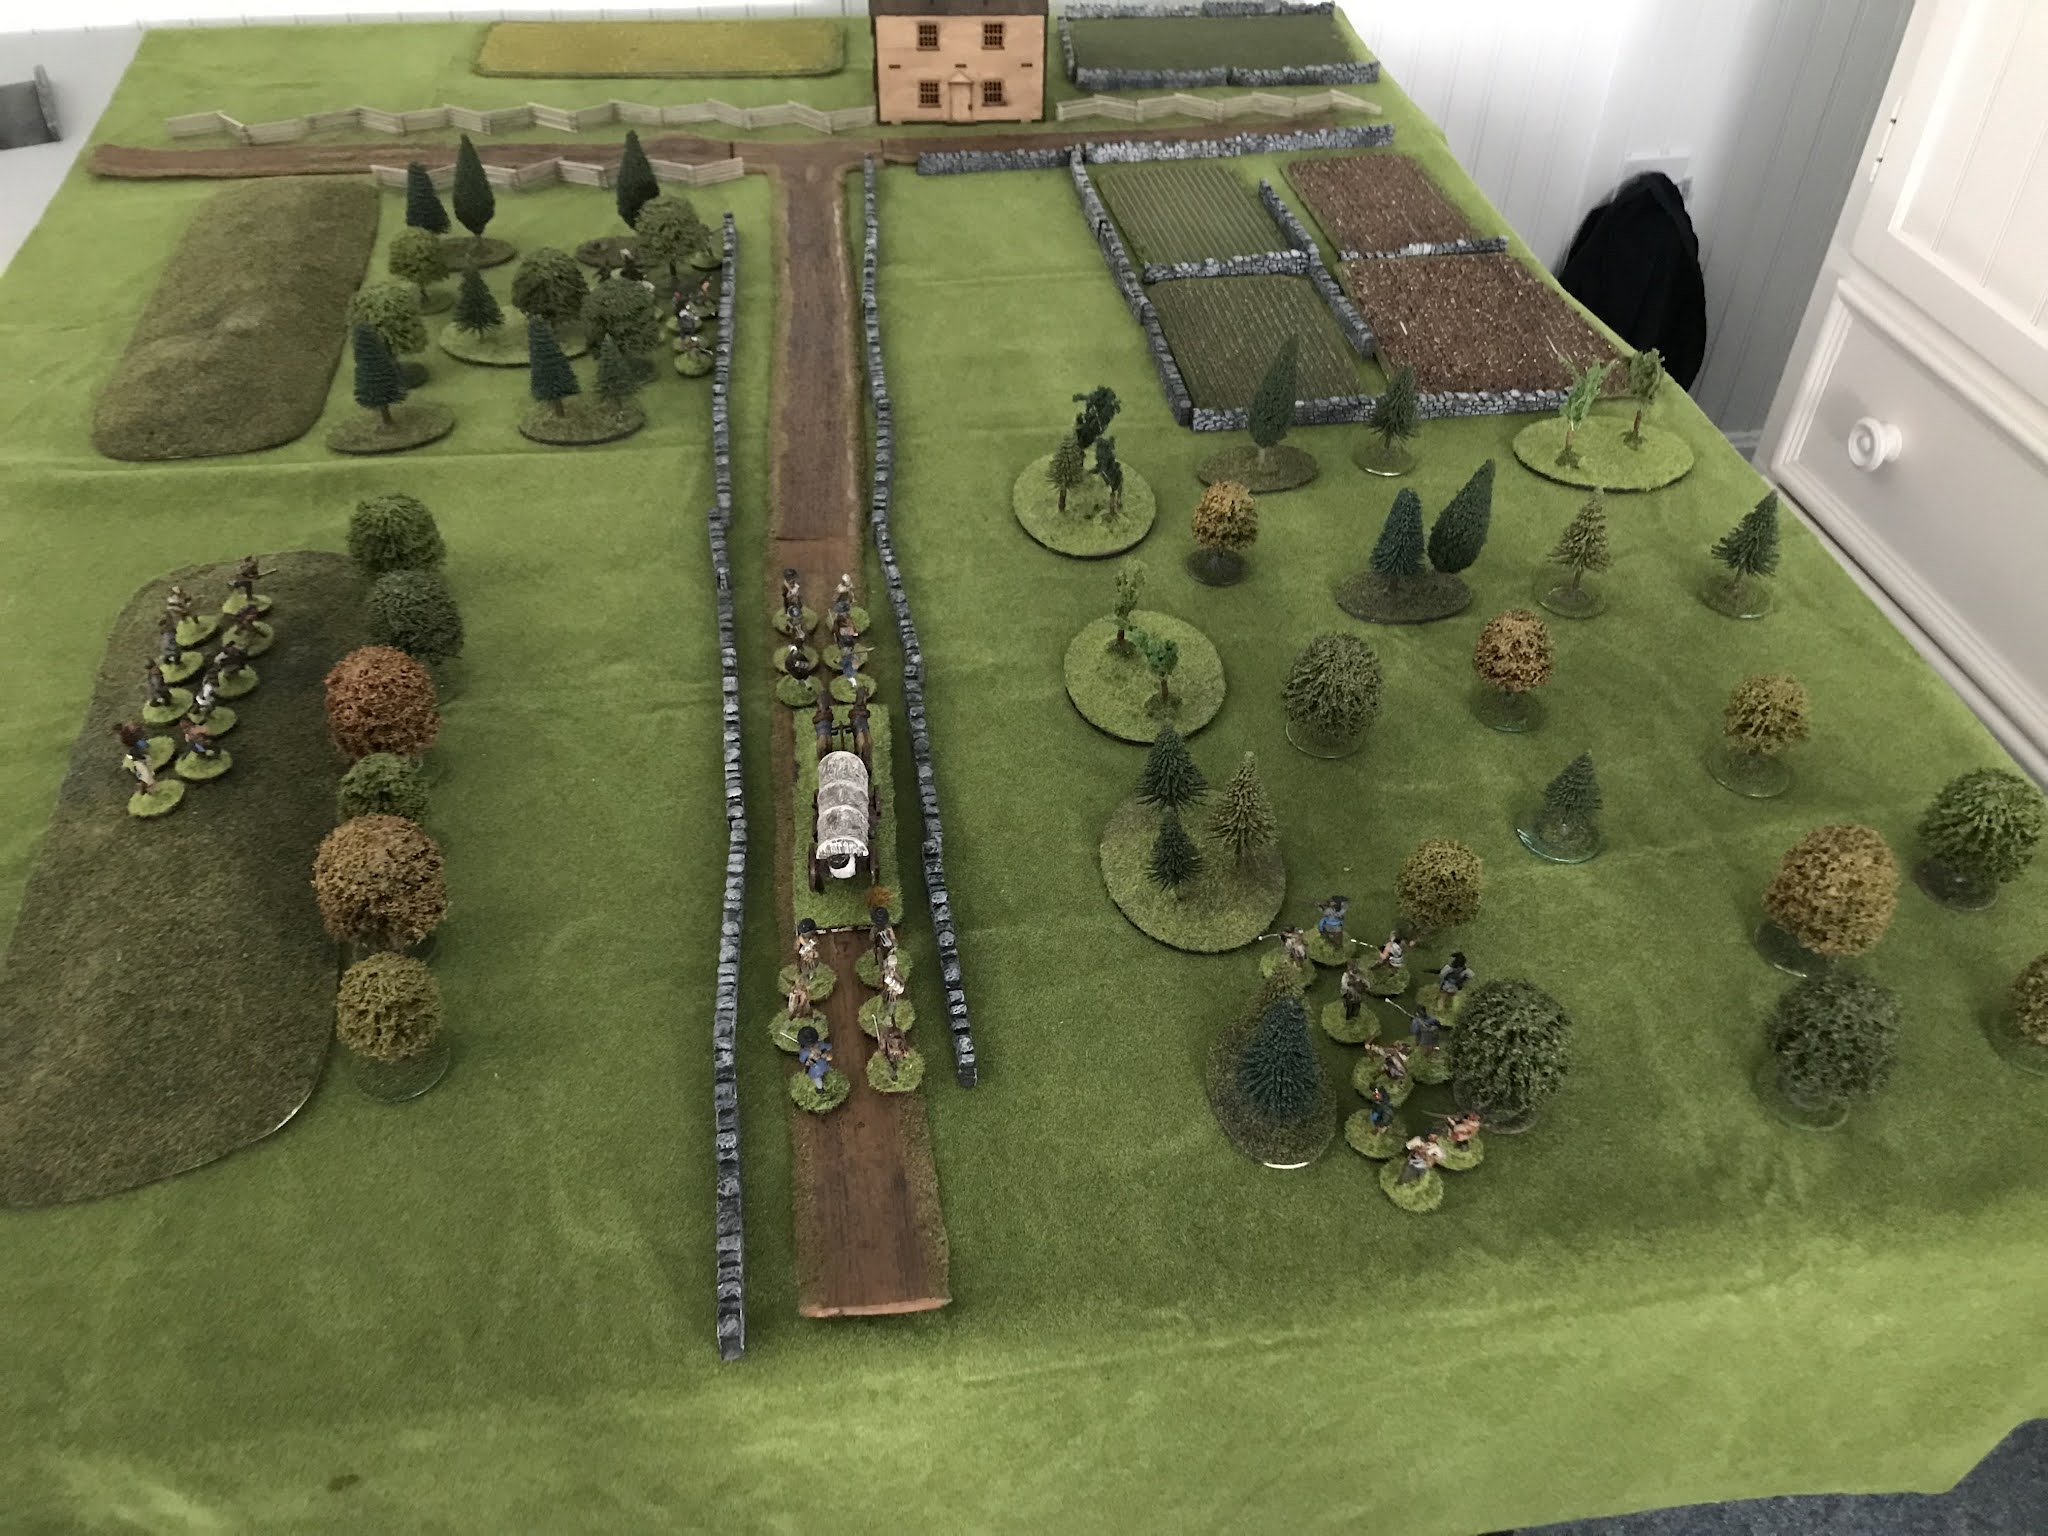
In fighting I will used  the historical order of battle at a 1:10 scale.  The rules used are "Whites of Their Eyes" by Steve Haller.  I limited the game to 12 turns to force the British to rush into the fight as historically they did.  The battlefield was very slight rolling ground.  There were scattered trees, mostly pines but they did not effect the fighting.  


The Americans are set up with the cavalry hidden in a swale along one edge of the field.  The American main line of Continental line troops is 15 inches from them.  A line of two militia regiments are 10 inches in front of them with another line of rifles 10 inches in front if them.  The plan was for each line to cause casualties before falling back. 


A hidden advantage of the game is the American command structure.  Morgan is the commander, assisted by Howard who commands the Continentals and Pickens who commands the Militia.  The British have only Tarleton.  This will effect starting troops and assisting with close combat and rallying routed troops.  So it will be a difficult battle for the British to win.

The British will enter the board in two lines.  The first is made up of the 7th Regiment, Royal Artillery (3 pounder), British Legion Infantry and Light Infantry battalion.  A troop of the Legion Cavalry and 17th Light Dragoons protect each flank.   


The reserve was the Dragoons of the British Legion and the 1/71st Highlanders.

The British must attack and destroy the enemy as quickly as possible.


The British main line advances steadily but the American rifle men fire, cause some casualties and fall back.  Although casualties are not heavy they are adding up.  The Royal Artillery concentrates on the militia up on the hill with long range fire.

In these rules Skirmishers can use a split move.  They can move part of their movement rate, fire and move the remainder.  This tactic kept them away from the enemy while still causing casualties.


The rifles swung to both sides of the militia line.  On the British left flank the commander orders the troop of Legion Dragoons to ride down the rifles.  Although they do so, heavy fire from the militia on the hill wipes them out!

  The 7th regiment decimated by rifle and musket fire fails morale and retired of the board.  The 1/71st Highlanders move up to take their place.  The South Carolina militia line holds steady and continues to fire at the enemy.

The Continental line says, aren't you guys supposed to fall back and let us do the fighting?


On the American left flank Tarleton orders the Region dragoons to charge and roll up the militia line.  As they wade through A swampy stream waiting for them is Lt. Col. William Washington with mounted militia and Continental dragoons.


For the next three turns A wild cavalry meele ensures.  First one squdroon of Legion dragoons are defeated.  A second squadron throws back the Continental dragoons.  Washington rallies them and back they go.  Finally the British cavalry break and retreats off the board!  

With his cavalry , the 7th and light infantry gone now Tarleton calls on the 1/71st to save the day.  But the commander of the 71st tells Tarleton perhaps it is time to retreat and save what he can.  While they may push through the militia there are too many. Continental waiting for them and cavalry ready to fall into their flanks.  Tarleton reluctantly orders a retreat.


Once again we had a fun and fast moving game with these rules.  By the third move of the game all players were running their troops with little help.  Although simple they give a good feel for the period.


This one us a hard battle for the British to win.  There are no sub commanders so Tarleton is kept busy trying to rally or encourage his troops.  The Americans have lots of extra commanders to do this.  In addition they have terrain on their side.


That said I was surprised the British just marched forward.  The lights or legion infantry could have gone into Skirmishers formation to deal with the rifles.  In addition throwing small groups if cavalry at bigger objects didn't b work well.  Oh well perhaps next time.

----------

If you are untetested in refighting Cowpens here is the order of battle I used.

Cowpens Order of Battle


Morgan's Light Division

Cavalry Brigade: Lt. Col.Wm Washington

Continental Light Dragons (8)

McCall's Militia Horse (6)


Continental Brigade: Col. Howard

Maryland-Delaware Light bn. 30)

VA. State Troops (12)

Tripplett's VA. Rifles (12).


Militia Brigade: Pickens

1st Spartan SC militia. (24)

2nd Spartan SC militia (24) 

(Hays Little River Militia Divided between the two militia regiments)

McDowell's Rifles. (12) 

Cunningham's Rifles (12)


Tarleton's Flying Column

Lt. Col. Tarleton commanding

17th LD troop (4)

British Legion Troop (4)

Royal Artillery 3pounder

British Legion Infantry (20)

British Light Infantry (16)

7th Fusiliers (18)

1/71st Highlanders (30)

British Legion  Dragoons (20)  

(Light bn made up of light companies 71st regiment, and companies from the 16th Regiment and Prince of Wales American Regiment. A most unusual unit indeed!)