Tuesday, July 11, 2023

Next project is the Battle of Lundy's Lane 25 July 1814


  Aly Morrison wrote in the comments on my last post, "Are you going to play Lundy's Lane next...?"  To quote Lt. Colonel Miller, " I'll try sir."

  This is a battle that has fascinated me for a very late by time.  It was the largest and bloodiest battle fought in Canada during the war.  I have walked what is left of the actual field. My library had numerous papers , articles and books about it.   But I have not as yet fought it on my table top. 


   Probably because it was a such a confusing affair.  Confusing from its order of battle, and because the major fighting occurred in the dark.   And how does one portray Winfield Scott standing his brigade under artillery fire for an hour wasting his ammunition during at artillery over four hundred yards away?  This is going to take some work on my part and advice from you.  What I am trying here for is not a simulation of the fight down to every little detail.  But a game based on the battle that will give you the flavor of the action. 


  Reading material and more:

If your interested in reading about the battle I highly recommend these two books,:

Donald E. Graves.  The Battle of Lundy's Lane: On the Niagara in 1814. (reprinted in paperback under a new title :  Where Right and Glory Lead! The Battle of Lundy's Lane, 1814)

And

Richard Feltoe.  A Crucible of Fire: The Battle of Lundy's Lane, July 25, 1814 (Upper Canada Preserved ― War of 1812)


  There are two very good book on the battle which I highly recommended.  Both are outstanding and go a long way to unravel the mysteries of the controversial battle. 

  Donald E. Graves is the dean of scholars on battles in Canada during the War of 1812.  His scholarship is first class and his books all must have.  Unfortunately his book is out of print and sometimes difficult to obtain.  

  Richard Feltoe's book is less well known then Graves' book but is equally well done.  In addition it has a large number of maps which makes following the battle much more easier.   I used thus book on my battlefield walk for Lundy's lane and it was if great help.  In addition there is a Kindle version of the book available for those who must have it right away.


Terrain and topography:


  The battlefield included a very large steep hill, woods, a small grave yard and fence lined roads.  There were a couple very small buildings but they played no part in the fight.  Here are two detailed maps of the battle for those who wish to get every little detail correct.


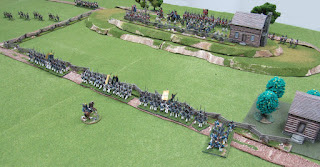
 On the other hand here is a very nice wargame table set up of the battle.  This comes from Forrest Harris of Knuckleduster miniatures and is the setup for his version of the battle.  I personally like it a lot and will be striving for something like this.  Almost all of my miniatures by the way are by knuckleduster miniatures.  They are excellent and Forrest is a true gentleman to work with.


Time and Darkness:


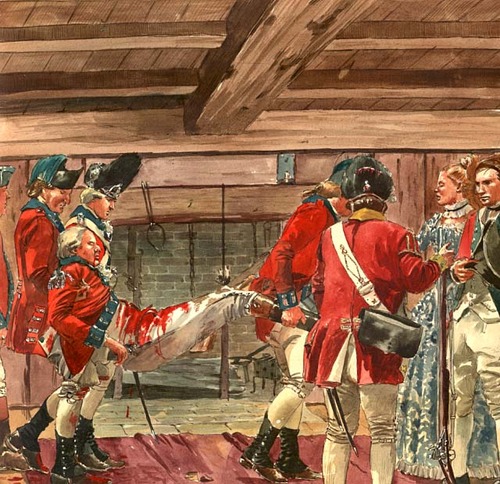
  The battle lasted for six hours.  It started about 6:00 PM and ended a little after midnight.   During that time Scott held his Brigade under artillery fire for an hour,  reinforcements arrived, and darkness obscured the action.  Regiments got lost and other regiments blundered into each others.  Sadly there were numerous examples of friendly fire.  Oh!  And Winfield Scott returned to the battle and marched what was left of his Brigade between both sides in the dark.  And yes, both sides fired on them.  Scott was badly wounded ( IMHO it was one of his own men who did it) and left the field while his brigade was destroyed.


  So, how to portray on the table gradual darkness?    How many inches away in the dark should you be able to see?  If short range for muskets is say 4" what is visibility? I was thinking for muskets in the dark no matter how close you are use long range to simulate the effect of darkness.  Regiments missed their way and got lost or blundered into each other. How to portray that!  And if course friendly fire because it did happen.  I am looking for advice here and how others have tackled these problems in their games.


Conclusion:

These are my thoughts and I am looking forward to hearing your advice.  I will be posting my order of battles soon to give you an idea of the armies involved.


Wednesday, July 5, 2023

"Those are regulars, by God!"


  Today is the anniversary of the Battle of  Chippewa on 5 July 1814.  This was the battle which sparked my interest in the War of 1812 when we visited the battlefield in 1985 (and again in 2018).   Although minor in terms of numbers the battle is important in the rebuilding of the American army during the War of 1812.  General Winfield Scott's trained brigade is able to stand toe to toe with British regulars.  The brigades gray jackets becomes the stuff of legend in the history of the American regular army.


  To me its one of the perfect battles to fight on the table top.   It has simple terrain, balanced and equal units and colorful uniforms.  British regulars in red coats, gray jacketed Americans regulars, volunteers in mixed dress and native Indians.  You would have a most difficult time finding a more perfect battle to fight in miniature.


  For this battle I used the maps out of Richard Feltoe's book, "Tides of War."  I concentrate the area in the center between the two fence lines for my table.  To fit the battlefield on a six foot by five foot table I divided the field in half to represent the plain and the woods.  Fences outlined the woods and defined the roads.  This way I could place trees in the wooded area but players could move the trees to not interfere with troop movement.   I did not include either river.  Instead both sides had to enter the table on the road in road column. The British/Canadian forces enter at top if map while Americans enter from bottom of map.  


  Light troops for both sides were already deployed in the woods.  Historically I should have had the players in the woods fight for three or more turns before the regulars entered the table.  But I did not  want players just hanging around doing nothing       ( no fun there).  So for the first couple turns players commanding the regulars entered the table and deployed while the light troops fought it out in the woods.  Rules used for the game were Steve Haller's "Whites of their Eyes."


American Order of Battle:

Brig.General W. Scott

9/21st Regiment (24 figures)

11th  regiment. (24 figures)

25th regiment  (24 figures) (elite)

Towson's battery (1 gun)


Brig.General Porter

Pennsylvania Volunteers (24 figures)

Red Jackets  Six Nation Warriors ( 2 x 10 figures each)


British/Canadian forces:

General P. Riall

1st Regiment of Foot. (24 figures)

8th Regiment of Foot. (24 figures)

100th Regiment of Foot. (24 figures)

Royal Artillery. (1 gun)


Lt.Col. Thomas Pearson

Light companies  (12 figures)

Lincoln Militia. (12 figures)

Norton's warriors. (8 figures)

Western Lakes warriors (10 figures)


The Battle:


 The regulars from both sides marched onto the cleared area (called "the plain" by both sides).  The Infantry in column and deployed into line while the artillery quickly set up and got the range.


  The light troops approached each other in the woods with the native warriors leading both columns.  Red Jacket's Six Nations warriors pushed back their counter parts while the Pennsylvania volunteers made short work of the Lincoln militia.


  Captain John Norton rallied his native warriors and returned to the fight.  More importantly the combined British light infantry companies (1st, 8th and 100th) under Lt.Col. Pearson entered the fight.  Attacking the Pennsylvania volunteers they routed them and killed General Porter.


  On the plain while this was going on General Scott deployed his Brigade with Captain Towson's Artillery on his right flank.  General Riall with slightly less room deployed the 1st and 100th in line with the 8th in reserve.  The Royal Artillery  under Captain Armstrong also deployed along the road.  But as his infantry advanced they blocked his field of fire.


  Once there was enough room the 8th Regiment moved into line with the other regiments.  Scott moved the 25th US Infantry up to face them with the 9th/11th US Infantry opposite the 1st Regiment and the 22nd US Infantry opposite the 100th Regiment.  During this time both sides artillery continued a long range fire in the advancing infantry causing very few casualties.


  For the next two moves the both sides exchanged musket and artillery fire.  All regiments stood firm in spite of casualties.

  Hoping to break the deadlock, Scott ordered the 25th US Infantry to charge the 8th Regiment.  In the melee that followed the 8th (having suffered heavy casualties already) fell back and then failed its morale test.


  With his line out flanked Riall quickly ordered his artillery to limber up and retire while his infantry grimly fell back.  Although Pearson in the woods had finally driven off the enemy warriors he was too late to help the regulars.  


 Conclusion:

 A fun little game which  mirrored the historical battle.   I think if the British/Canadian lights in the woods could have returned sooner they might have effected the main battle.  As it was I was surprised how easily the British light infantry drove off their enemies;  especially the militia.  For the British/Canadian commander it takes some time to bring his regulars into line which lets the American get a few extra hits on him.


 All in all the rules worked very well.  I usually use these for my Rev War games but with some slight modification worked well here.  With rules in think its important to have a set you play regularly so you know and understand  them.  Changing rule sets at the drop of a hat is not my thing and effects the game negatively.


  Thank you for staying with me on this.  If any of you try this game out I would like to hear about it.  I will be putting g thus game on again at the end of the month for my club. Lets see if history gets changed then.


Tuesday, July 4, 2023

Independence Day


  Spending a quiet day today.  Weather is rainy but starting to clear up finally after A week of this.  Later this evening going out to a minor league baseball game followed by a fireworks display.  Certainly cannot get more American then that!


  As 5 July is the anniversary of the Battle of Chippewa I got my War of 1812 figures out for a game.  This is the battle that got me interested in the period and most of my figures are painted for this battle and Lundy's Lane.  


Here is some some eye candy from the game and much more about it tomorrow.  Stay tuned please.

Monday, July 3, 2023

Battle of Chippewa July 5, 1814


   July 5  is the 209th anniversary of the Battle of Chippewa.  Although minor in terms of numbers the Battle is important in the rebuilding of the American army during the War of 1812.  General Winfield Scott 's highly trained brigade is able to stand toe to toe with British regulars.  The brigades gray jackets becomes the stuff of legend in the history of the American regular army.  


  Back in 1985 as part of our honeymoon Janine and I traveled around the Niagara Falls area.  Our visiting the battlefields of Chippewa, Lundy's Lane, Forts George and Niagara was the start of a life long fascination with not only the War of 1812 but especially with the Niagara campaign of 1814. It was also the start of my interest in wargaming this campaign.


  The battle today is remembered by a number of units of the US Army.   The old  25th Infantry was later combined with the 27th, 29th and 37th Infantry Regiments to form the present day 6th Infantry Regiment. The 6th Infantry's motto is "Regulars, by God" from General Riall's remark about the American regulars during the battle.  A number of present day units of the United States Army trace their lineage to this battle and Scott's brigade.  The 25th US Infantry was later combined with the 27th, 29th and 37th Infantry Regiments to form the 6th Infantry Regiment. The 6th Infantry's motto is "Regulars, by God" from General Riall's remark about the American regulars during the battle.  Ten active regular infantry battalions of the United States Army (1-2 Inf, 2-2 Inf, 1-3 Inf, 2-3 Inf, 4-3 Inf, 1-5 Inf, 2-5 Inf, 1-6 Inf, 2-6 Inf and 4-6 Inf) perpetuate the lineages of American infantry regiments (the old 9th, 11th, 19th, 21st, 22nd and 23rd Infantry Regiments) that fought at the Battle of Chippawa.


  The Corps of Cadets of the United States Military Academy at West Point wear gray parade uniforms, but the assertion that they were adopted in commemoration of Scott's troops at Chippawa appears to be a legend, possibly started by General Scott himself.  There were a number of reasons given in 1815 for its selection. Gray wool jackets simply wore well and were considerably cheaper than the regulation blue coat.  Also, the Secretary of War disliked Scott and sent gray jackets (usually associated with militia) for his Brigade as an insult.


  The actual battlefield is preserved as the Chippawa Battlefield Park, a unit of the Niagara Parks Commission.  For a tour of the battlefield check this post from my blog: "A Visit to the Chippewa Battlefield";   https://bravefusiliers.blogspot.com/2018/07/visit-to-chippawa-battlefield-chippawa.htm


Lastly, if you are interested in reading about the battle I highly recommend "Red Coats and Grey Jackets" by Donald E. Graves.  Outstanding!


 If you are thinking of building a War of 1812 army this is a perfect place to start.  You can, for a very reasonable amount of money build both sides.  Because of the colorful and varied collection of troops its a great way to start your new army.  It is how I started mine.


Sunday, June 25, 2023

Ensign DeBerniere'sMap of Bunker Hill


Ensign Henry DeBerniere as an officer in the 10th Regiment of Foot in 1775.  An enterprising officer with a talent for map making DeBerniere had undertaken spy missions in 1774 mapping routes out of Boston.  He took part on the 19 April mission to concord to destroy the supplies gathered there.  And he made a series if maps of Boston and the surrounding areas.  One of his best maps is of the Charlestown Peninsula and British troop movements during the Battle of Bunker Hill.


  There are a couple editions of this map on the internet.  This one is from Geography and Map Division Library of Congress ( G3764.B6S3 1775 .B3 Vault) and is an excellent copy.  The details of the map are outstanding and super useful to students if the battle or miniature wargamers wishing to refight the battle historically.


  This enlarged section showed the area where the Howe landed his main force at Moulton's point; sent his light Infantry companies along the beach to turn the American flank and the Grenadier attack against the rail fence.  The numerous fences slowed the British advance, and exposed them to small arms and cannon fire while trying to cross them.  The Royal Artillery could not cross the fields due to these fences so went a round them and got stuck in the wet marshy ground at the base of Breeds hill. The routes if the 5th and 52nd regiments during the third attack are clearly marked.


A close up of the Light Infantry companies on the beach trying toout flank the American position along the rail fence.  This area today is near the present Charlestown High school  and still has a sharp drop which obscure it from the ground.  The order of march for the light bobs are (from left to right) 23rd, 4th, 19th, 52nd, 43rd, 65th, 59th, 47th, 35th, 38th and 5th.


The final assault on the redoubt and breast work on Breeds hill. This is one of the very few maps which show how close Charlestown was to the hill and how snipers there effected earlier attacks.   It also points out the barn which had to be taken before the final attack on the redoubt.  Again fascinating details here like the extra flank companies position with the Marines and 47th regiments.


Thursday, June 22, 2023

National Park Service Art


  If you have visited a National Park Service battlefield you probably stopped and looked at the wayside exhibits.  These are placed on the battlefield and usually have a illustration and text.  What you may not know is the NPS owns a good deal of art work;  much of it commissioned for the park.  These are stored at the Harper's Ferry Service Center in Harper's Ferry West Virginia.  Recently most of the art work has been digital and put on line.  This means you can see the art work and download copies;  for your you own use.  

  They can be found on line.  To get you started here is a link to some Rev War stuff;

npgallery.nps.gov/HFC/SearchResults/d86bb824bf2643e482ed02cc592f0854?page=1&view=grid&sort=default


Militia on first line at Guilford Courthouse.


Webster's Brigade starts the battle of Guilford Courthouse


  It's an interesting mixed bag.  There are old illustrations from past hand books from the 1950-60's.  Lots of early work from a very well known artist.  I also found the old slides from the 1960 slide show at Minute Man NHP!


Lt. Frederick


Monday, June 19, 2023

Breed's Hill battlefield


"Bunker Hill After the Battle"


by Thomas Davies  1775

(New York Public Library)


A fascinating watercolor done by Thomas Davies of the Bunker Hill battlefield done shortly after the battle.   The view is from the base of Breeds hill looking up towards the redoubt and breastwork built and defended by Colonel William Prescott and his Massachusetts soldiers.  This was the area through which the 5th and 52nd Regiments marched to attack in the final assault.  Note the remains of the fences throughout the field which numerous British officers spoke about.  Also the three soldiers in the fore ground wearing cut down coats and cut down cocked hats.