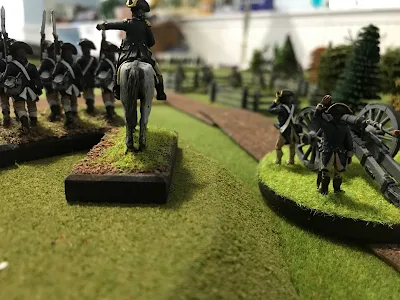
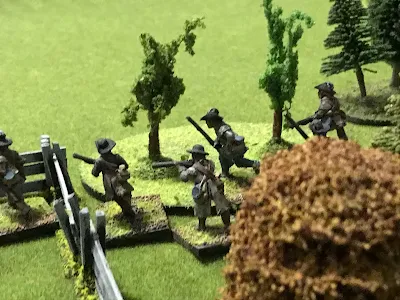
Table top set up at the start of the game. For order of battle and background to the game please see previous post here:
https://bravefusiliers.blogspot.com/2020/10/nostalgia-on-table-top.html
The Americans must hold the bridge as long as possible and inflict heavy casualties on the British. They have placed Porterfield's light infantry (mixed muskets and rifles) on the right flank hidden in the woods. They are supported by the 2nd Maryland battalion and a light artillery battery. The left flank is held by two militia battalions from Virginia and North Carolina. They need to cause casualties to the advancing British and try and delay their attack. They are supported by two Continental line battalions (1st Maryland and 4th Virginia) as well as Lee's legion infantry and dragons.
As the British advance all across the front, there is a cavalry fight by the woods.
The 17th Light Dragons charge the Militia horse who are screening the woods. They defeat the Militia, who retire, fail their morale check and rout.
The Royal Artillery concentrate their fire in the Virginia Militia. In spite of heavy casualties the morale of the militia holds and they stand fast (for now). The British Infantry advances.
The America artillery scored hits on the 33rd which continued it's advance. But the second gun misfired! Tarleton brings his legion dragoons across to threaten the American guns. But Porterfield's Lights, hidden in the woods opened fire on the British cavalry. The British Legion dragons took two hits and had to test their morale. They failed the test, and routed back! (Really bad dice roll on my part!).
The Royal Artillery scored hits on both the Virginia militia and the Continental on the hill. Both groups passed their morale checks and returned fire at the British. Gates ride over and rallied the Militia horse who returned to the woods. Behind the lines the Continental took up a secondary position.
In the woods, the American lights used the split move to advance into range, fire at the British and retire back into the woods. (Light troops may move part of their movement, fire and then move the rest if their movement) This is one part of these rules which captures the flavor of skirmish ing very well.
The American artillery continued to cause casualties to the advancing Red coats. But their morale held and they continued their advance. The Virginia and North Carolina militia continued to hold steady.
On their right the British 33rd and Light Infantry charged the militia. They easily won the fight, and the militia routed when testing their morale. Racing back they passed by the Legion infantry who also failed their morale! Carried back the wave of troops headed for the bridge over Granny Creek! The British lights, having suffered heavy casualties fell back and the 1/71st moved up to replace them.
Gates quickly moved his Continental up to cover the gap caused by the retreating militia and light. He ordered the militia horse and the lights in the woods to hold up the British as long as possible.
In the center the 23rd Royal Welch Fusiliers charged the Continental and gun on the hill. In the fighter that followed the artillery crew routed and the Continental line retired. Captain Edward Bell of the Fusiliers quickly claimed the captured guns. With his center and left in confusion Gates threw in the towel and ordered his Continentals to save themselves. The British Legion Dragoons, having been rallied by Lord Rawdon returned to the fight ready to chase the retreating troops.
Epilogue:
It was a fast and fun game. I liked the terrain and possibly will revisit it for another battle but with different troops. Although I used the set up from the original game should I play again I will allow the Americans to set up as they like. The militia in the open stood little chance against the British.
I enjoyed the rules very much, but I am still learning then. The Artillery firing is great fun as you point to where you are aiming then roll to see where you hit (or misfire!). The split move for the lights really captures the feel of light troops. I highly recommended them.
This was a fun fast game that gave me a lot of fun on a rainy day. I am sure I will be revisiting it again.


Great AAR Mark - chalk one up for the Crown! And for once its not a Pyrrhic victory! I like the sound of the skirmish rules - funnily enough, I remember playing a WW2 game 40+ years ago as a young teenager where we allowed advancing infantry to move quarter move out of cover, fire and then move a quarter move back into covers, so the defenders had no target to shoots at!
ReplyDeleteThank you! Its the little things like that that make certain rule sets so memorable and fun to play.
DeleteGorgeous pictures Mark, what a great looking game...and period!
ReplyDeleteThank you very much, I appreciate it. Most especially from someone who's games are so brilliant.
DeleteThe more I see of your toys the more I’m convinced my decision to go with ‘slight’ 25s is justified. It’s what I’m telling the wife anyway... Loved it when Gates tells the Continentals to save themselves. Did he give the actual Reno order? 😆
ReplyDeleteI am very glad someone got my little joke! I thought it appropriate that Gates would say something like that.
DeleteAgree on the slight 25mm figures.
A really nice little game Mark...
ReplyDeleteIt would suit a number of different periods.
All the best. Aly
It does fit a number of period. I have recently found it is most interesting to fight out battles from one period in another. Working on Adapting Quatre Bras to American Revolution .
DeleteA grand looking battle Mark, your collection is top notch.
ReplyDeleteCheers,
Paul.
Thank you very much Paul!
DeleteA vivid narration and nicely painted figures on a beautiful terrain! What's not to like?
ReplyDeleteThank you. I followed your most excellent battle reporting when I wrote this up.
Delete