Showing posts with label Fife and Drum rules. Show all posts

Tuesday, August 16, 2022

Fire and fall back boys!


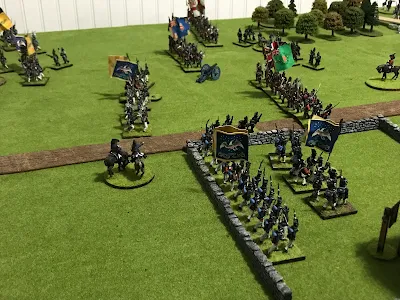
  In the game  an American Brigade must hold up an advancing British column for seven turns.   I based it on the action of Pell's Point in October 1776.  I added plenty of fences and walls and hedges  to break up the landscape and give the defenders cover.  The American commander deployed two regiments on either side of the road behind fences.  The 14th and 26th Continental regiments on the right and the 3rd and 13th Continentals on the left.  The artillery was held back as crossing fences would be an issue (you have to knock them down).  The British entered with a Brigade of three regiments, the 10th, 33rd and 23rd  and a medium artillery gun on the left of the road. On the right were two loyalist regiments, the New York Volunteers (NYV) and the Prince of Wales America Regiment (PoWAR) with a light gun.  The Guards Brigade was held in reserve.


  As the Crown Forces advanced onto the field the Americans waited until they were within musket range.  Once there they fired and immediately fell back towards the next fence line.  In the rules, if you don't move during the movement phase you can use a fire and retire.   Once you fire you turn the unit to face the rear and move back half your movement rate.   So they get to cause some casualties but get out of the way before the enemy can close.  Hopeful, because if the enemy can close you are in a heap of trouble.


  This time it worked.  The Americans fell back to the next line of cover.  The Crown forces kept advancing but did take some  casualties.  Eventually one British Regiment (33rd) did go shaken but quickly recovered.  Once the Americans ran out of positions to retire to it was time for them to leave the field.


  Rather then a exciting game it turned into more of a learning experience in testing out a new wrinkle in the rules. A tactical exercise.   I have long played the Fife and Drum miniature rules (with some modifications) for my War of 1812 games.  They provide a fun and and fast game.  Because they are one page long they are easy to learn and you play the game rather then spend your time looking up rules and interpretation.  For an explanation of his the rules see https://bravefusiliers.blogspot.com/2019/11/rules-i-use-for-wargaming-war-of-1812.html

 They provided an interesting game which reflected many a action during the war.  The Americans were not going to stop the British, but could wear then down and slow them up.  In this way it was a fun learning experience.  The fire and retire rule worked very well.  But of course you need a series of good positions to falk back to each turn.  And that is not always going to happen.  I also got to get my newest regiments onto the field for the first time.  Both the Prince of Wales and the 10th fought well I am glad to say.  


 If you are interested in the period I would highly recommend these rules.


Tuesday, June 28, 2022

Spare your reserves: The Battle for The Farm


Turn 1 & 2


Both sides march onto the table.  

The American 1st Brigade will flank the farm while the 2nd Brigade marches in column towards the farm.  The 1st and 2nd US Rifles will race to secure the farm.

The British brigades march onto the table in column heading towards the farm.


Turn 3:


The American 1st Brigade and British 2nd Brigade both deploy into line.  The 1st US Rifles fire at the advancing redcoats but draw heavy fire on themselves and they retreat shaken.


The 2nd US Rifles charge over the walls into the farm buildings.  They are met by the GLI who they chase out of the enclosure.  


Meanwhile both sides bring up the regulars for the next round of fighting.

(Neither side calls for reinforcements) 


Turn 4:


The Americans 1st Brigade closes with the British 2nd Brigade.  Both sides exchange heavy fire with the 22nd US shaken and the 25th US steady but with heavy casualties.  In the return fire the 8th Regiment of foot is shaken taking both musket cannister . 

 General Morrison, riding up to steady them is shot and killed!


In the farm enclosure the 1US advances over the stone wall but us treated by heavy fire from the 89th Regiment of foot.  


And on the other side of the farm the 21st US marches steadily unto the combined fire of the Royal Artillery and the 1st Regiment of Foot.  The US Artillery dashes to assist but is too late, as are the Rifles.


Turn 5:


The British commander Lord Drummond races over to take command of the 2nd British Brigade.  He feeds some skirmishes into the line to give additional fire power.

The US  1st Brigade is decimated by the heavy fire from the British line.  The 22nd US breaks and rout while the US25 goes shaken as dies the US Artillery.  

On the far side of the farm some US Rifles and Artillery arrive to help but it us too little too late.  The 21US us barley holding on.

The Americans call for reinforcements.  But they will not arrive until turn 8!


Turn 6:


Disaster!  The British 2nd Brigade sweeps the remnants of the US 1st Brigade off the field!  The 25th and  22nd US break and rout while the Artillery is overrun.  The 41st, 49th and 8th Regiments of Foot advance forward!

On the far flank both the 1st Regiment of Foot and the 21st US retreat with broken morale.  But the 100th Regiment of Foot advances to secure the front.

In the farm the 1st US is broken and routs from a hard fight with the 89th Regiment.


At this point the game is called.  Although the Americans hold the farm both flanks are gone and reinforcements will not arrive in time to save the day. I could add up points but why bother rubbing it in.


Conclusion:

  This proved a fun and challenging game.  Although reinforcements could have effected the outcomes they didn't because they would have arrived too late.  The game translated well to another time period.  I cut the number if regiments back due to the smaller size of my table and using 25mm figures.


  In the rules I use each side rolls initiative every turn.  High side decide if they move first and fire second or fire first move second.  This works great for solo play.  I used a d6 roll to see if a side called for reinforcements.  1-3 no, 4-6 yes.  Simple.


 I highly recommend this game.  Its fun and fast and adapted well for other time periods within the Horse and Musket period.  


Thank you my friend for you recommendation!


Thursday, November 21, 2019

Rules I use for Wargaming: War of 1812


Mr Maddison's War:
War of 1812 rules

These rules for gaming the War of 1812 originally started out as a set of rules for The American Revolution by Jim Purkey at Fife and Drum miniatures.  These are offered free on his miniature site.  I liked them, and made a few changes to better reflect the new time period.  In addition I have posted a few clarifications and additions here to how we play the game.  They provide a really fun and fast game. Since playing these rules I have had lots of wonderful games and great fun.  My title for these rules, "Mr Maddison's War meets Fife and Drum" reflects the negative image the war had among many Americans.  In addition I often use these rules for American Revolution games with my friends who do not care for Loose Files.

Please do not be fooled by the simple mechanics of these rules.  They are simple but create lots of deep thinking here.  The "I Go You Go" fire and move system has a major twist.  Casualties are removed when they happen. So it's important who fires first.  But if you move first you may pin your opponent in a unfavorable position or run down exposed units.  As I said a lot of thinking goes I to these rules.

In addition, if you like them here is a beautiful example of how to play by the author.  I really wish more rules writers would do this.  Brilliant!  As the two men from Guinness would say.

http://altefritz.blogspot.com/2017/08/fife-drum-awi-rules-tutorial.html

Now, on to my interpretation.

Here are the rules. A nice one page set ready to go!

Move first, fire second, move second, fire first:  when it is your turn to fire remove all casualties from hits.  No, casualties removed do not get to return fire that was the advantage of firing first.

Retire facing or not facing enemy:  deduct 2" from move to retire with back towards enemy.  Half move to retire facing enemy or move sideways.

Charges or moving into melee:  during your move declare charge and point out target.  Defender tests morale;  if they pass they stand and fire at charger. If not retire a column distance back shaken.  There is no charge move bonus.  Fight one round of melee then side who has lost more figures tests morale.  If they fail they retire one column move back facing the enemy.  If they pass then other side tests morale.  If both sides pass then attacker is considered to have failed to push back defender from their position.  The attacker retire one column move back facing the enemy. 

Routing units effect on other units:  ignore friendly units routing past if router is lower morale.  Take morale test if equal or better morale.

Multiple units in melee:  If two units vs one distribute casualties evenly to both units.

Wheeling regiments:   Wheels are made from the left, right, or center of the unit only.

Fences, small streams:  Units move up to them and stop move.  Next move you cross obstacles and continue your move. If both units are touching the same fence line and facing each other across it neither gets the benefit of the fence.

Artillery:  one operation costs 1/2 move, this included fire.  So you can limber and move half movement;  move full move if limbered; unlimber and fire Artillery cannot enter woods, need infantry to knock hole in fences to cross.  Any friendly unit within a friendly artillery arc of fire, if the arc of fire goes through two opposite sides of that friendly unit the artillery can not fire.  Arch of fire is measured  from cannon barrell, with of stand forward like a bowling alley


Difficult terrain (fields, Rocky ground): cost 2" for every 1" of movement in it

Woods; units stop movement at edge of woods.  They enter next turn (similar to fences).  Once in woods skirmishers troops (skirmishes or Indians)  move their full movement, while formed troops move half their movement.  Small arm range is half.  Only skirmishes get cover modifiers. Yes, it sucks for regulars in the woods (please ask General Braddock).

Indians:  always unformed, in mass formation (I.e. in a bunch).  No penalty to change direction.  In woods move full movement.  Units fired at by Indians for first time check morale.  In open clear terrain go one step down chart for firing and morale (if on line "C" use line "D").  Indians are not shock troops. They race about being obnoxious and scaring volunteers and militia who are not used to them.


Rockets:  roll  d10.
   10 = hit, one casualty and test morale.
6 - 9 = test morale
3 - 5 = miss
     2 =  hit nearest friendly unit test morale