Turn 1 & 2
Both sides march onto the table.
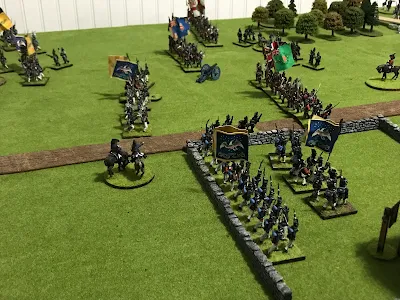
The American 1st Brigade will flank the farm while the 2nd Brigade marches in column towards the farm. The 1st and 2nd US Rifles will race to secure the farm.
The British brigades march onto the table in column heading towards the farm.
Turn 3:
The American 1st Brigade and British 2nd Brigade both deploy into line. The 1st US Rifles fire at the advancing redcoats but draw heavy fire on themselves and they retreat shaken.
The 2nd US Rifles charge over the walls into the farm buildings. They are met by the GLI who they chase out of the enclosure.
Meanwhile both sides bring up the regulars for the next round of fighting.
(Neither side calls for reinforcements)
Turn 4:
The Americans 1st Brigade closes with the British 2nd Brigade. Both sides exchange heavy fire with the 22nd US shaken and the 25th US steady but with heavy casualties. In the return fire the 8th Regiment of foot is shaken taking both musket cannister .
General Morrison, riding up to steady them is shot and killed!
In the farm enclosure the 1US advances over the stone wall but us treated by heavy fire from the 89th Regiment of foot.
And on the other side of the farm the 21st US marches steadily unto the combined fire of the Royal Artillery and the 1st Regiment of Foot. The US Artillery dashes to assist but is too late, as are the Rifles.
Turn 5:
The British commander Lord Drummond races over to take command of the 2nd British Brigade. He feeds some skirmishes into the line to give additional fire power.
The US 1st Brigade is decimated by the heavy fire from the British line. The 22nd US breaks and rout while the US25 goes shaken as dies the US Artillery.
On the far side of the farm some US Rifles and Artillery arrive to help but it us too little too late. The 21US us barley holding on.
The Americans call for reinforcements. But they will not arrive until turn 8!
Turn 6:
Disaster! The British 2nd Brigade sweeps the remnants of the US 1st Brigade off the field! The 25th and 22nd US break and rout while the Artillery is overrun. The 41st, 49th and 8th Regiments of Foot advance forward!
On the far flank both the 1st Regiment of Foot and the 21st US retreat with broken morale. But the 100th Regiment of Foot advances to secure the front.
In the farm the 1st US is broken and routs from a hard fight with the 89th Regiment.
At this point the game is called. Although the Americans hold the farm both flanks are gone and reinforcements will not arrive in time to save the day. I could add up points but why bother rubbing it in.
Conclusion:
This proved a fun and challenging game. Although reinforcements could have effected the outcomes they didn't because they would have arrived too late. The game translated well to another time period. I cut the number if regiments back due to the smaller size of my table and using 25mm figures.
In the rules I use each side rolls initiative every turn. High side decide if they move first and fire second or fire first move second. This works great for solo play. I used a d6 roll to see if a side called for reinforcements. 1-3 no, 4-6 yes. Simple.
I highly recommend this game. Its fun and fast and adapted well for other time periods within the Horse and Musket period.
Thank you my friend for you recommendation!


A good read and an interesting take on the scenario, very enjoyable.
ReplyDeleteDonnie,thank you stopping by and very glad you enjoyed it.
DeleteA great Tabletop Teaser!
ReplyDeleteIt is. I will filing this one away to try again . perhaps the Crimean War?
DeleteThat certainly looked and sounded like a great little game…
ReplyDeleteI will certainly keep that scenario in mind for when I get back to using my wargames table…
All the best. Aly
Very glad you liked it. And I am looking forward to seeing your game!
DeleteGreat stuff there Mark....I have to admit, I was rooting for the Brits...sad to see the 1st Foot (Royal Scots) getting a bloody nose doing their duty but the overall outcome was a triumph for the Crown forces!
ReplyDeleteI was surprised by that myself. I Think it was more due to my poor dice rolling then the regiment's fault.
DeleteSuperb minis and great looking game!
ReplyDeleteThank you
DeleteWhat a joy seeing my scenario being played for another period and still standing! Turned out as a bloody battle, I don't know what would happen if the US had a better luck. For sure, who holds the farm first, doesn't manage to hold it until the end... Such a wonderful table with your beautiful figures! I hope you enjoyed gaming it as much as I enjoyed reading your narration! Cheers!
ReplyDeleteI thank you for sharing this and suggesting I try it out. It was loads of fun and I think could go to either side. I will be playing this again. Not sure how it would go in the American Rev War due to the differences in troop quality. But I think.it would be great fun in the Crimean War!
DeleteThat's a great looking table and the armies are well painted. Thanks for flagging this very interesting scenario, it looks like a tense and exciting game, I shall certainly try this. Cheers, Michael
ReplyDeleteThank you for the kind words. Glad you enjoyed it.
Delete