Sunday, November 20, 2022

Multi Period Game: Rev War


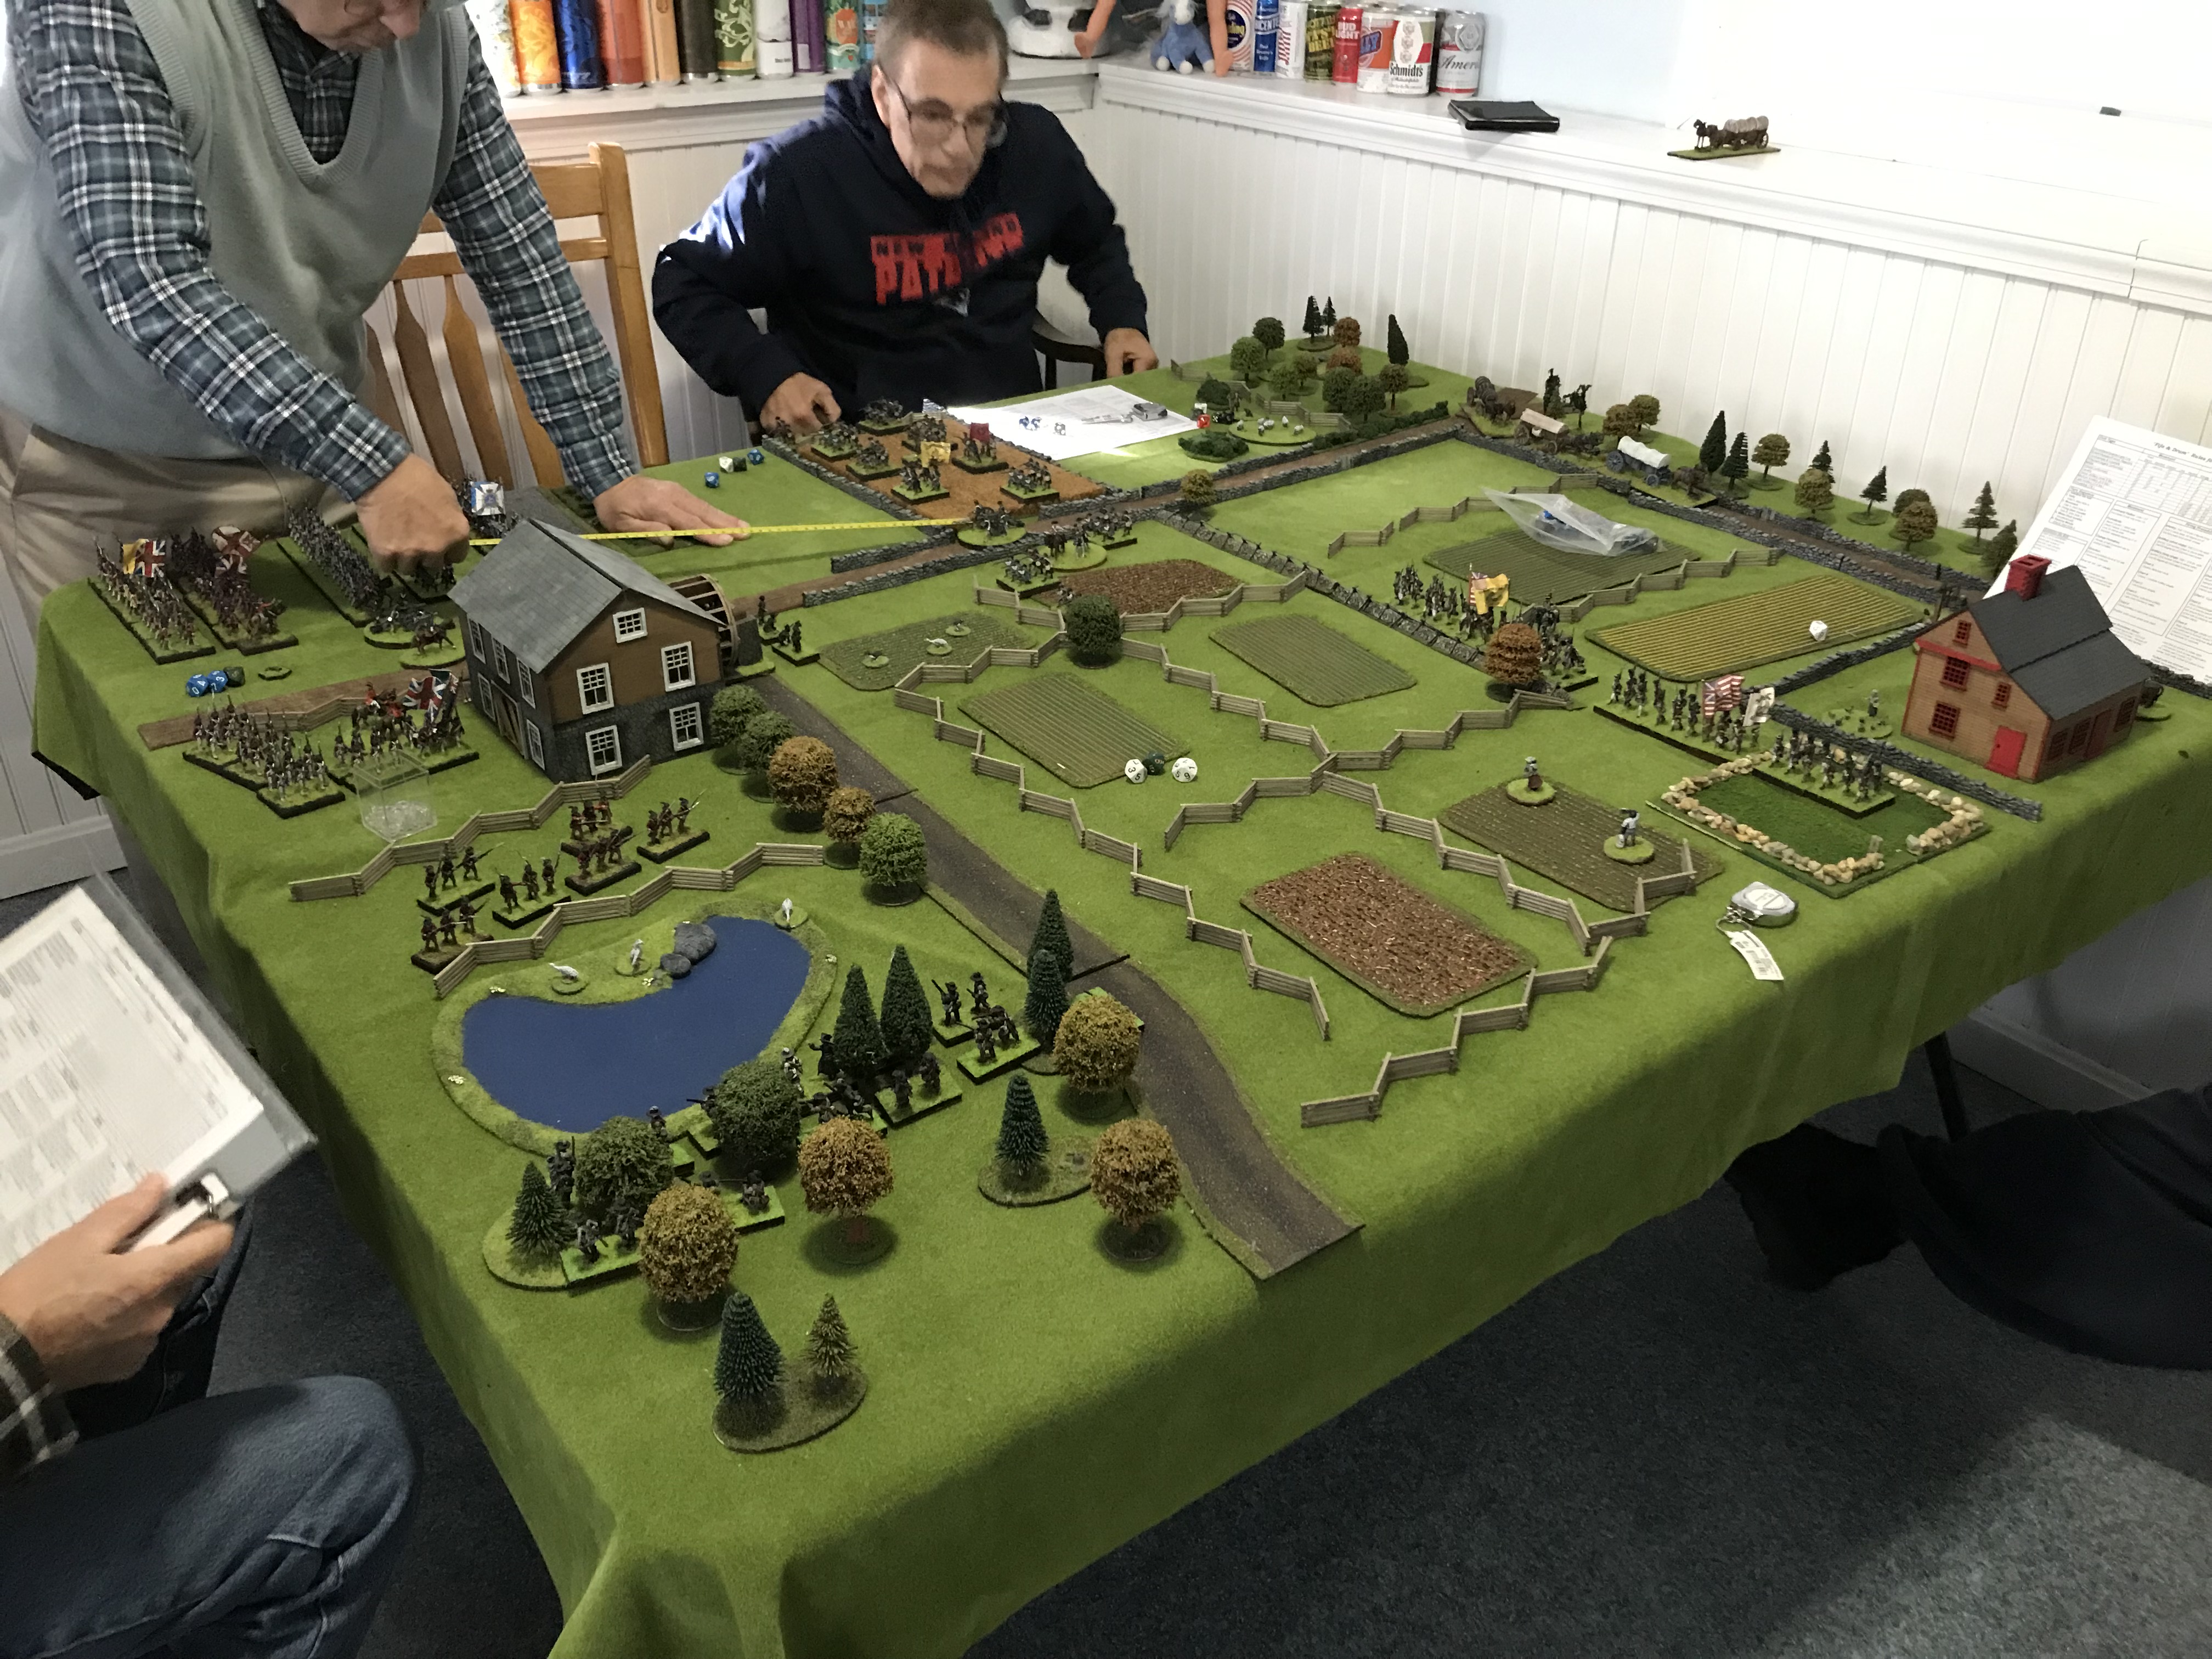
Here we go with the first of three table top battles based on the river crossing scenario devised by Norm on his blog "Battlefields and Warriors. " For details of the game please reference back to the previous post.

  Set in 1776 an American and British force are attempting to capture a major bridge crossing.  Because of its importance the bridge cannot be destroyed but must be captured intact.  Both sides have similar sized forces which reflects the armies of their time period.  Victory conditions are to capture and hold both sides of the bridge by game end.  If either force is reduced to under 50% that side must retreat off the board and has lost.  In addition both sides may select one unit to out flank the enemy and appear on a random turn on the enemies flank across the river.  I rolled to see which side of the table to set up on.  I also came up with two battle plans for each side for what they wanted to do.  

  The American force consists of three Continental line regiments (13th, 14th and 26th Continental regiments), two militia regiments, a rifle regiment, a Light Dragoon regiment (3rd Continental) and a medium artillery battery (Hamilton's NY).  There plan was to rush the militia and rifles up to the river and lay down a deadly fire to try and cause as many casualties as possible.  The artillery will cover the bridge in case the British try and cross.  Two Continental regiments will act as reserve by the bridge while the third will cover the left flank in case of enemy attacks.  Because the river bend covers their right flank they do not have to worry about that flank.  The Light Dragoons are sent on a out flanking mission to cause mischief behind British lines.

  The Crown forces set up to try and rush the bridge.  Two Hessian regiments (Bose and Lossberg) will deploy to the left of the river while two British regiments (10th & 49th) deploy to the right of it.  They will support any attack across the bridge.  The Royal Artillery will set up on the hill.  All of this is to cause casualties to the Americans.  The British Legion Dragoons will charge across the bridge.  The Grenadier battalion will support them.  Regiment Rall will attempt to out flank the enemy.  


  Now, let the game begin!

  On the first turn both sides set up four inches from their base line.  Both sides moved forward with the Americans throwing their rifle (operating in two wings) and militia units  forward and the Continental line in reserve.  The British sent the Legion Dragoons across the bridge hopping to surprise the enemy.  


  On the second turn the Legion Dragoons crossed the bridge, formed line and smacked into the left wing of the rifle unit.  While the British brought their regiments up towards the river and deployed the artillery on the hill,  the Americans prepared to give the Legion Dragoons a warm welcome.


   The bold plan with the Legion Dragoons didn't work out so well.  The Rifle's morale held, they and the surrounding units got to fire and the Legion retired shaken.  ( note: I allowed the Dragoons to retire up to the river bank.  I suppose they should be eliminated because they couldn't cross but I made a arbitrary decision).  Meanwhile the Grenadier battalion has crossed the bridge on deployed into line.

  On turn 3 exciting things happened.  The Americans roll less then the turn number so their off board regiment, the 3rd Continental Light Dragoons charged in from the British left flank.  They plowed right into the Lossberg regiment who did not have time to face about.  The poor Hessians routed and It. Col. Washington turned his cavalry about to threaten the Royal Artillery on the hill.


  But across the river the Grenadiers and Legion Dragoons charged the two wings of the rifle regiment and easily destroyed them.  The Grenadiers took position on the militia's left flank while the Dragoons charged the 14th Continental regiment.  The 14th failed morale shaken and fell back!   

  Obviously the American plan to defend the bridge was going to pot.  The British were now in a position to threaten the American defence and reinforcements are marching across the bridge.  What else  could go wrong?

   Well, plenty.  On turn four the British rolled for their off board Regiment to enter.  On the American left flank marched Colonel Rall and his regiment of (land) Grenadiers!  They quickly routed the militia in front of the and faced to challenge the nearest Continental line regiment.


  The Legion Dragoons continued the ride against the 14th who had rallied.  This time the Continental stood their ground and in a example of good shooting decimated the Dragoons and shot Colonel Tarleton off his horse!

  The British Grenadiers charged the 13th Continentals Regiment and drove the back.  The militia witnessed this and failed their morale check and bolted!


 Meanwhile across the river Lt.Col.Washington charged the Royal Artillery who stood to their guns and fired a round of grape shot.  Both sides suffered casualties but the Dragoons were forces to retire shaken.

  At this point I called the game.  My poor Americans had  bad dice rolls and everything that could go wrong went wrong.  That said it was a entertaining game and a good senario.  The random reinforcements arriving on an enemies flank  makes things most interesting.   Although there was a roll to slightly change your army (taking away A regiment or upgrading one) that did not happen in thus game. All in all I enjoyed it very much, and since Tarleton was killed at least the Americans could write home about something positive!


Monday, November 14, 2022

Multi Period Game


  On the blog "Battlefields and Warriors", Norm has devised a wonderful multi period scenario.  It is designed for a smaller table (6 x 4) and modest forces.   Most importantly to me is the ability to place it in any time period, with adjusted forces to reflect that time.   It is an interesting tactical problem which should make a most interesting game.  Reminds me greatly of the old Table Top Teasers from Military Modeling in my younger days   That’s the 1970’s to you, by the way  These were always the first pages I turned to and read.  They always greatly inspired me and influenced my gaming and hobby.


  I plan on fighting this out on the table top with American Rev War, War of 1812 and Crimean War armies.  I will make some adjustments to the forces to better keep within the time period I am playing.    So stay tuned for three battles.


Thank you Norm for sharing this!

http://battlefieldswarriors.blogspot.com/2022/11/generic-multi-period-scenario-creation.html


Here is the game plan from Norms blog.

From Battlefields and Warriors blog:

Multi period

Forces:

At start, both sides have the same units, these being;

5 x regular infantry units

1 x elite infantry unit

1 x medium cavalry unit

1 x foot battery


2 x average commanders so that 2 commanded formations can be formed PLUS 1 x average commander to work with the reinforcement


Optional rules for forces:

At the start of play, each player rolls a D6. 1-2 the player loses one of their regular infantry units. 3-4 no effect. 5-6 the player gains an additional regular infantry unit OR can upgrade any one (only) existing unit to elite status.


Admin :

All units except one, start the game by being set up anywhere along their baseline and up to 4” in from the edge. See special rules for the one unit that does not begin play on the table.


The game will end the moment one of the forces loses 50% of their units.  At that time check to see which player controls the bridge (defined below) to establish a winner.


Special Rules:

The river is only cross-able via the bridge In a modern setting, amphibious capable vehicles cannot be used to cross the water.


The ditch counts as a linear obstacle and provides cover when attacked frontally.

One unit from each side will not be set-up on the table at start. That unit is off table manoeuvring on the flank. Starting on turn 2 and on each subsequent turn, at the start of their turn, a player will roll a D6 on and a score less than the current turn number, their reinforcement will arrive along either of the short edges of the table.

The player chooses which end of the table the unit will come on and at what point, so it can arrive on the enemy flank or the player might prefer it to arrive on their own flank as a reinforcement to shore up their own position. The reinforcement is given its own commander, who will be of average quality. 


The armies will set up on their baseline (one of the wide table edges) and before play, both players will each roll a D6 adding +1 if they have chosen elite cavalry. The winner chooses which of the two table edges they will play from. Re-roll equal modified scores.


Winning :

 This is a meeting engagement and victory will be based upon the capture of the bridge. Once the game is called, based on a side suffering 50% casualties, check who controls the bridge. Controlling both ends of the bridge (i.e. the road bit at each end) will be classed as a win, anything else is a draw.


Friday, November 11, 2022

November 11th


  My grandfather, Edward McNamara from Lexington Massachusetts served with the 101st Regiment (Medical company), 26th Yankee Division in the first world war.  He seldom talked about it, and when he did it was a terrible memory which haunted him.  It was only later that I found out  he was mentioned in the division's orders and was highly decorated for heroism under fire.  He never mentioned this to me, I found out later through my own research.  But  I will always remember his smile when he told me how at 11:00 A.M. on 11th November the guns stopped and he and his friends knew they would live, knew they had survived.  He went on to raise a family and contribute to society.  During the next war he built ships for the Navy at the Charlestown Navy yard.


Edward McNamara helmet.

   And as this date is now called Veterans Day I say thank you to my father in law, Aldrich Stevens  who served in the  3rd Ranger Battalion (Darby's Rangers) in the Second World War.  He saw service with them at North Africa, Sicily and Italy.  Seriously wounded he did not make the Anzio landing and thus missed the action at Cisterna (although he may have listened to the last radio calls while at headquarters).   Like my grandfather he too was haunted by the memories of what he saw, experienced and especialy those he lost.  But again he went on with life.  Due to the GI bill he got a education, raised a family and contributed to society.  


I remember their sacrifices and hope both men  have found peace.

Tuesday, November 1, 2022

Game at Mark's house


  Yesterday, I hosted a small game at my house.  John, Paul, George and Warren all took the time to drive a good distance down to my house. Janine made a big pot if chilli with corn bread for us.   We played a American Rev War game.  But that was less important then for the first time in a very long time I had friends together and over my house.   It felt great to have friends back and wonderful to move toy soldiers about the table, roll dice and tell tale tails and stories and just laugh.  As John said it was time to get me back into gaming with my friends.  


  What happen in the game was far less important then being back together.  By the end of the day I was very tired but extremely happy.  Its nice to have friends who care.  Thank you guys.  I appreciate it much more then you all may ever realize.  


Monday, October 24, 2022

Lauzun's Legion Hussars


  Finished up the 1st Squadron of the Legion cavalry.  These are the Hussars dressed in yellow trousers and trim.  A most handsome unit and now ready to take the field.


Friday, October 21, 2022

Lauzun's Legion Infantry


 I  have long wanted to add Lauzun's Legion to my armies. The fight between Tarleton and Lauzun would make an excellent, very colorful game.  Staring with the infantry element I have finally gotten on my way.

  The infantry of the Legion was supposed to contain a grenadier company of 100 men, a chasseur company of 170 men, and two line infantry (fusilier) companies of 170 men each.  When Rocheambeau’s force left France  there was a shortage of transport ships so the Fusilier companies were left behind. The Grenadier Company sailed with 116 men and wore a bearskin hat without a front plate. The Chasseur Company  sailed with 99 men and wore a black cocked hat with white tape (and not a helmet).  I decided to combine the two infantry elements into a single unit if 24 fugures.  Rather then the Grenadier uniform I went with the Chassaur uniform as I wanted to have some skirmishes type troops for thus legion.  Also I believe the chassaurs were involved n the battle with Tarleton.    Perhaps later on I might add Grenadiers but we will see.


It felt good to be back in the saddle so to speak painting wise.  I know they are not my best effort but I am still pleased with them.  


Next up the Hussars of the 1st Squadron then the Hussars/Lancers of the 2nd Squadron.

Wednesday, October 19, 2022

The Charge: The Real Reason Why the Light Brigade was Lost. By Mark Adkin

 The Charge: The Real Reason Why the Light Brigade was Lost. By Mark Adkin


" An officer named Captain Nolan, who writes books, and was a great man in his own estimation..."

Colonel Lord George Paget


  With the anniversary of the battle coming up I thought I would post this book review.  A fascinating read no matter if you are interested in the Crimean War or not.  Highly recommend as Hal used to say.


  This is the kind of book that shows how military history should be written. It is a careful analysis of the Battle of Balaclava and especially the Light Brigade's charge with the emphasis on untangling the hows and whys that resulted in the charge. The book is extremely well researched, with well thought out explanations, good illustrations and especially outstanding maps. Many, many maps.  I do wish more military history books followed his example.


  Complimenting the maps (and tied into them) are a series of battle and topographical drawings which are very effective in understanding the battle. These drawings are based on a series of photographs done by the photographer Fenton which show the actual battlefield from where Lord Raglan watched and sent his infamous order from. The photographs were taken slightly after the battle so they provide a you are there view. To actually see the battlefield as the participants did is priceless.


  The usual villain responsible for the disaster in most books was Lord Lucan the Cavalry Division commander. I am glad to say he is given a fair shake here and is partly exonerated; but with some very serious serious criticism. I do wish the author discussed more about Lucan's decision to pull back The Heavy Brigade during the Light Brigades charge. A fascinating what if.


  The primary culprits in Adkin's view are Lord Raglan and his ADC Captain Nolan. Raglan was clearly over his head as army commander. I find little positive about him and blame him for the disaster that the army suffered that terrible winter. Cardigan by the way comes out as a very brave man who had not the foggest idea of what was what. If you saw the 1968 movie of the Charge of the Light Brigade these three main actors really captured and look the part of their historical characters. In my opinion of course.


  Adkin believes Captain Nolan (who carried the order down from Raglan to Lucan)  may have deliberately indicated the incorrect objective. In my opinion the author makes an excellent case that Nolan deliberately misrepresented Lord Raglan's order when he delivered It to Lord Lucan. Nolan, a self educated authority on cavalry had never served on campaign and had never been in battle. But he was certain that British cavalry were being misused and was very vocally critical of all commanders throughout the army but especialy Lucan And Cardigan. He was certain Light Cavalry could overthrow anything in its way and that neither infantry nor artillery could stop them. He had once demonstrated in a classroom how light cavalry alone could charge and take out a battery from the front. Nolan possibly did not have second thoughts about the liberty he took as aide-de-camp in misinterpreting Lord Raglan's written order. His death, the first casualty of The Charge prevented his being questioned after. The author suggests and I agree Nolan wasn't trying to stop the charge when he was killed. The canard about his trying to stop the charge when killed was invented by Kinglake in his multiple volume history of the war; "The Invasion of the Crimea, Its Origin, and an Account of Its Progress Down to the Death of Lord Raglan."   Most Of the officers who took part in the action certainly though King lake was non sense and Noland was taking them right where he wanted. 


  Also interesting is the account of the actual charge. Details such as such as how many rounds were fired at the brigade, how a artillery battery operated, how cavalry horses were so trained they remained in formation after their riders were killed, and how the casualties were not as spectacular as is often claimed. The Light Brigade was no longer combat efficient due to the horrendous number of horses killed which could not be replaced.  His account if the stand of the 93rd Highlanders is also outstanding and he points out details most authors don't.  Having a battery handy didn't hurt their stand.


  I especially enjoyed the epilogue - A Balaclava Banquet about the 1875 dinner for the survivors, which sounds like a rockous good time. The appendix section entitled The Last Survivors was very moving to read. Those who were impoverished were provided for by a wealthy Fleet Street publisher who established the Roberts Relief Fund to provide them with a pension. The last survivor passed away in 1927.